I have no idea why I decided to spend X-MAS break upgrading the home lab network, but in hindsight it was a bad decision, but at least it’s all done and working.
After spending a week redesigning and configuring the new network infrastructure, it was time to do some documentation. My home lab is getting much too complex to try to remember how everything is setup, so here is my first attempt at documentation.
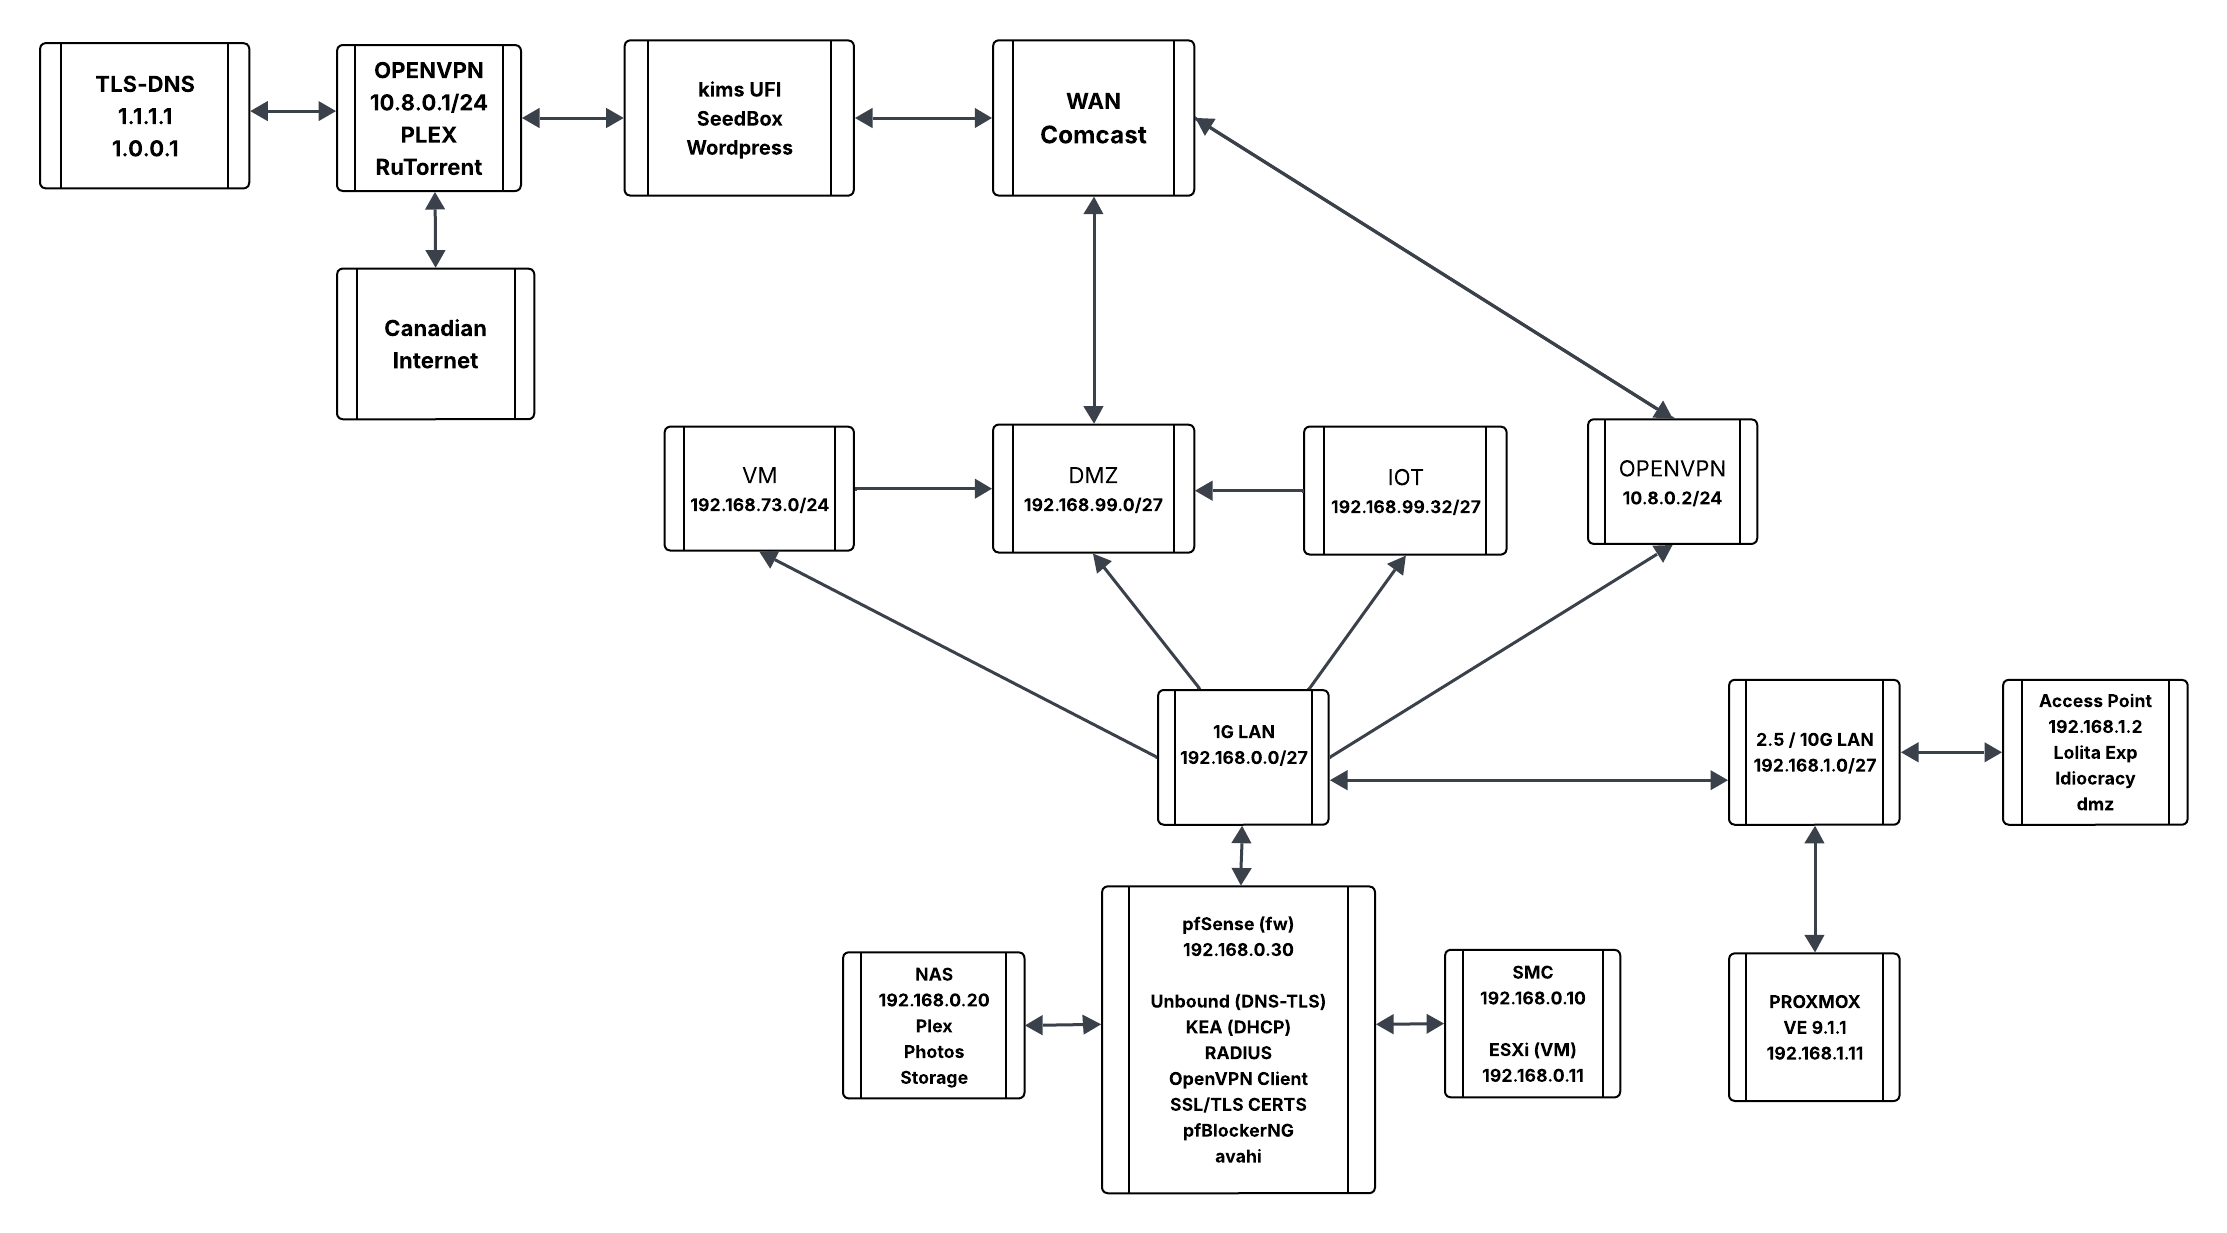
Logical Layout
Here is an idea of how my network is laid out and some of the infrastructure services I’m running. I have not went down the path of trying to document all of my Virtual machines and Docker containers but I’m sure I will get to that at some point.
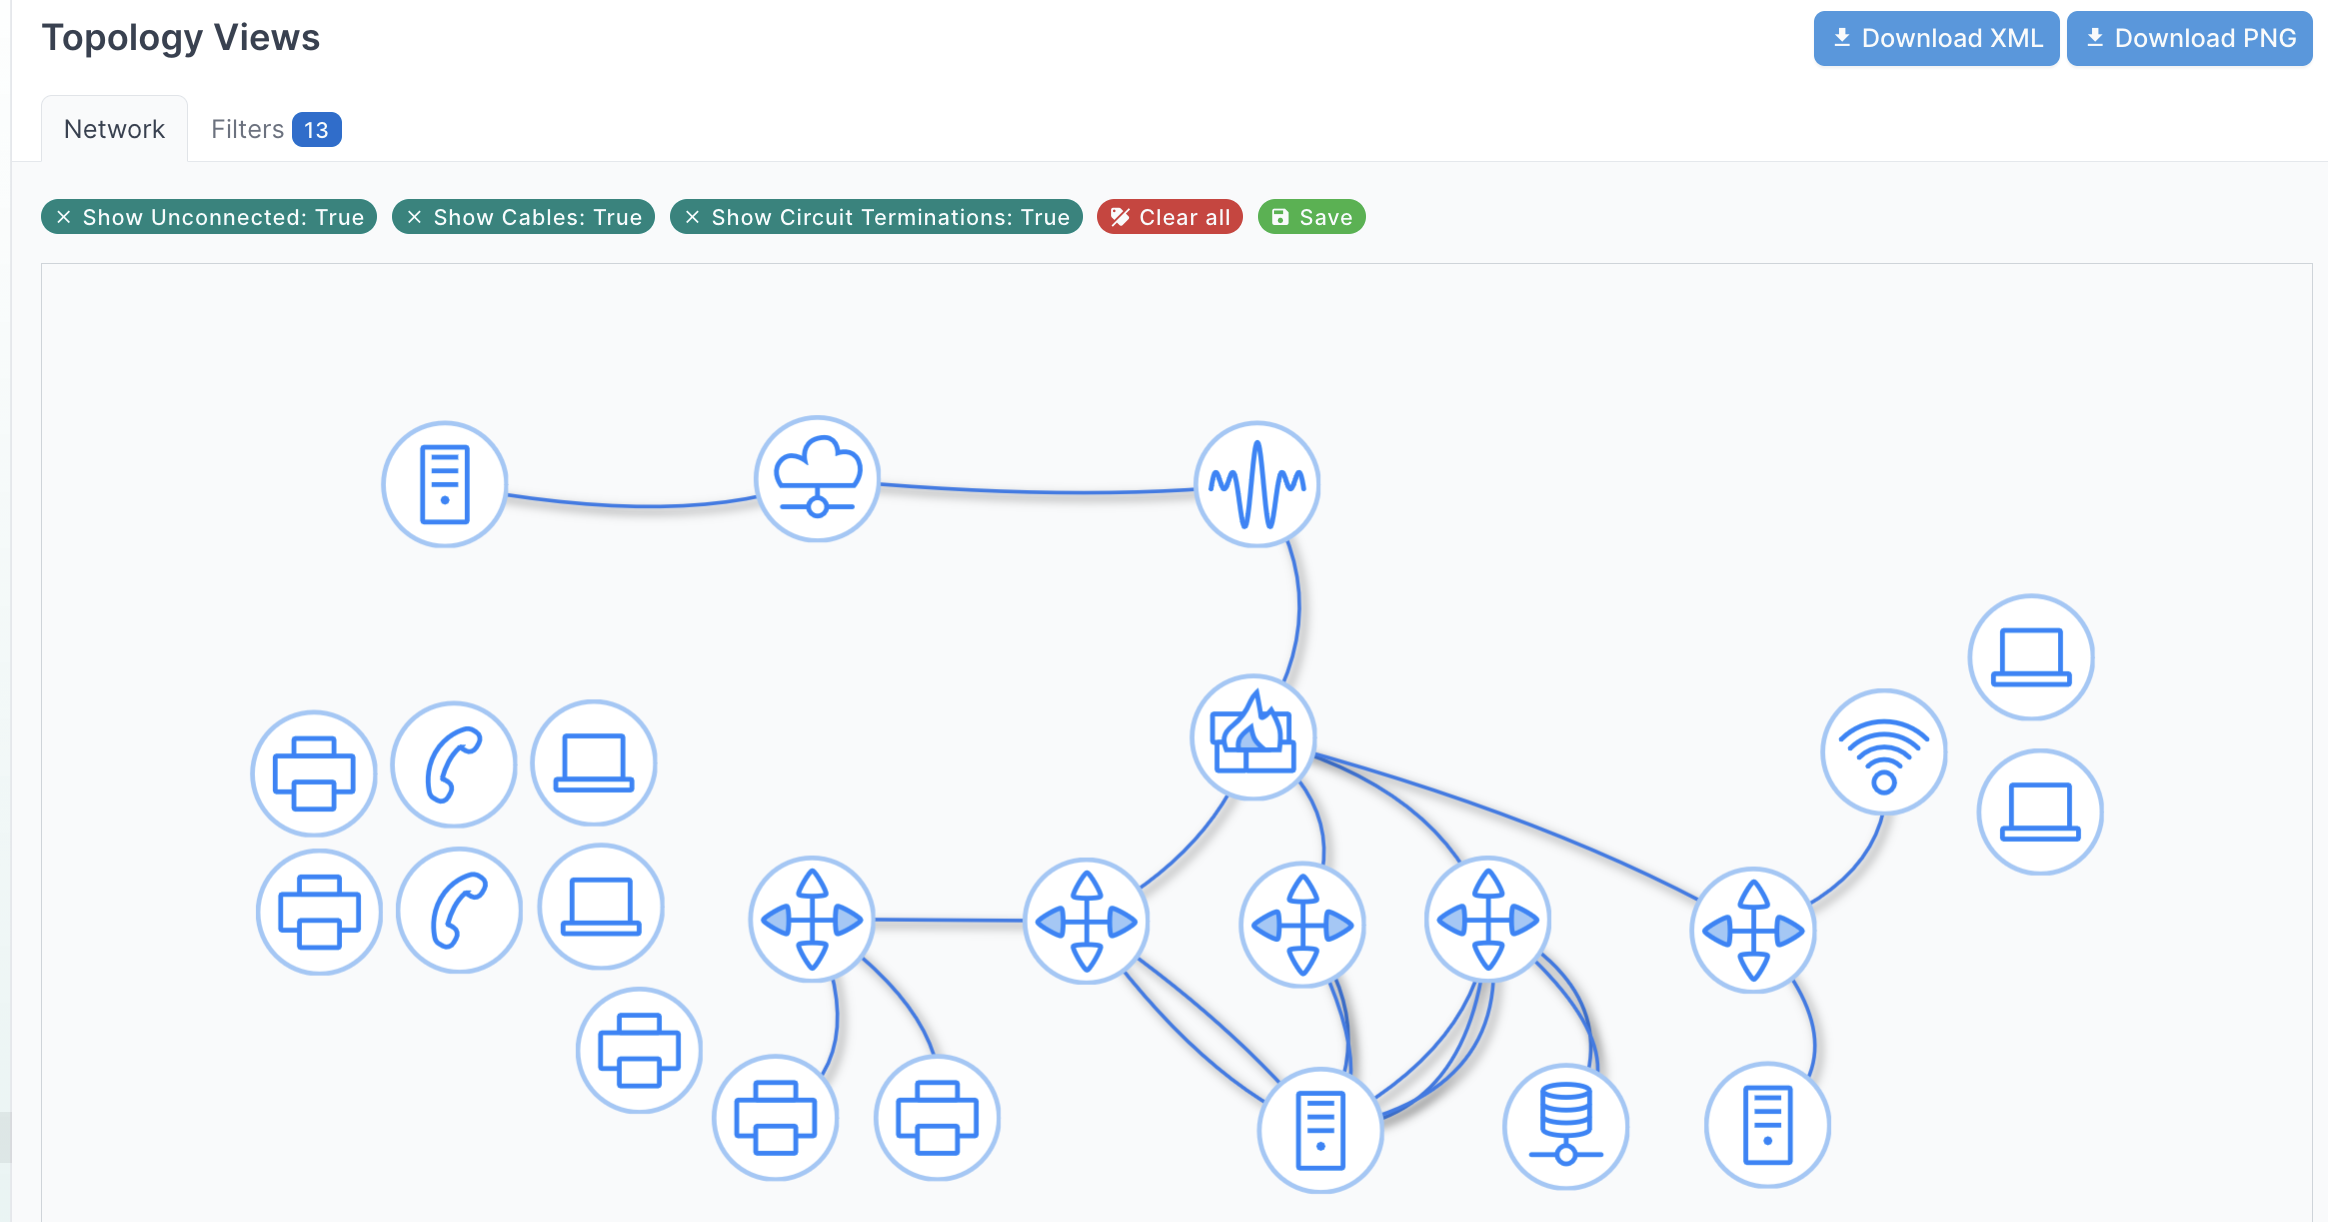
Physical Layout
I’m documenting my home network using NetBox and this is the community plugin called topology-views. It’s an amazing plugin that provides real time network diagrams that are interactive. For instance, when I hover over a device, I get the details for it. Moreover, when I click on a device on the topology, it brings me to the actual device in Netbox.
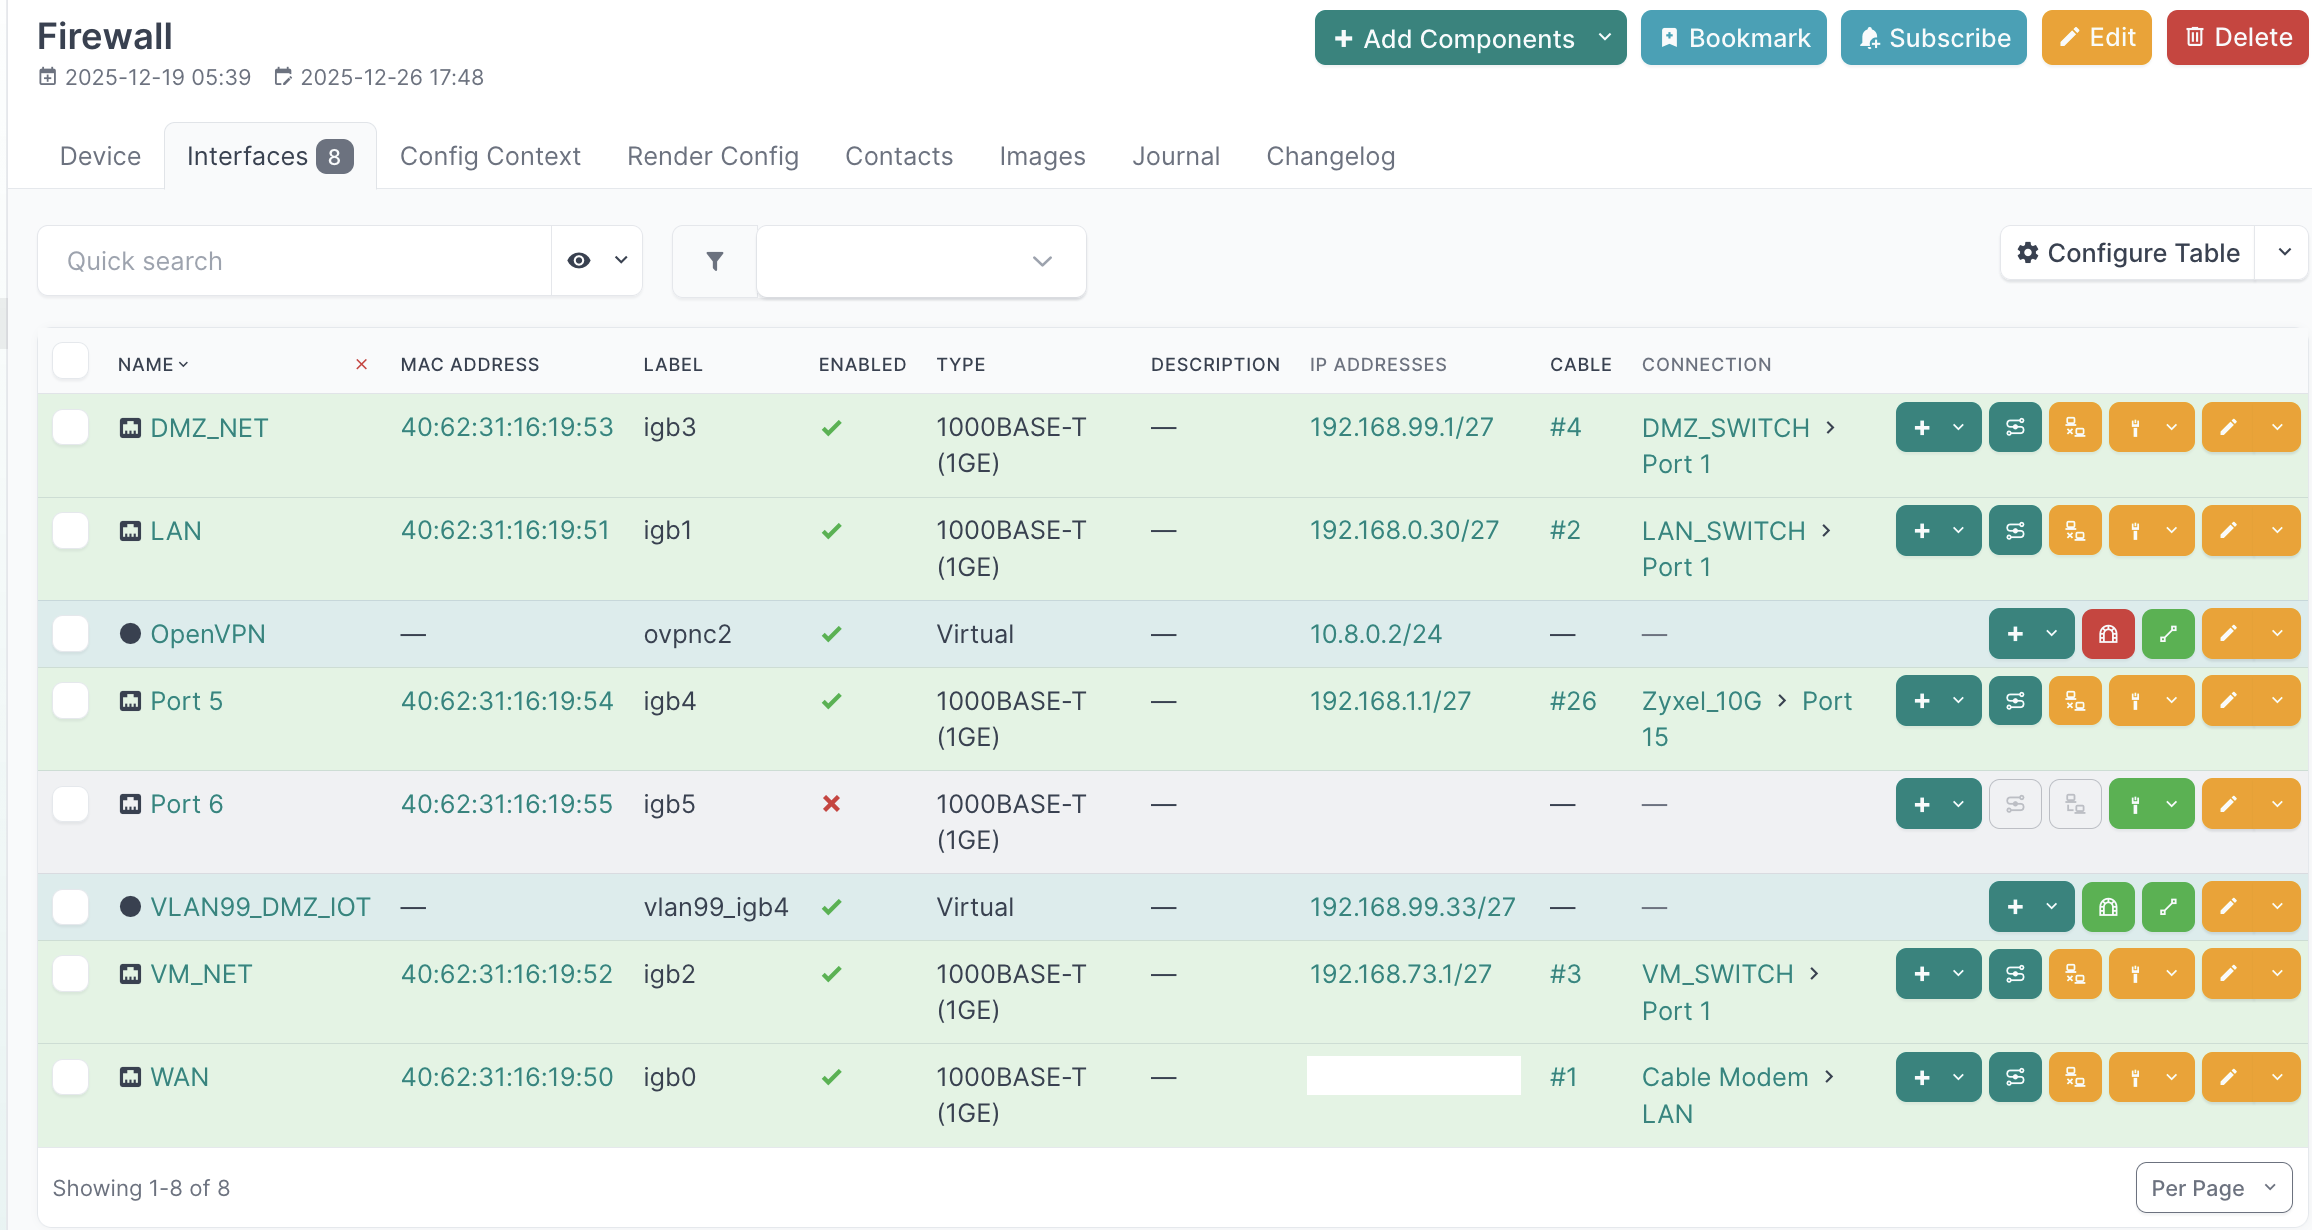
NetBox Data
These are the Firewall Interfaces from the topology above that shows some of the details.
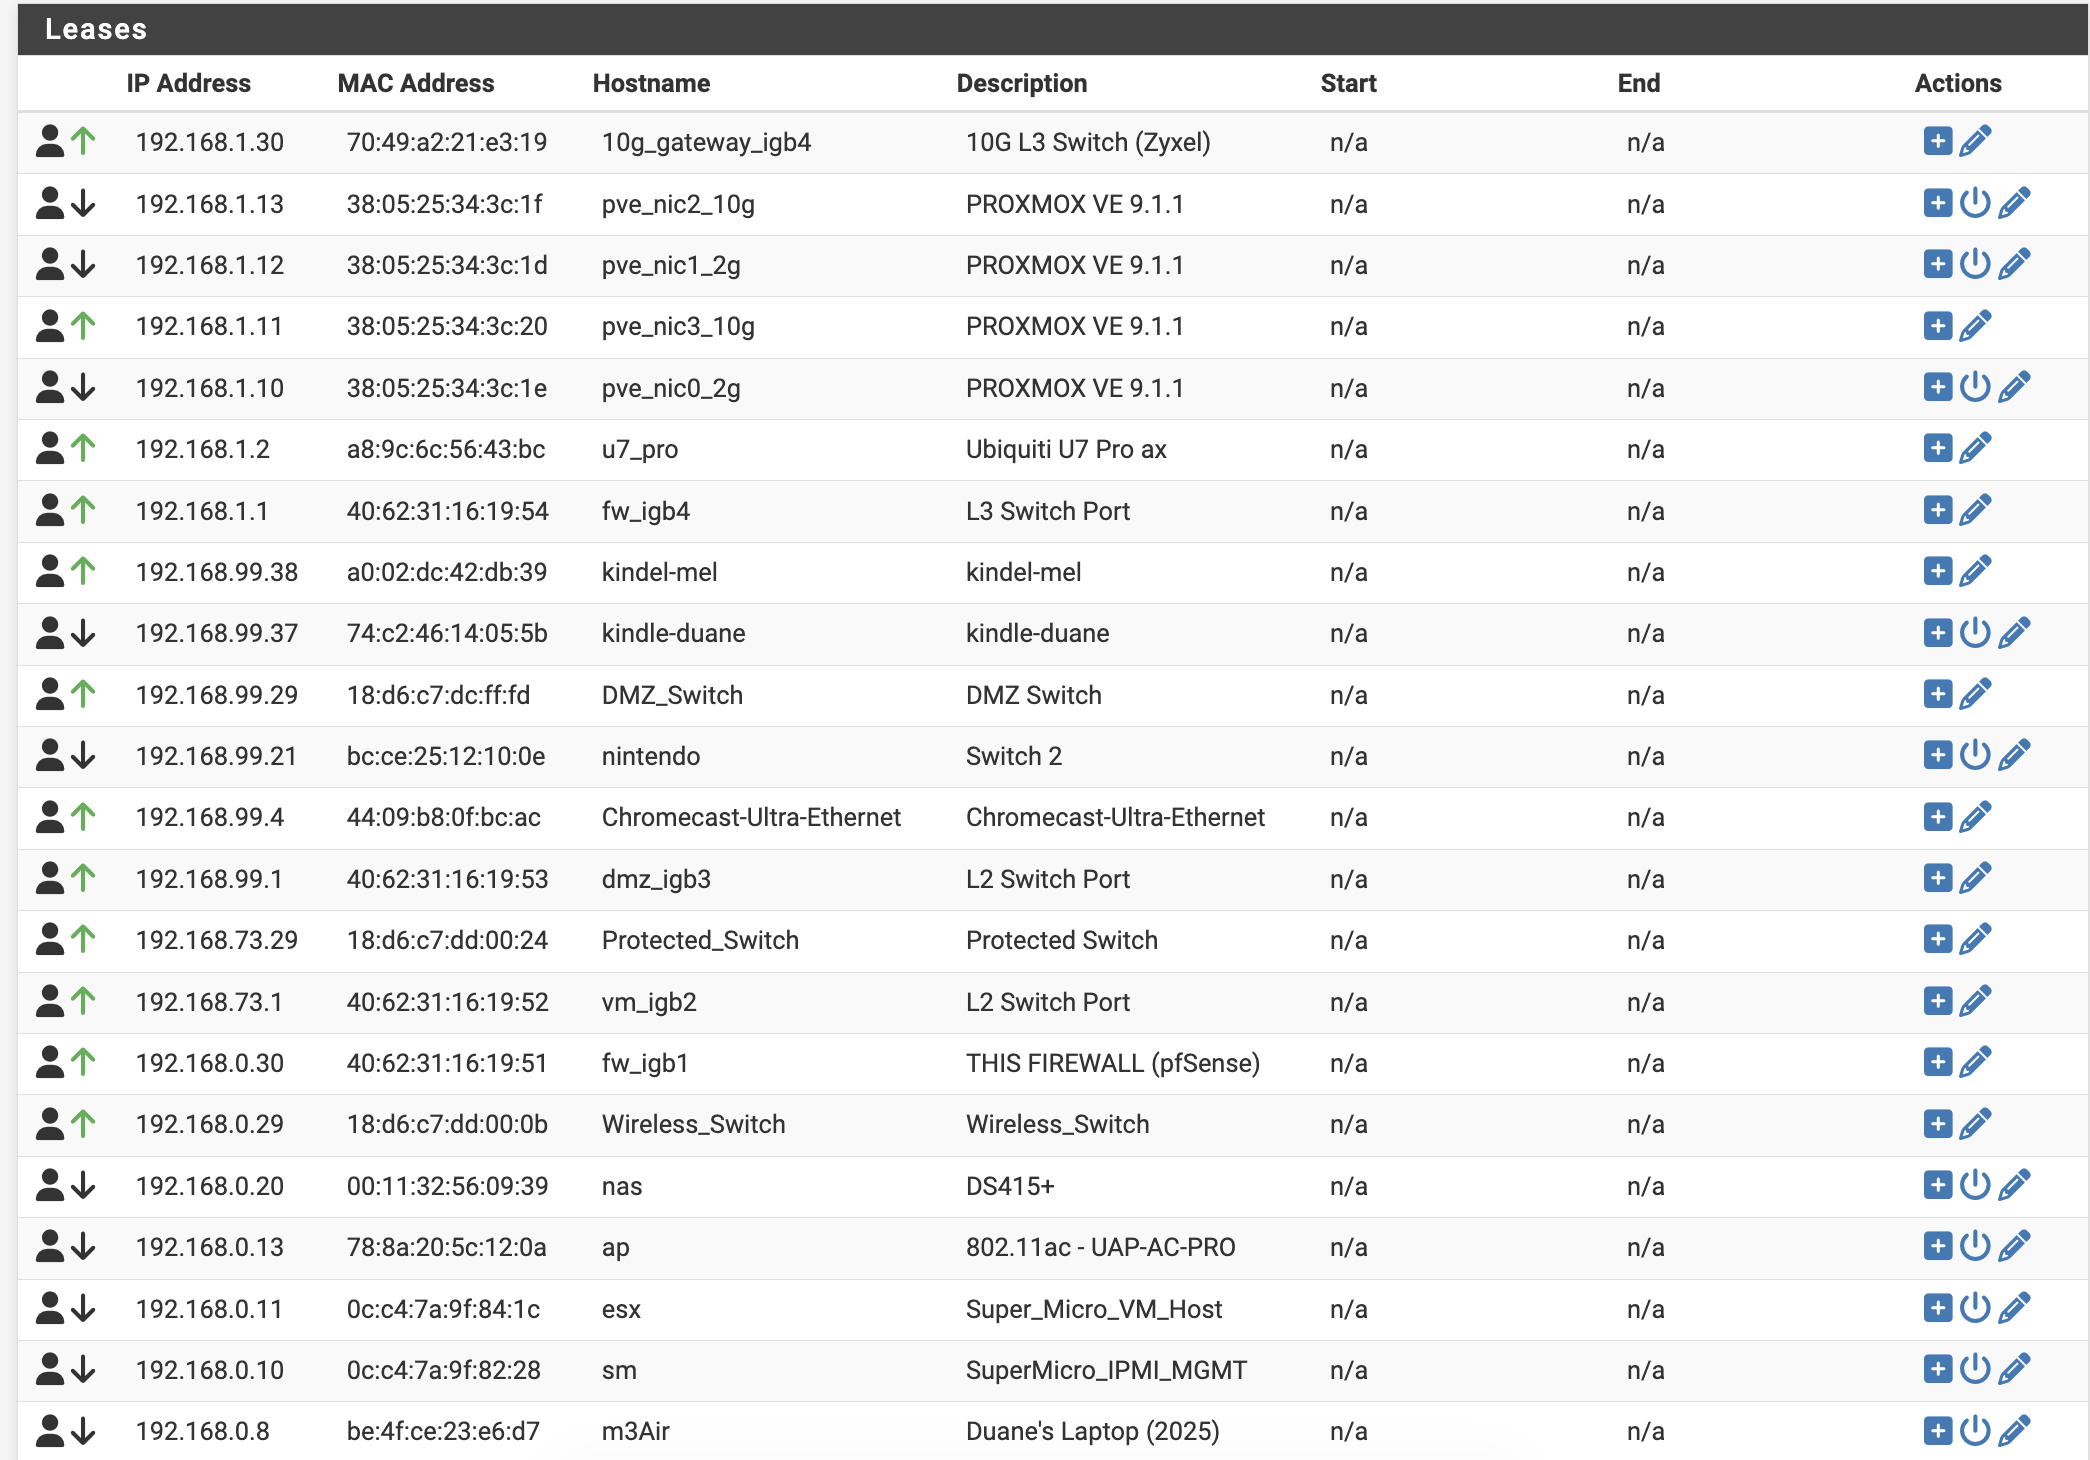
DHCP Server (KEA)
Static DHCP Leases for all of the lab infrastructure and a few of the home devices. I’ve still got some devices pulling normal DHCP but I’ll get to those at some point to have a full list of every single mac address on the network!
Posted inUncategorized|Comments Off on Lab Upgrade Part 3
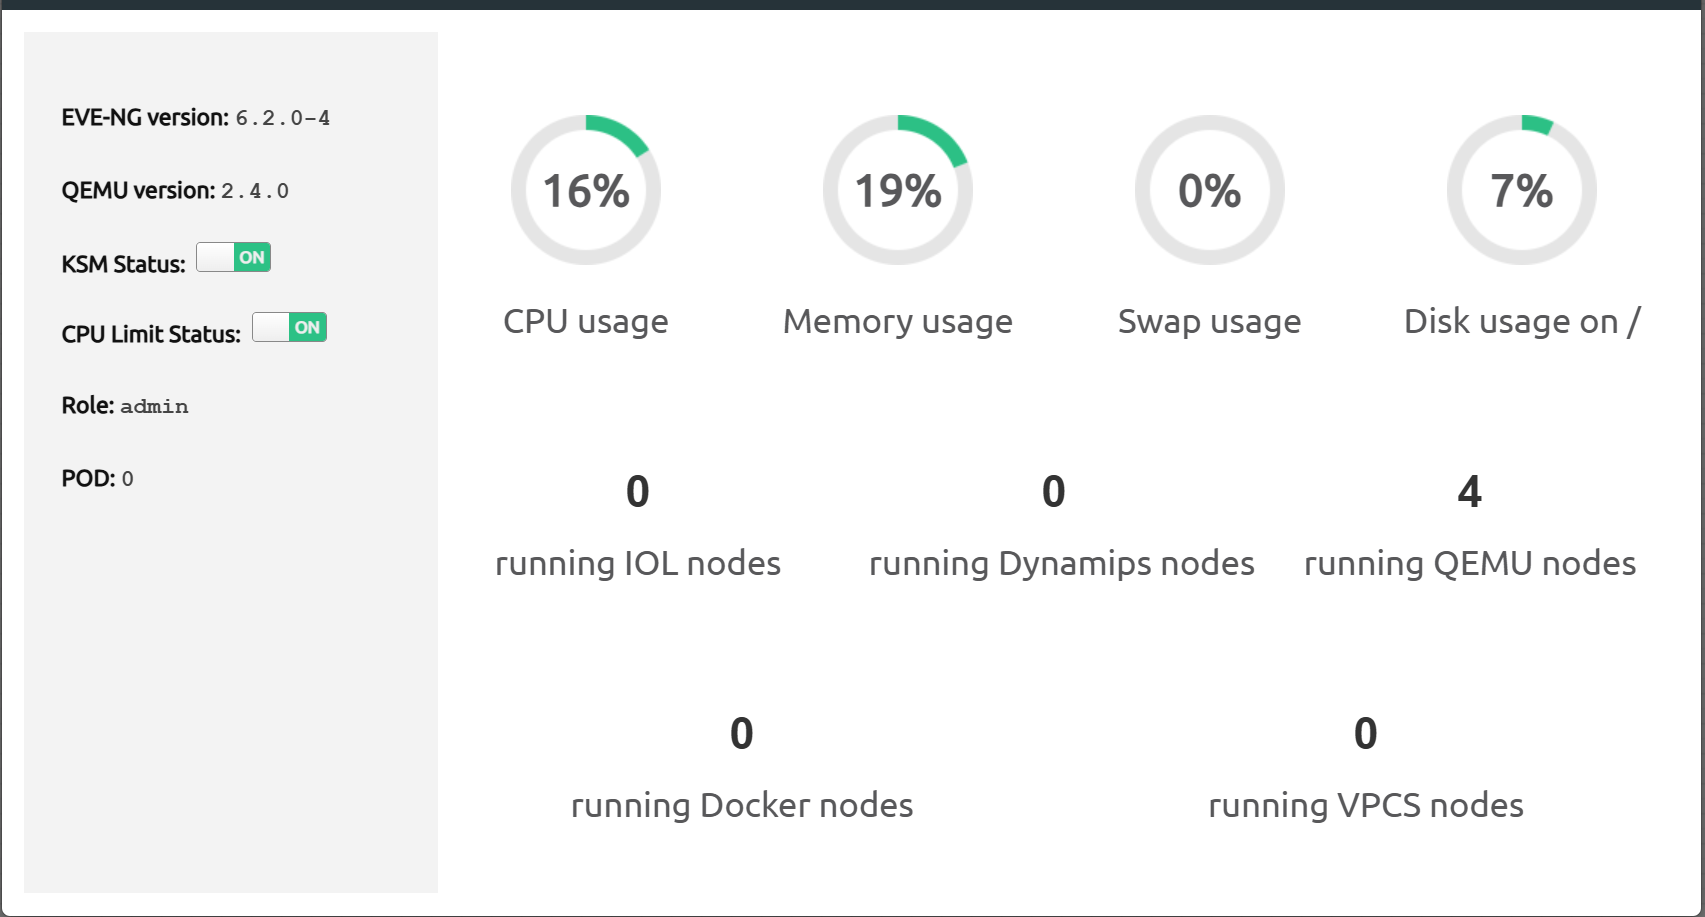
After building out my new rack in the garage It was time to upgrade some aging hardware that’s not quite up to the task of running some of my EVE-NG networking labs.
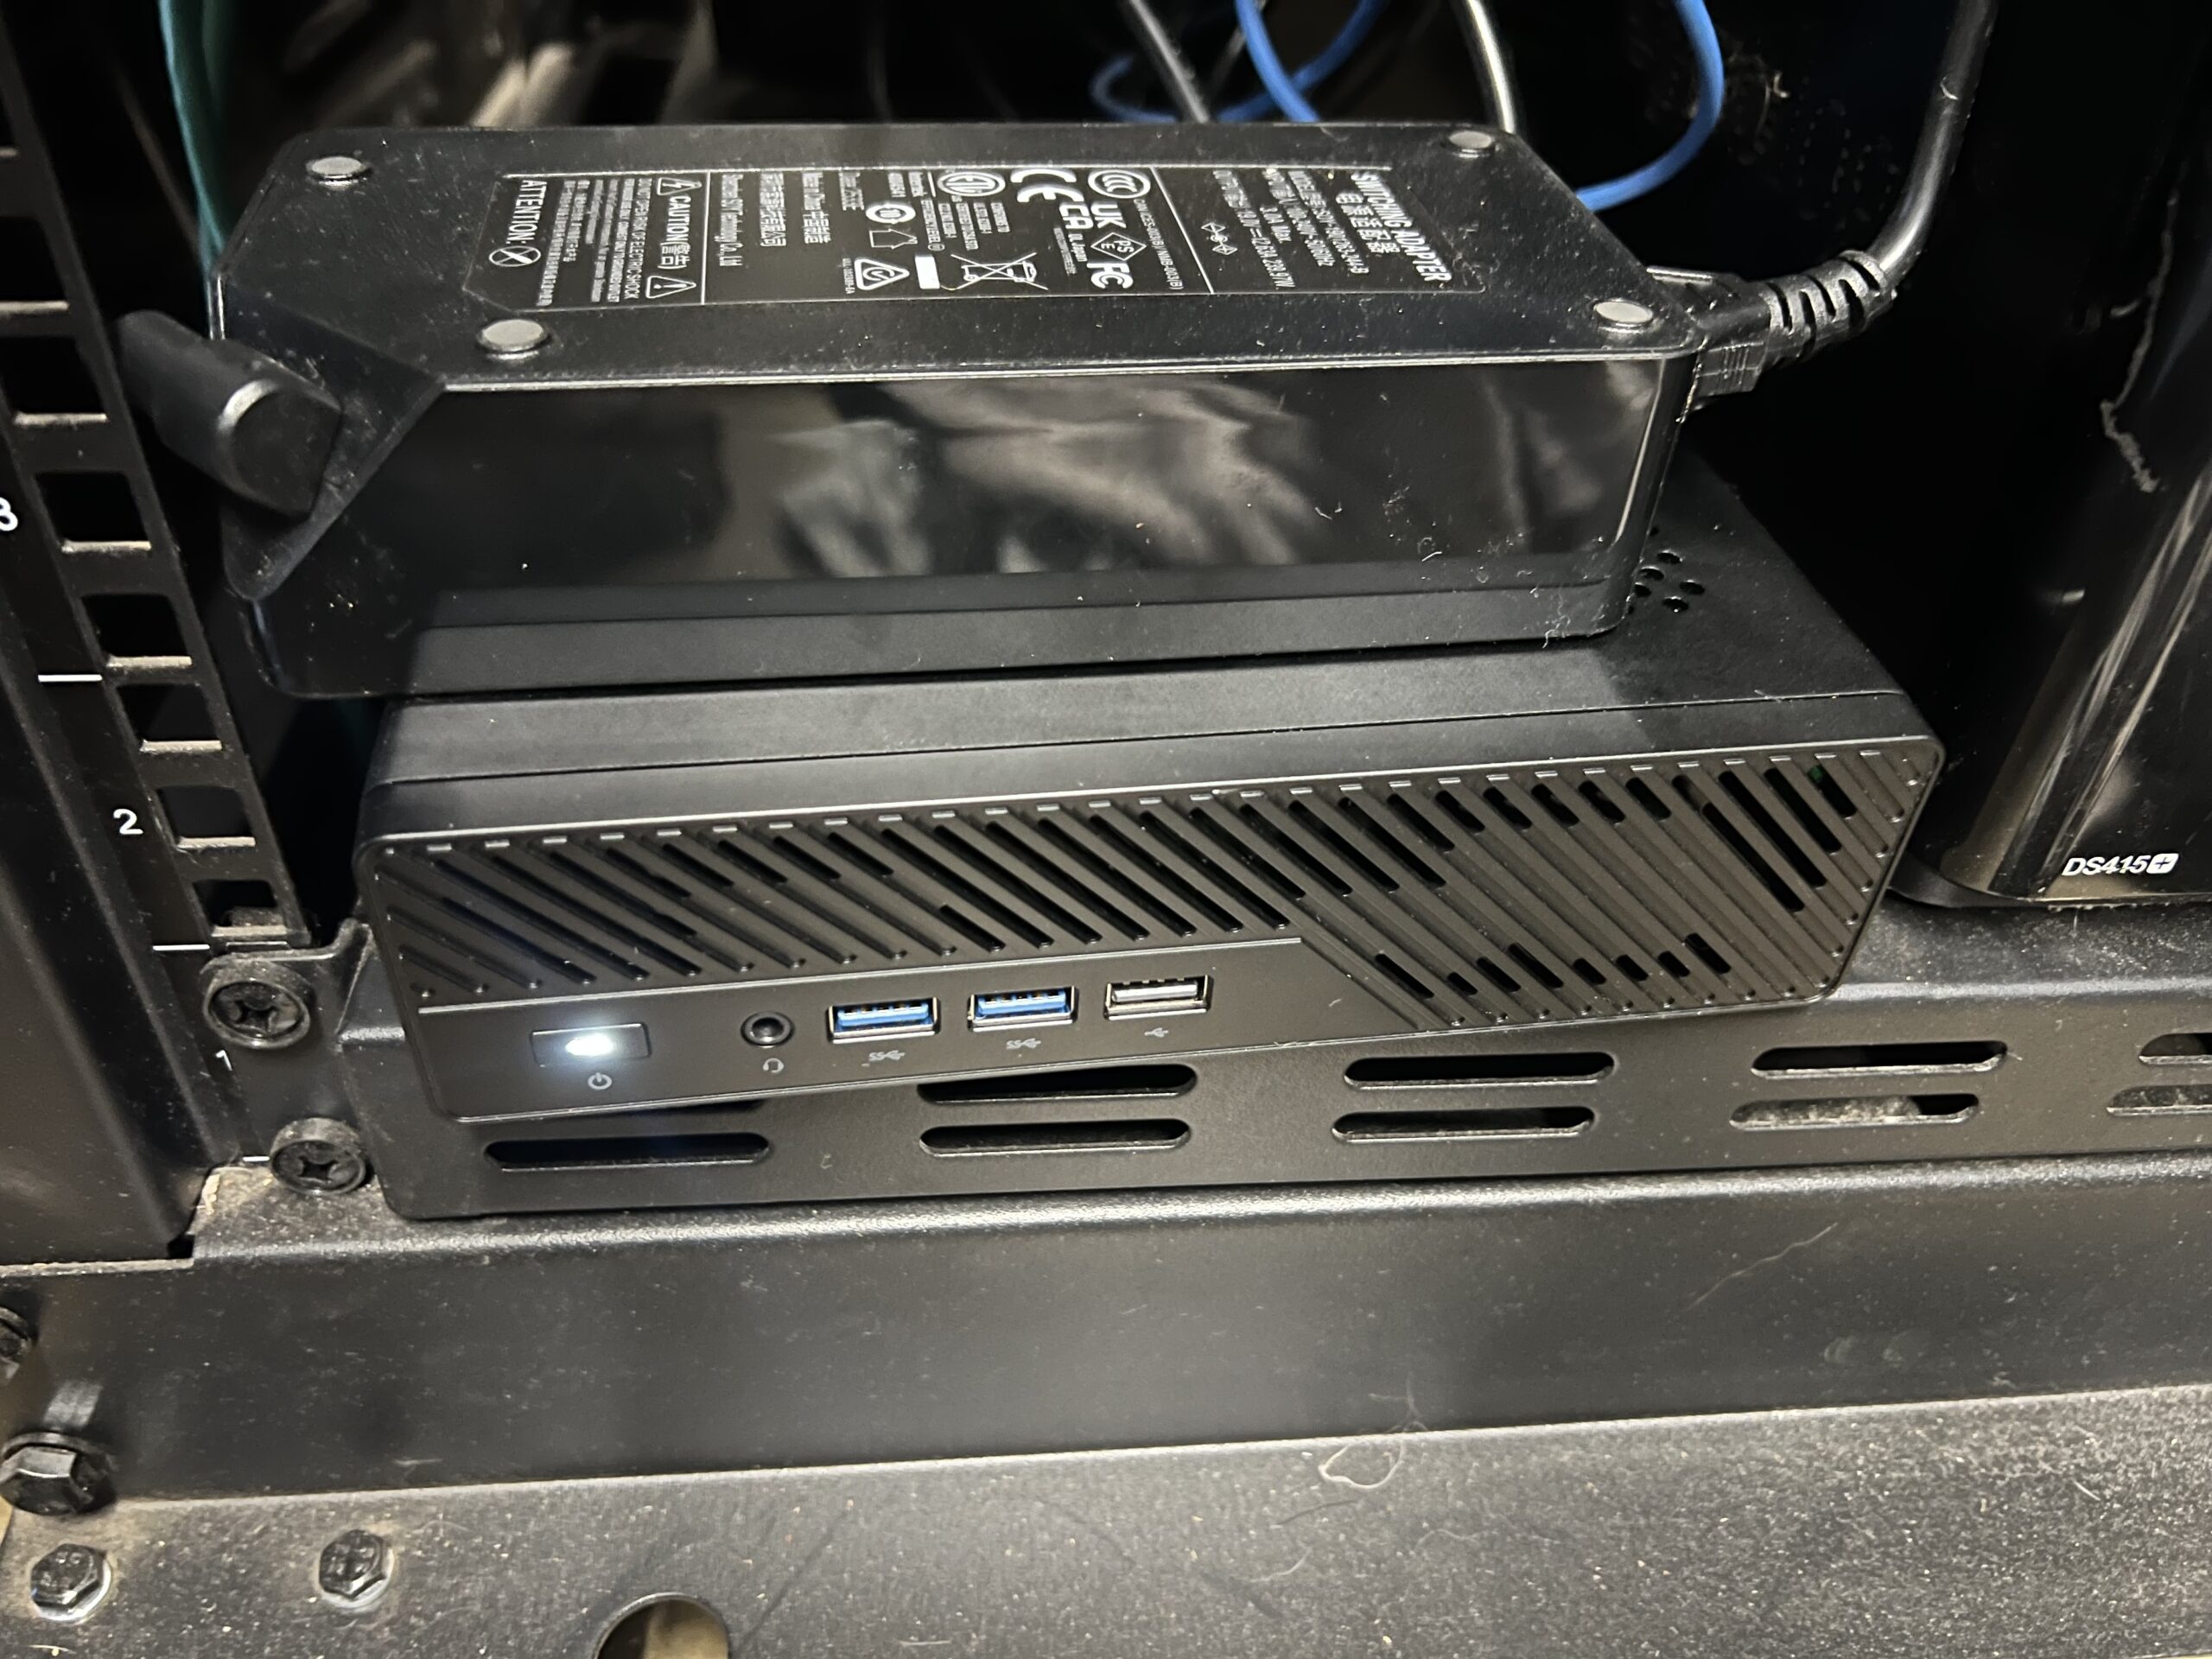
I decided on a MinisForum A2 to power my home lab. I purchased the bare bones system for about $800 (AMD Ryzen 9955HX) and then added 32Gb of DDR5 ram for another $250. I already had a spare SSD so that kept the price just around $1150 or so. I wanted to max out the ram but 128GB is about $1000 in Dec 2025. I’ll upgrade to 128GB at some point if I see a good deal.
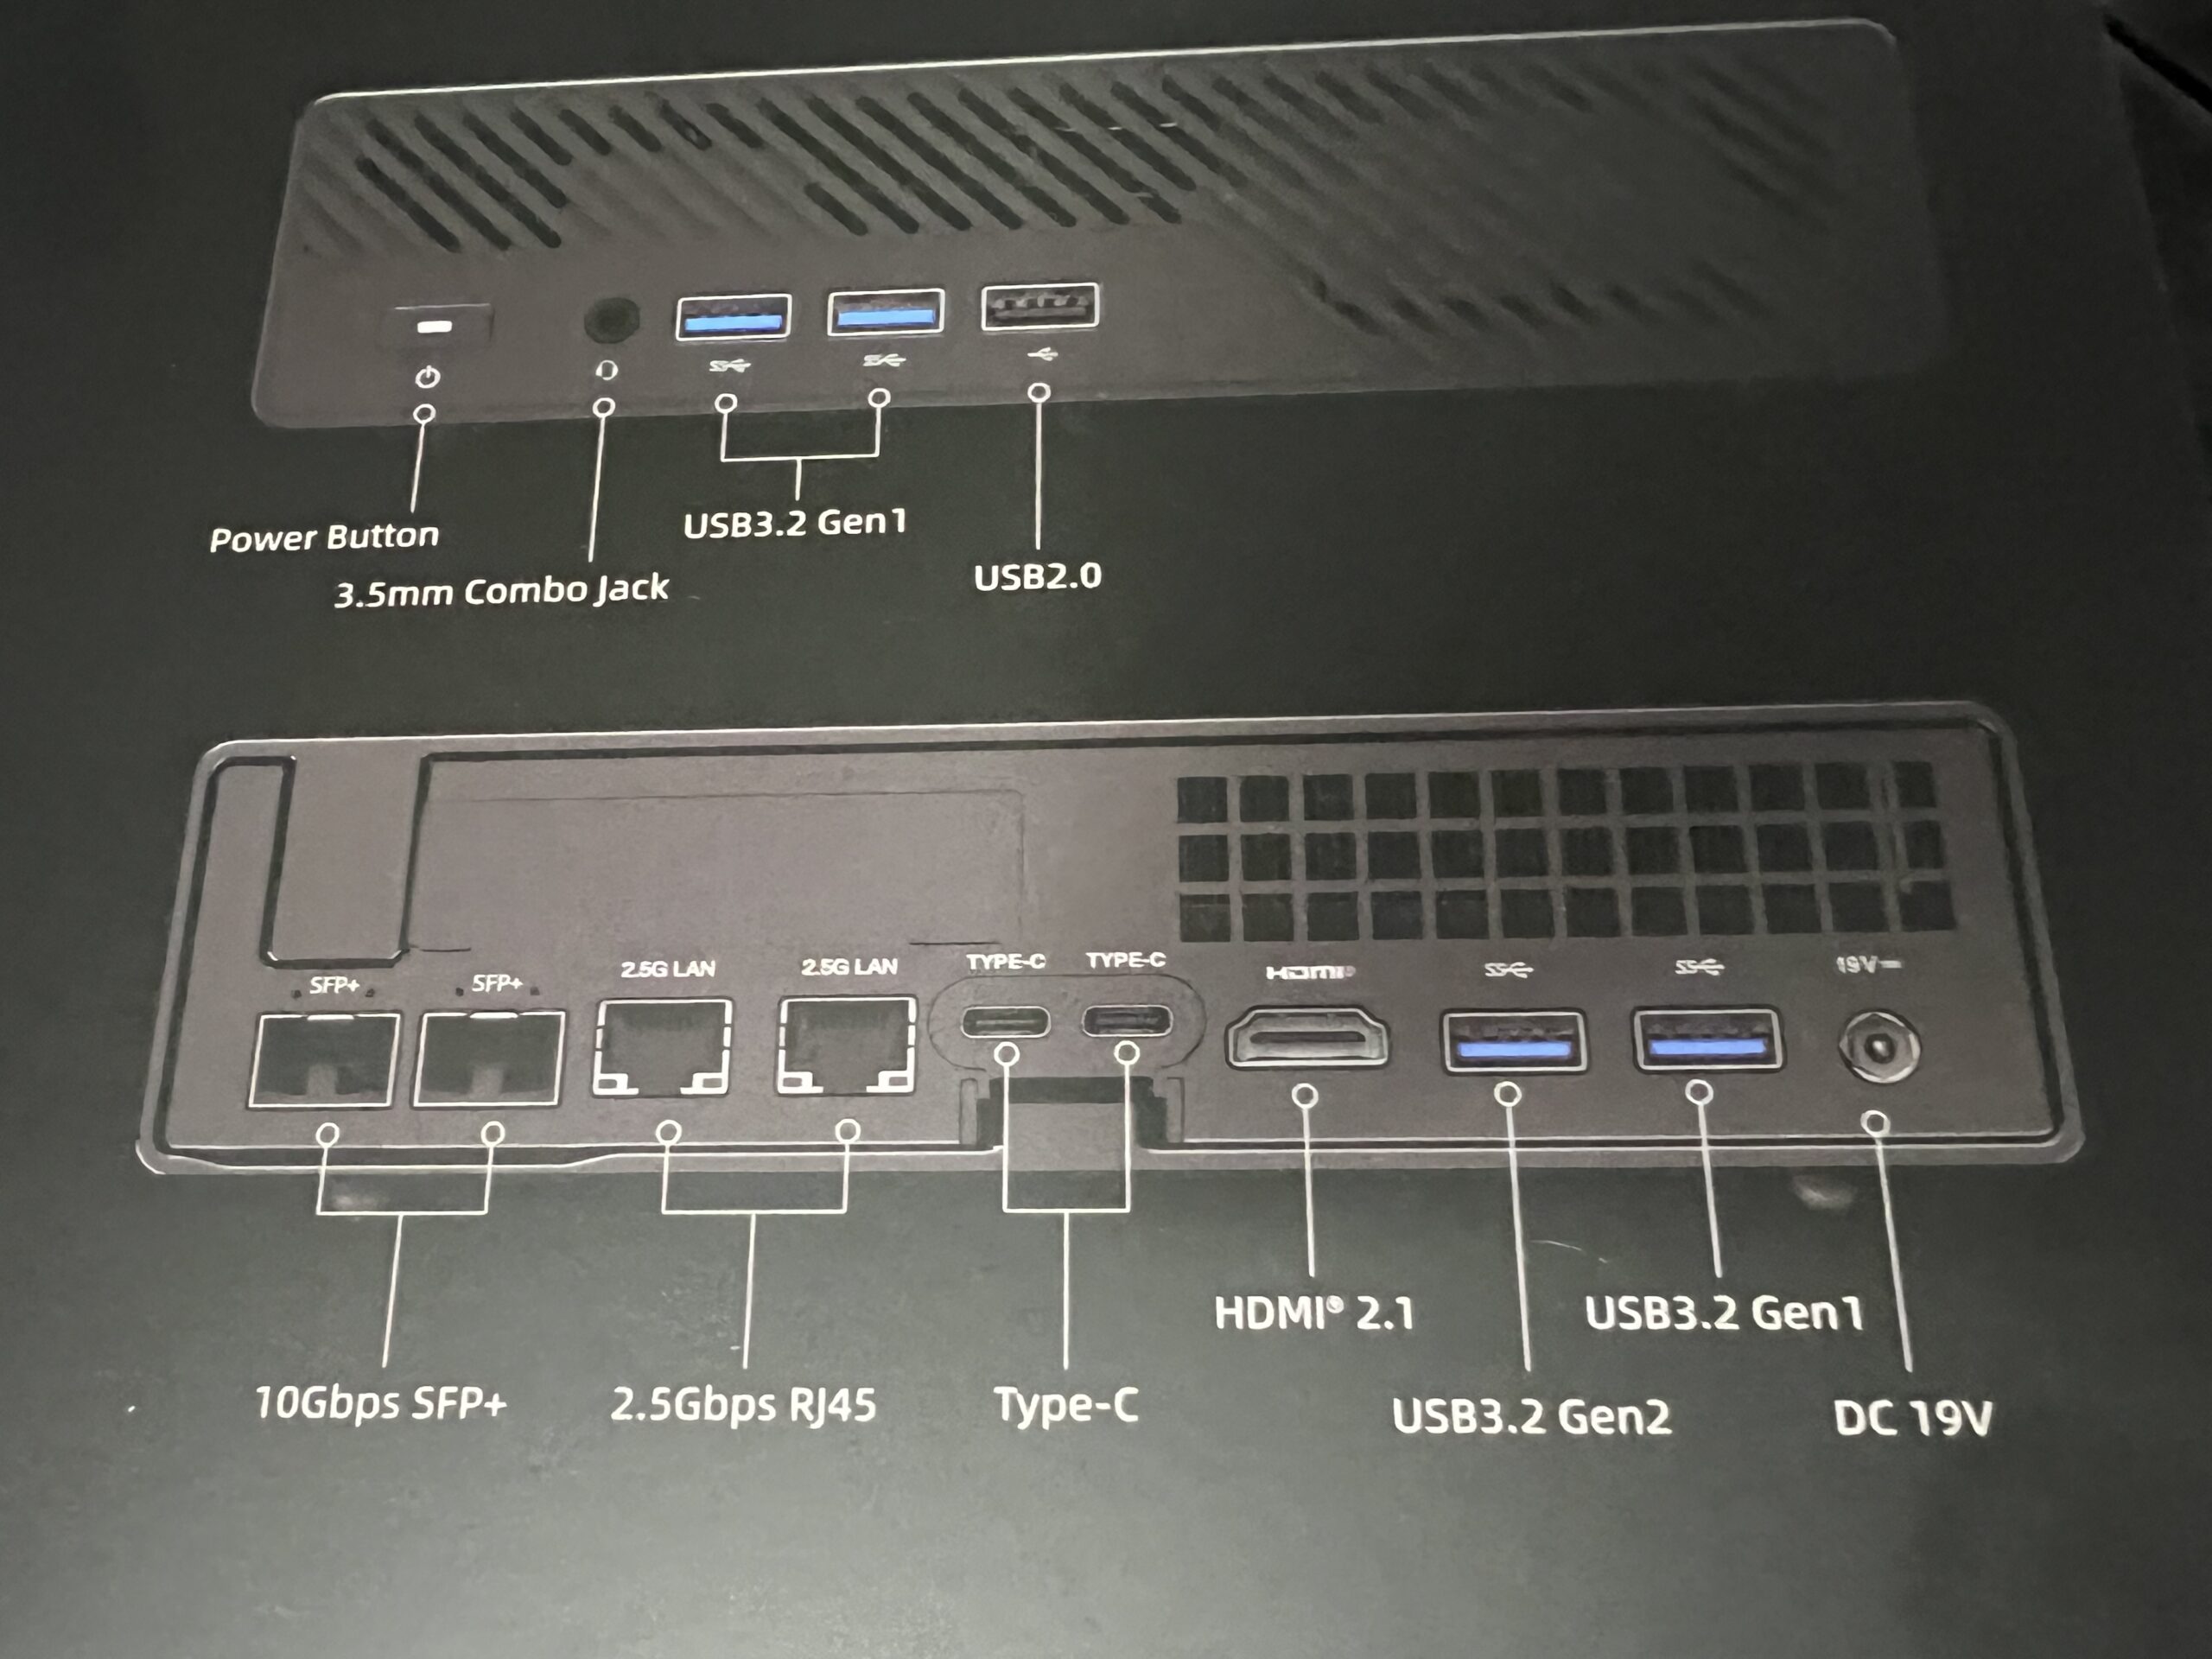
Lots of ports for such a small box.
The power brick is HUGE for such a small box.
The only issue I ran into (so far) is that I thought it was dead on arrival because it would boot to a black screen and I could never see the BIOS options, just a quick flash screen. The fix was easy enough, you just have to be very quick mashing the Delete key to make sure you catch the boot options, it seems very quick to move along if you fail to catch it.
need to hit “e” and edit the quiet boot string and add to end
nomodeset
Press Ctrl-X or F10 to boot
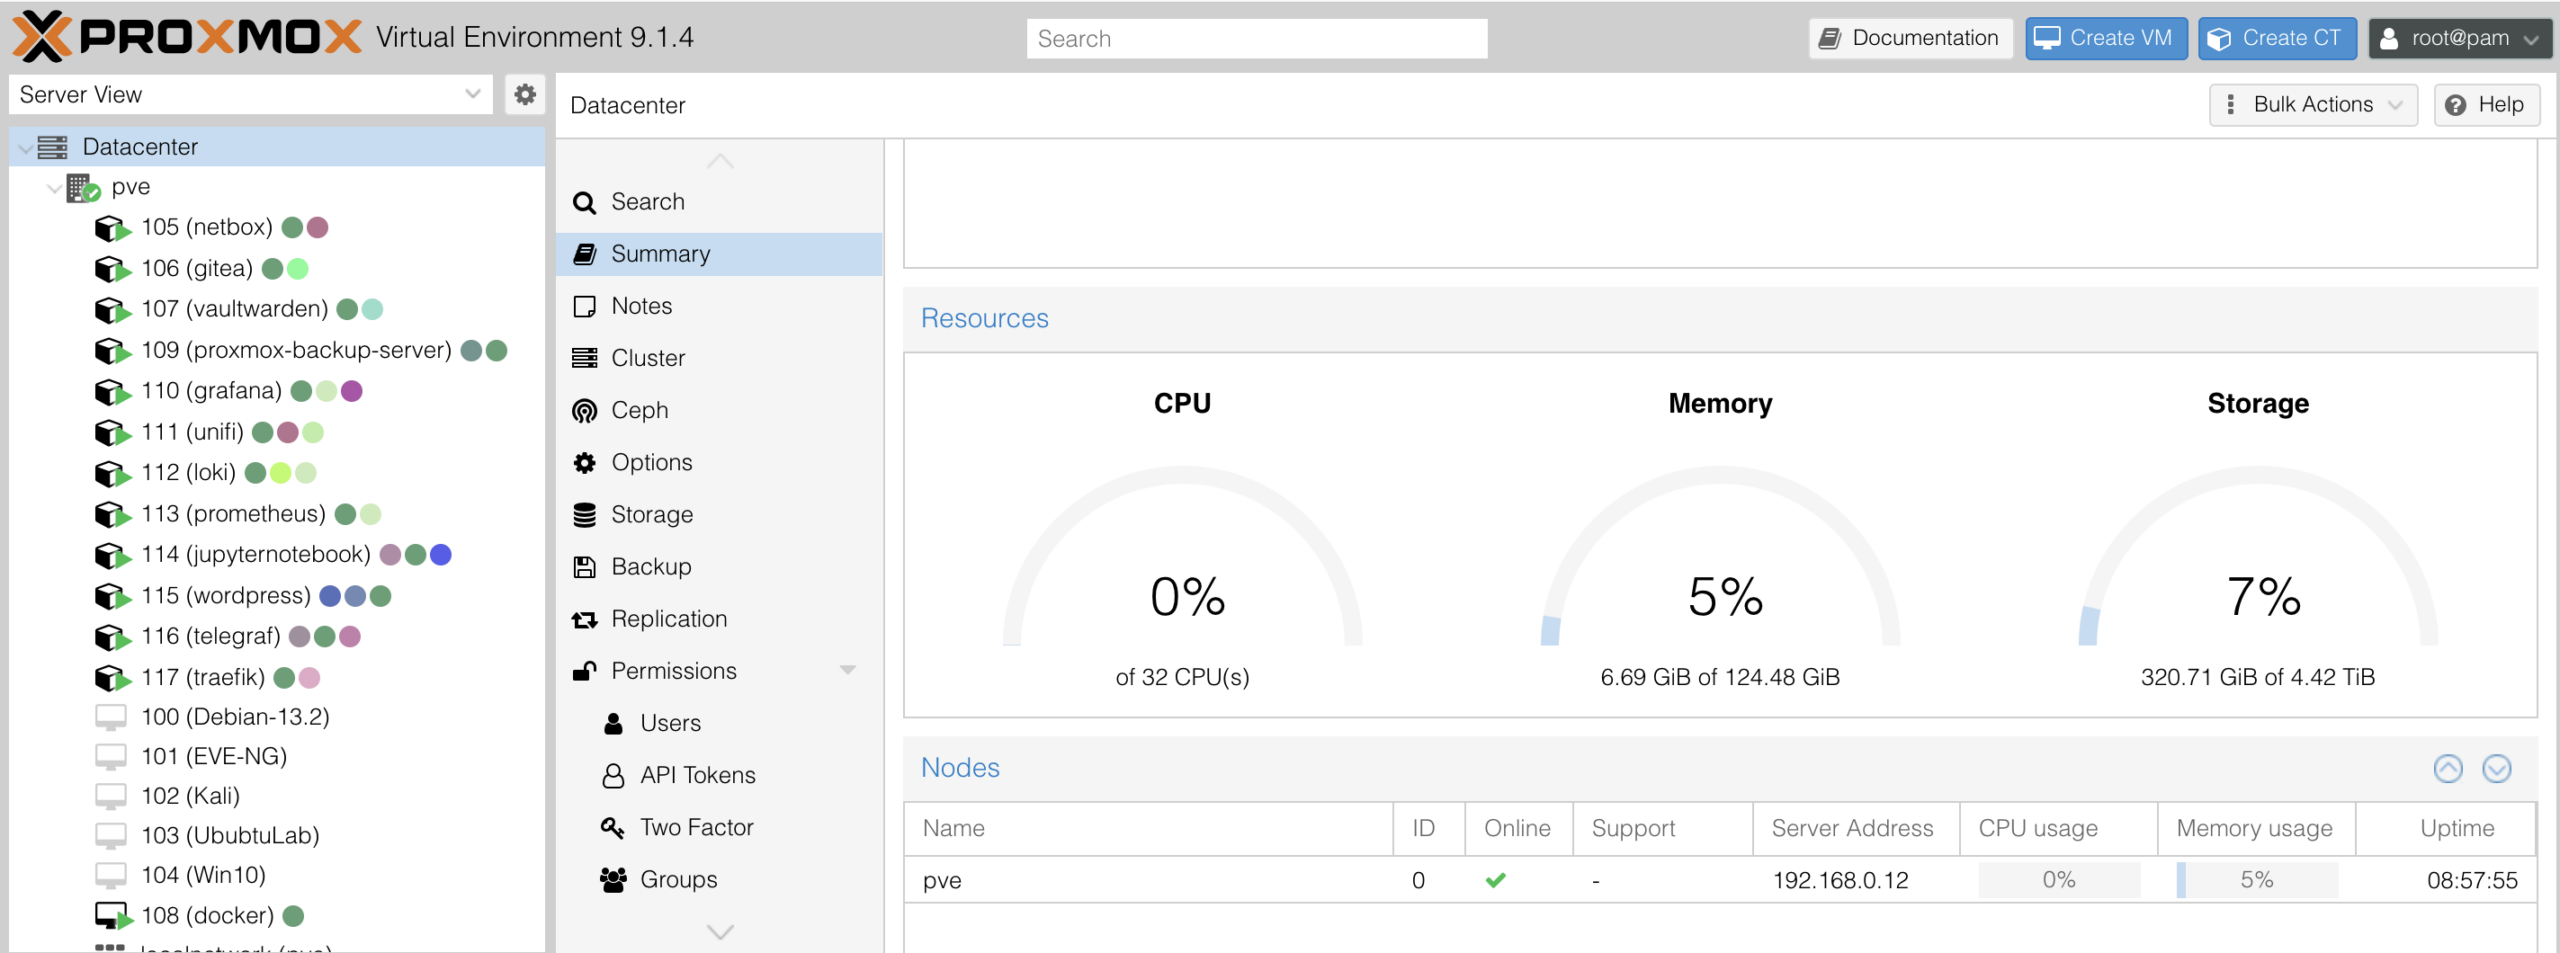
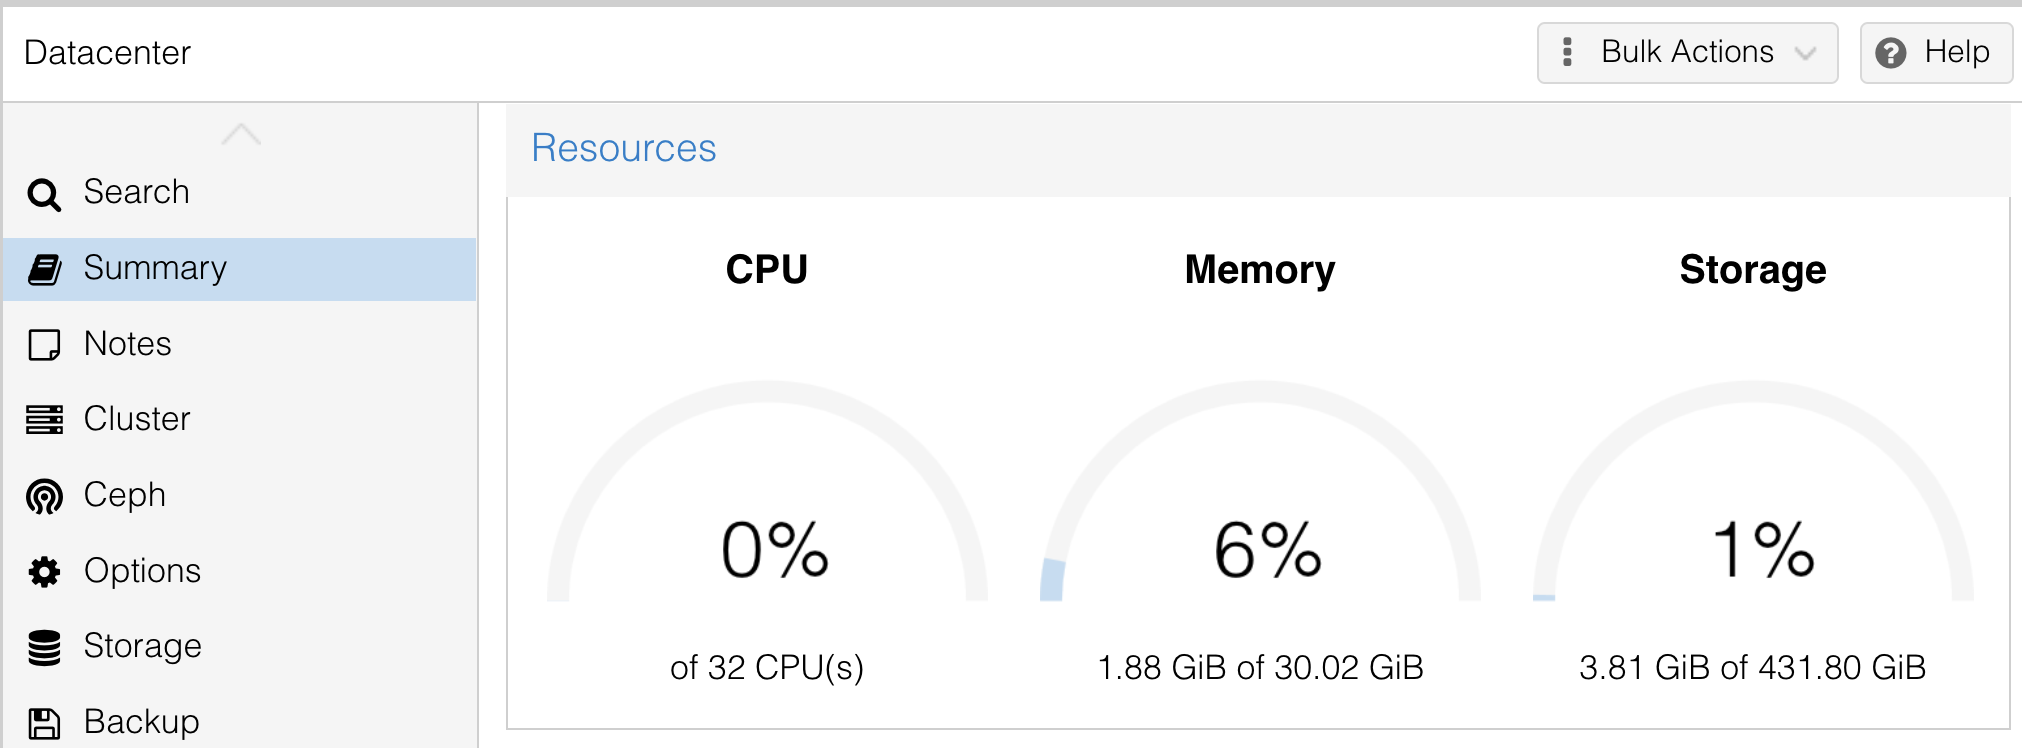
PROXMOX Virtual Enviornment 9.1.1 is pretty amazing, Looks like an ESXi killer to me!
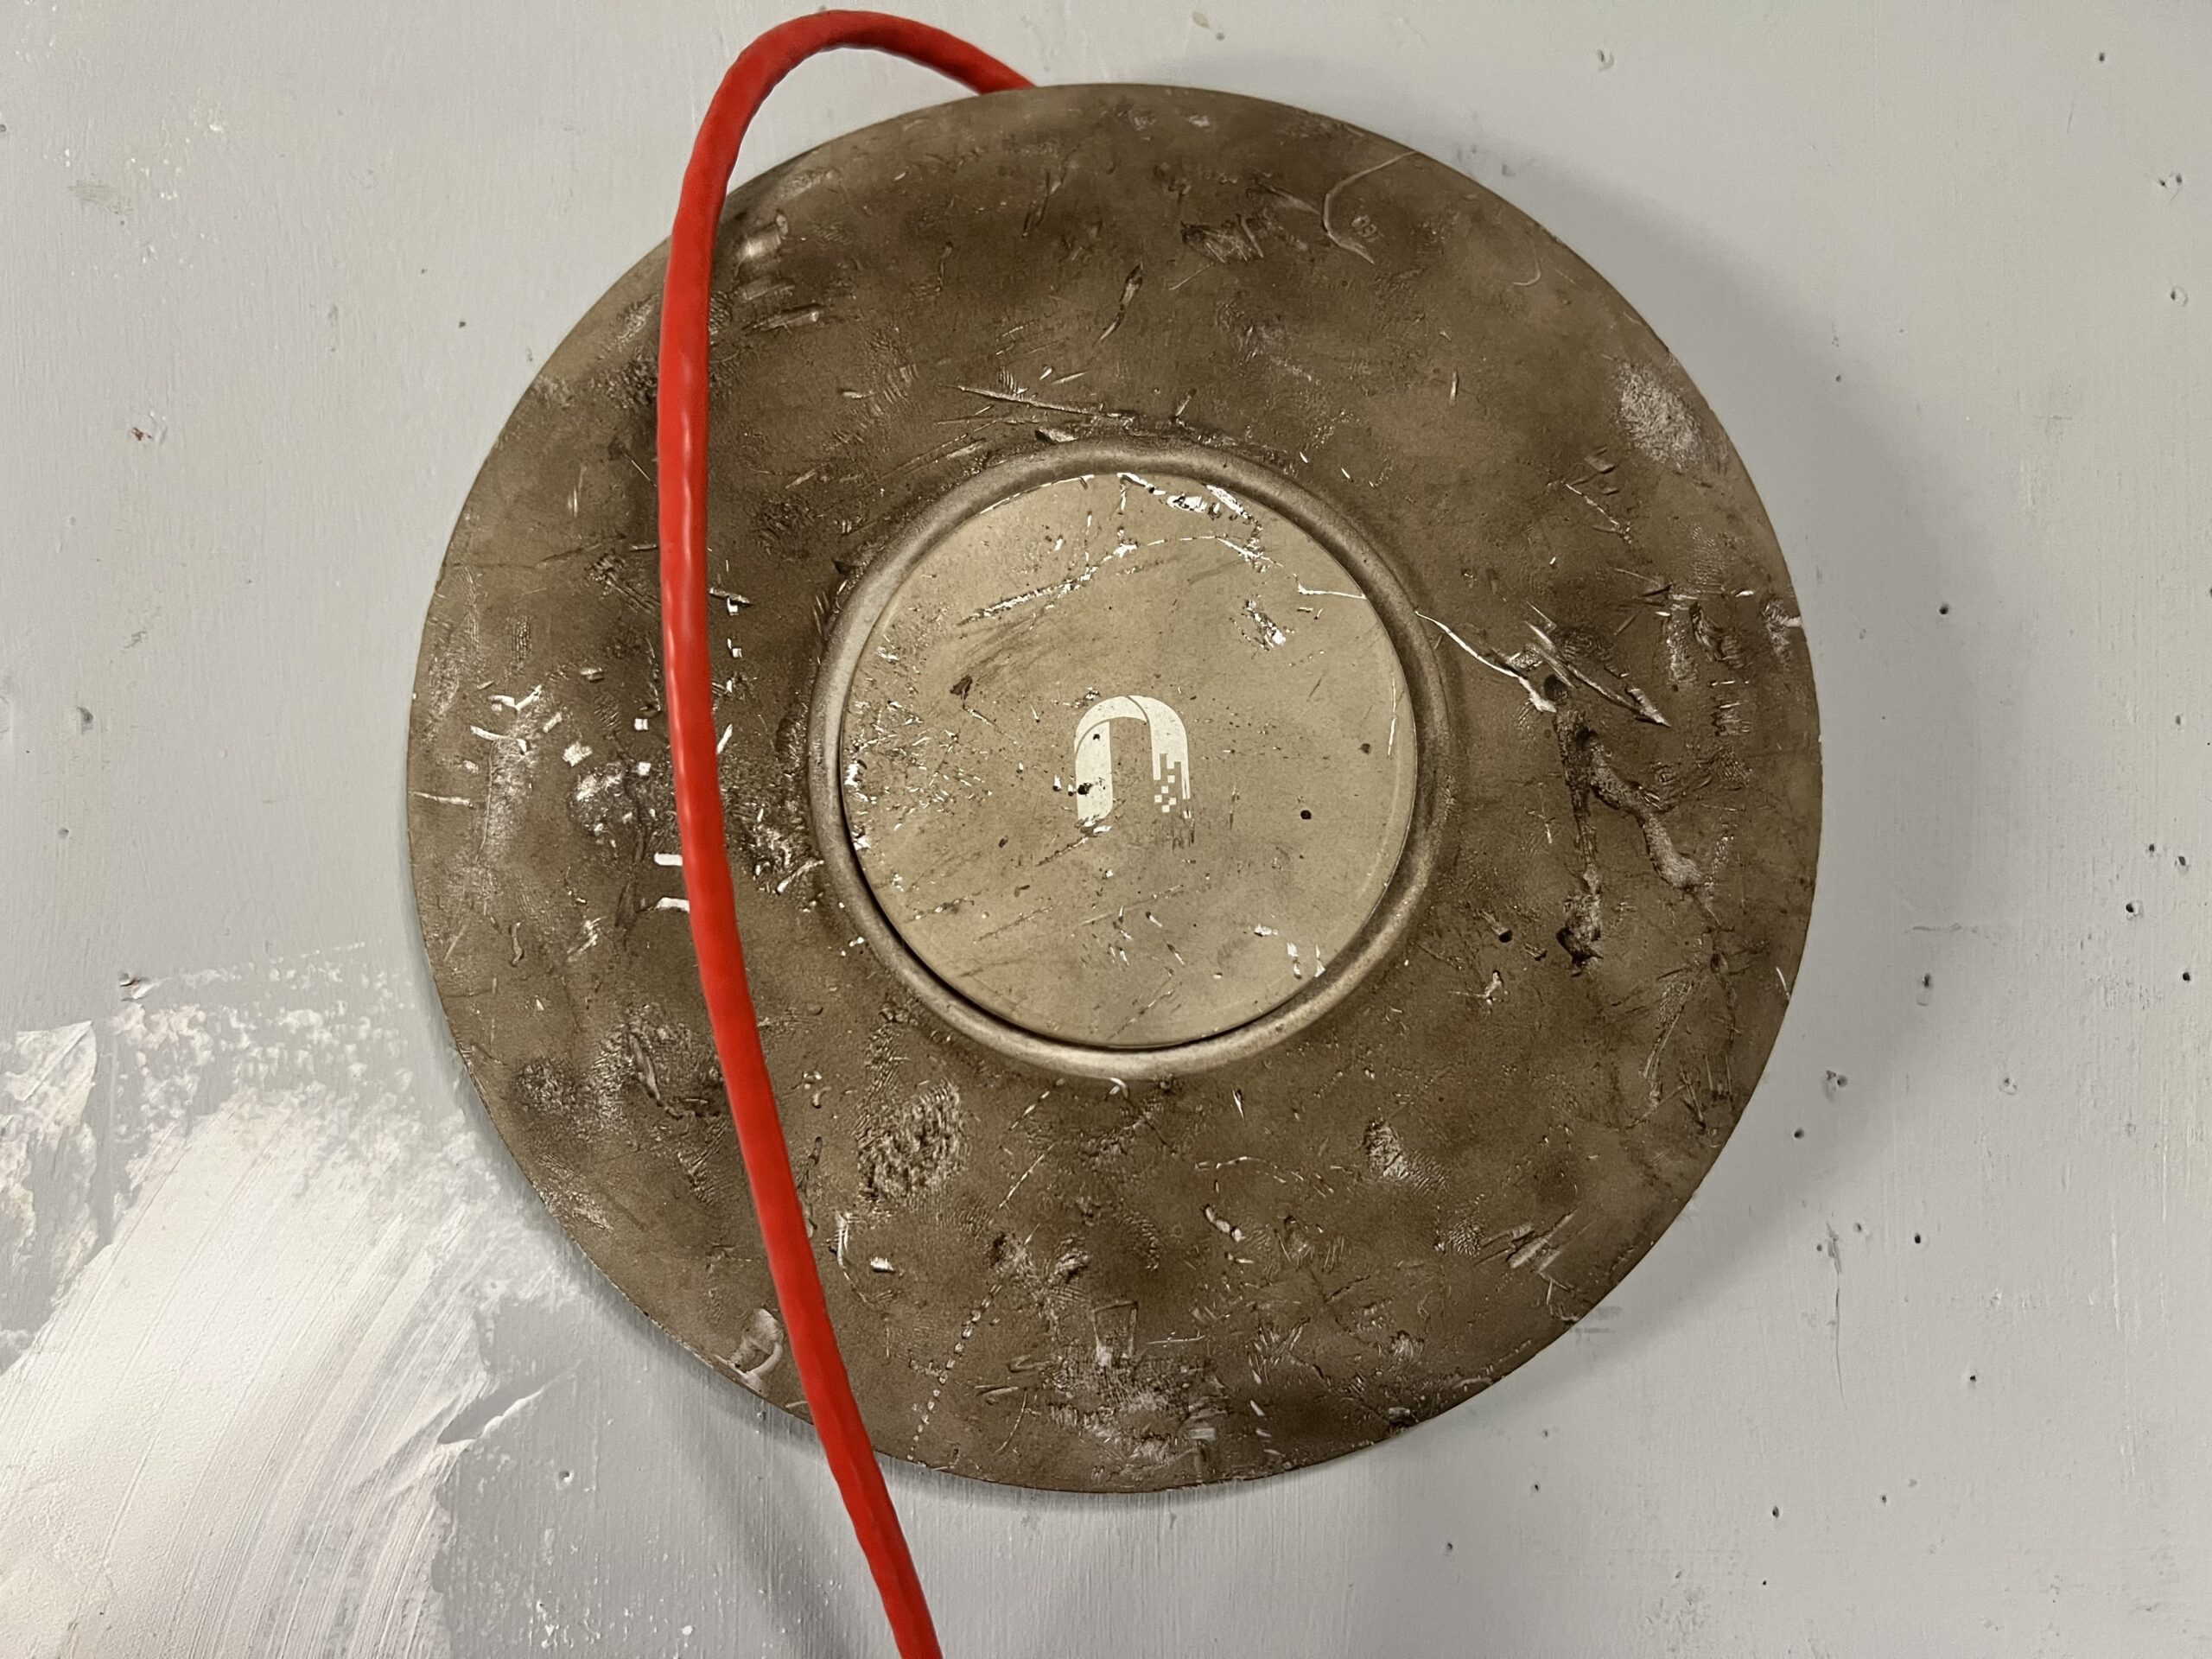
The Ubuquiti AC-Pro served me well for many years, but it’s time to upgrade!
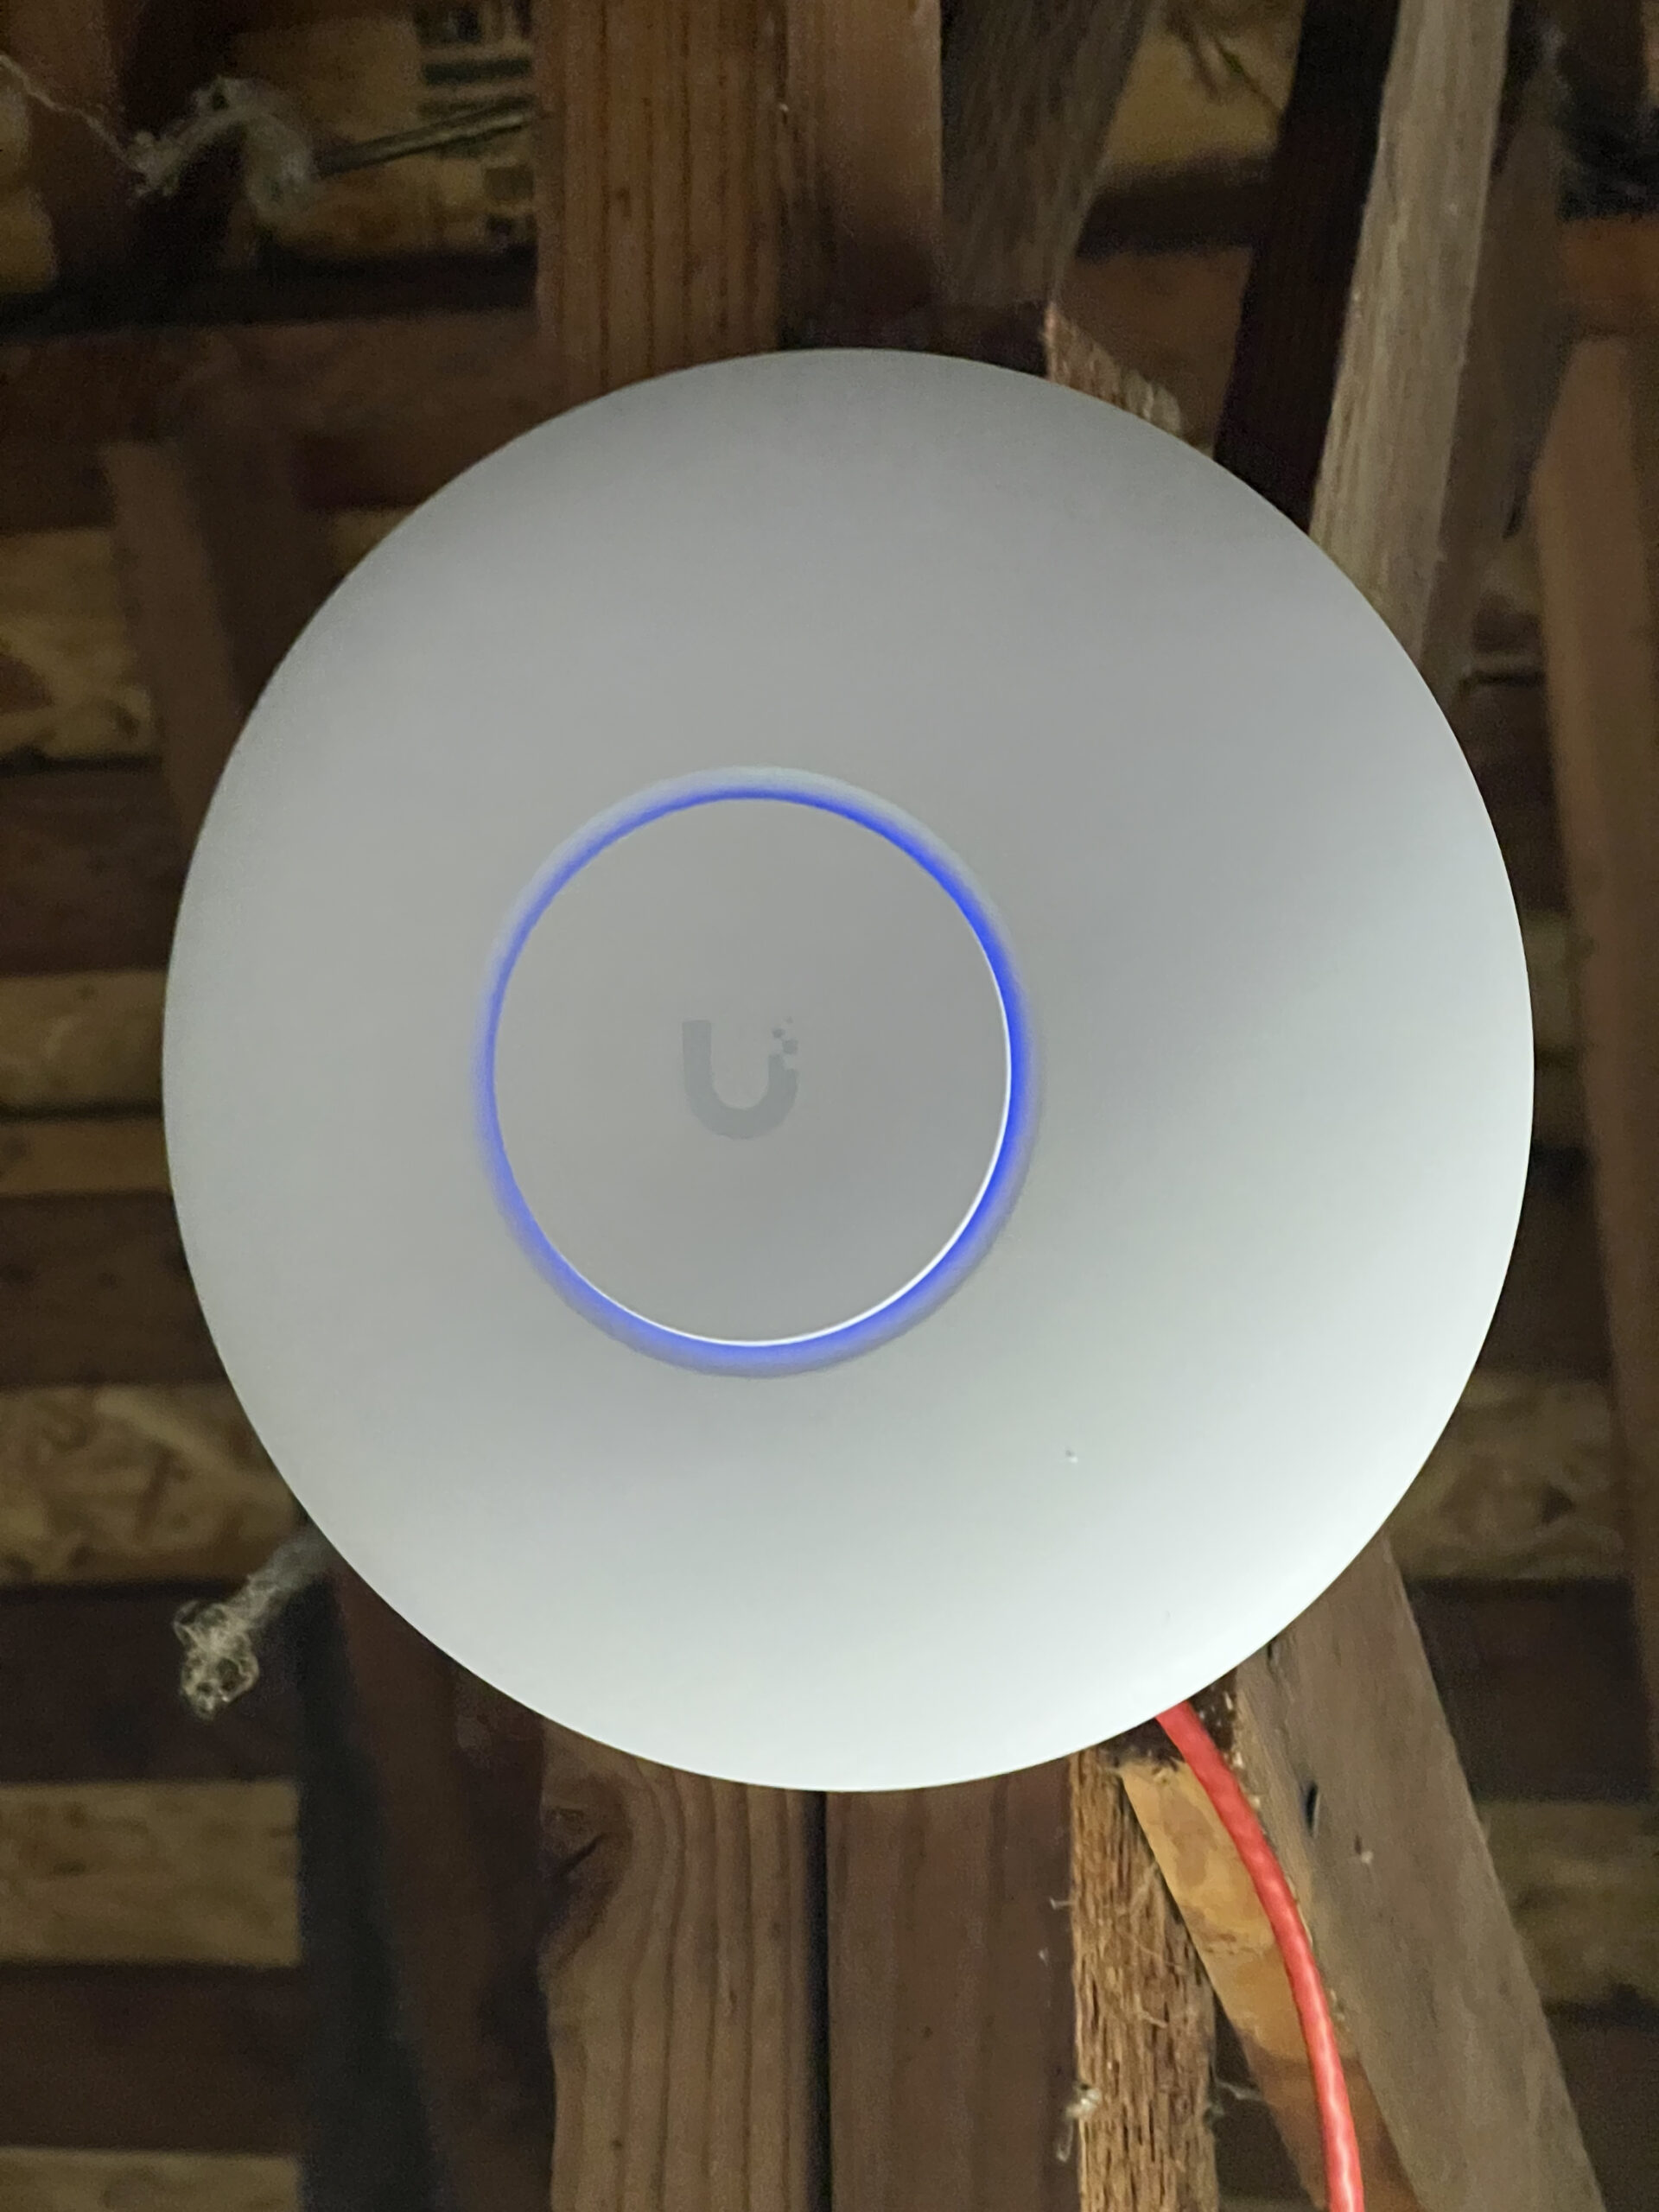
The U7-Pro has a ceiling mount now for better reception but the LED is INSANE!
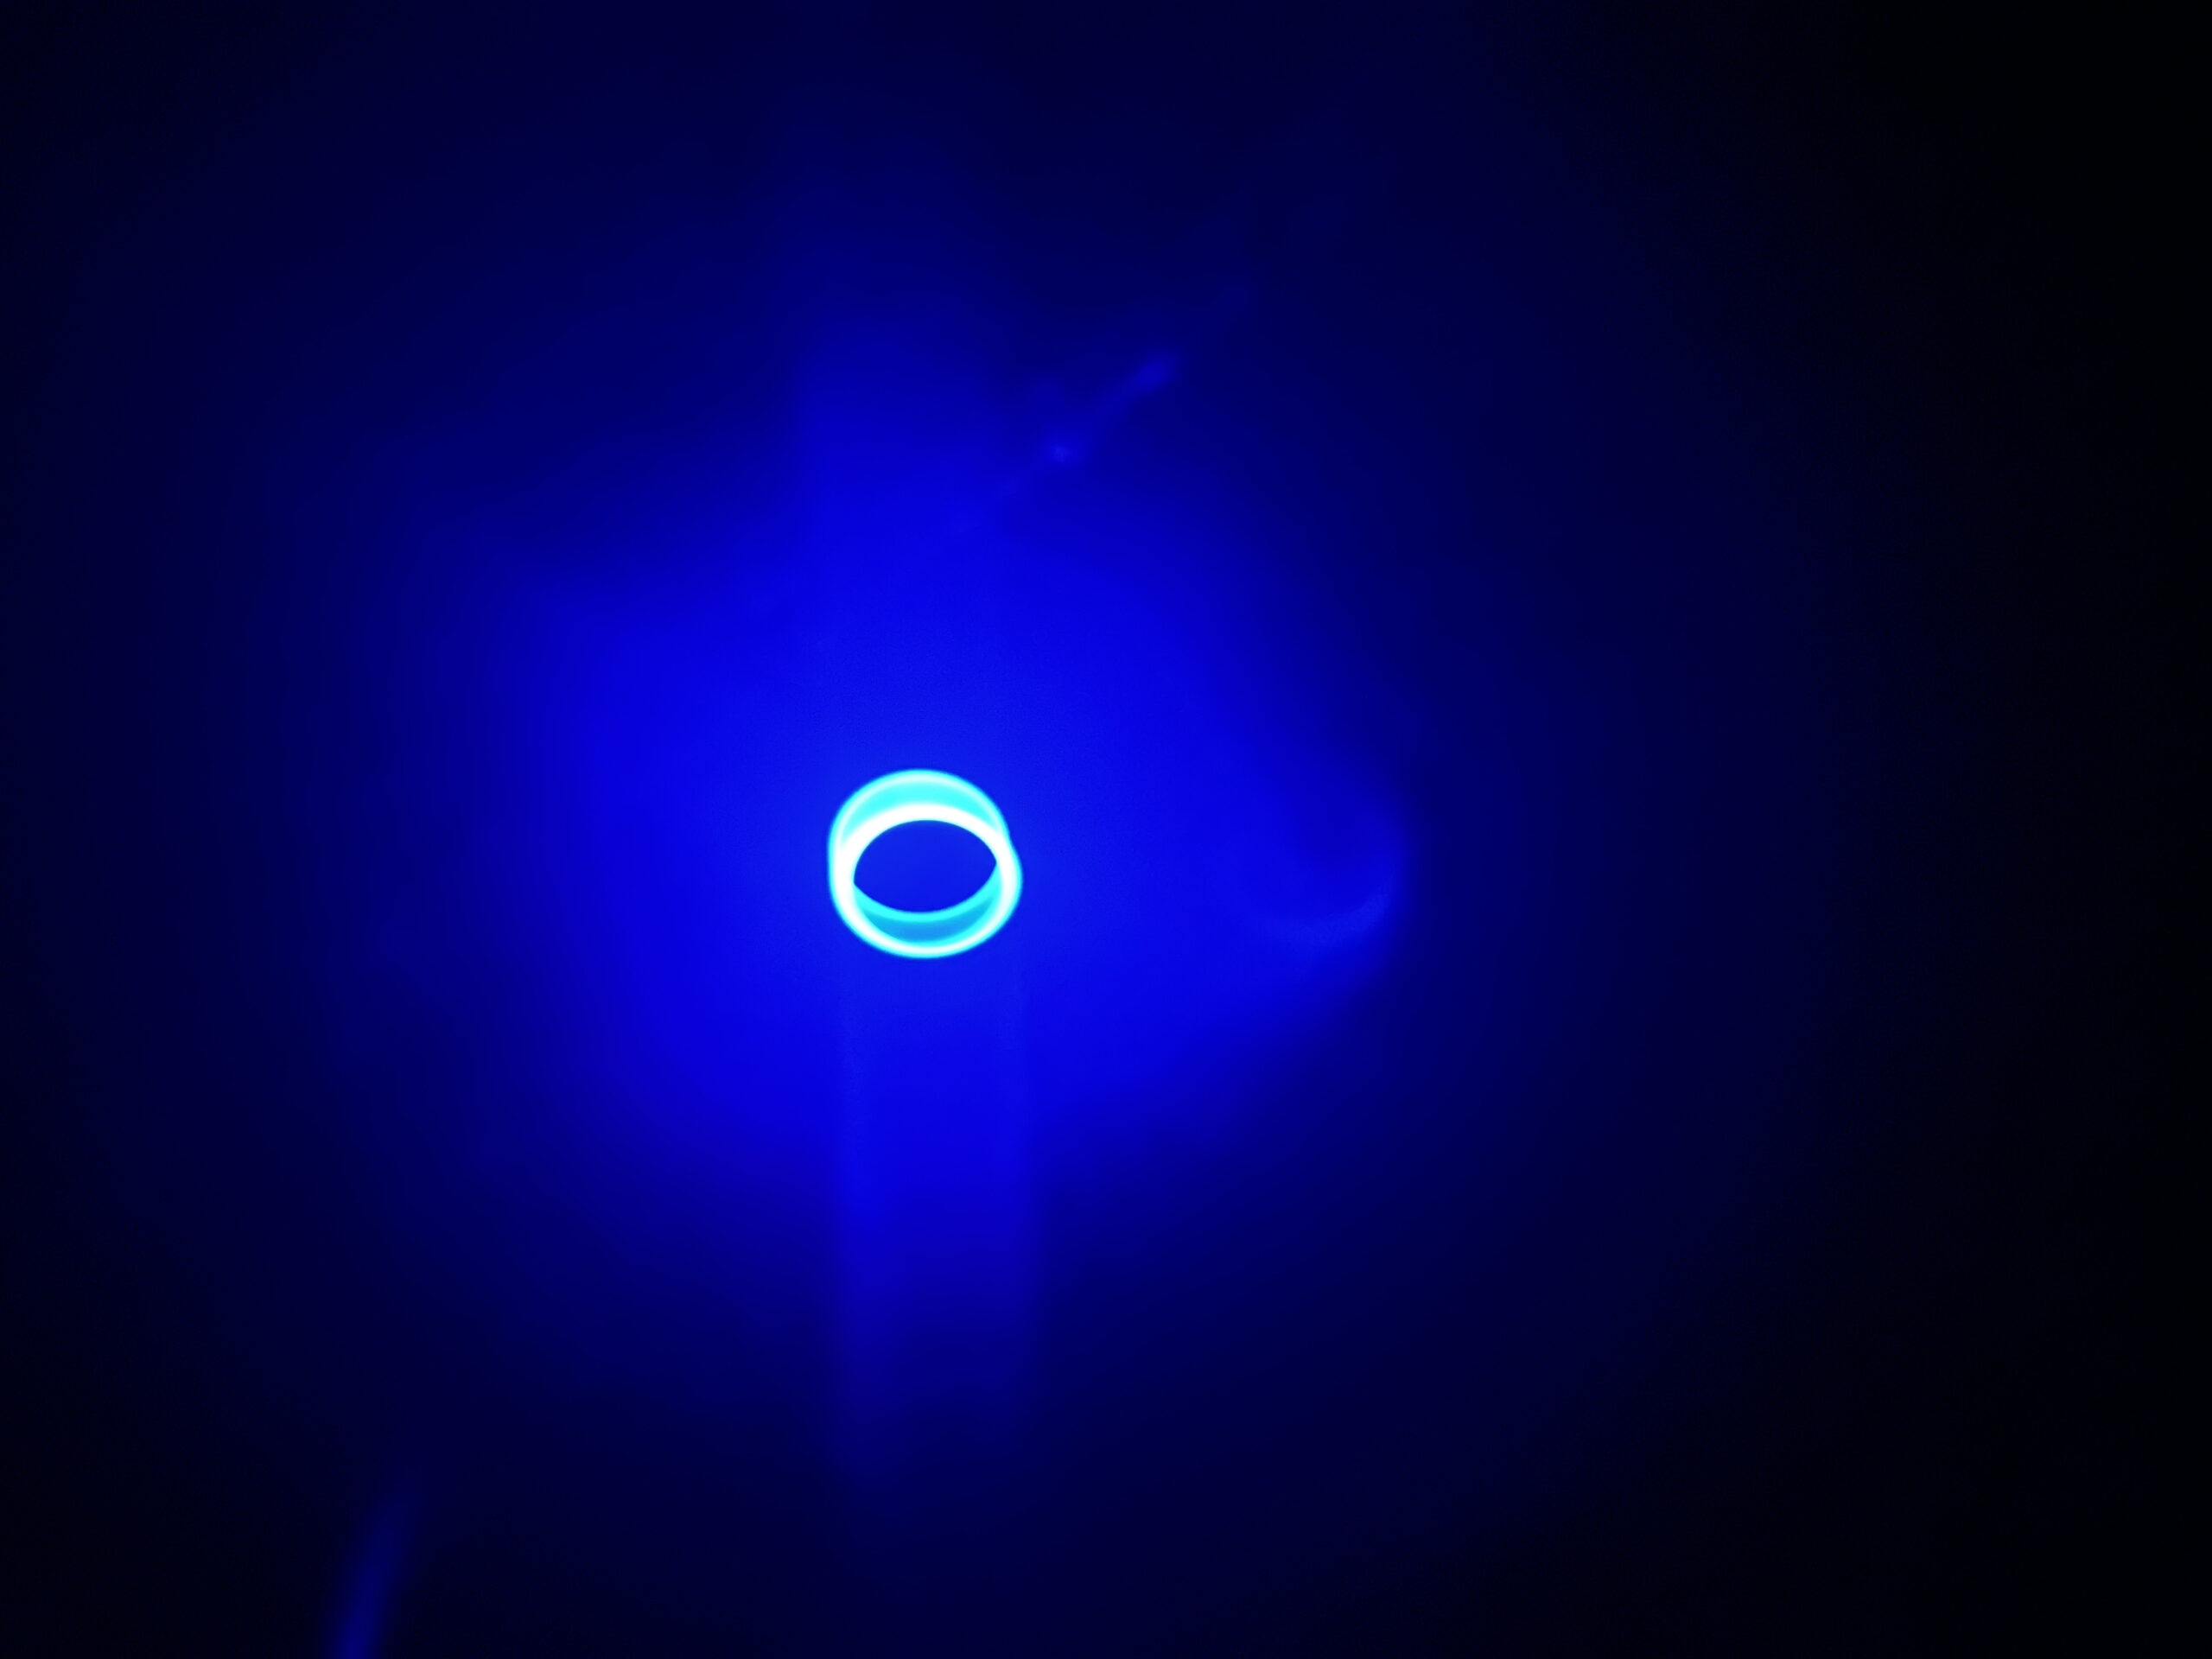
This thing lights up the entire garage and is obnoxious as all hell!
The GUI has a setting for adjusting the brightness, but it does not work. It’s on or off only. However, I did manage to find a post where someone mentioned you could run a command from SSH and I’m happy to report that works and the blue light is now at 5 percent 🙂
echo 5 > /sys/class/leds/led_blue/brightness
Some other useful commands that can be run from SSH
System Info
info
Model:       U7-Pro
Version:     7.0.64.15828
MAC Address: a8:9c:6c:56:43:bc
IP Address:  192.168.1.1
Hostname:    U7-Pro
Uptime:      3059 seconds
NTP:         Not synchronized

Status:      Unable to resolve (http://unifi:8080/inform)
Adopt the AP
set-inform http://192.168.0.8:8080/inform
Adoption request sent to 'http://192.168.0.8:8080/inform'. Use UniFi Network to complete the adopt process.
One other really important thing is that the AP will change login after initial provisioning from ubnt/ubnt to admin/random_password. The new password can be found at the following link http://127.0.0.1:8080/manage/default/devices
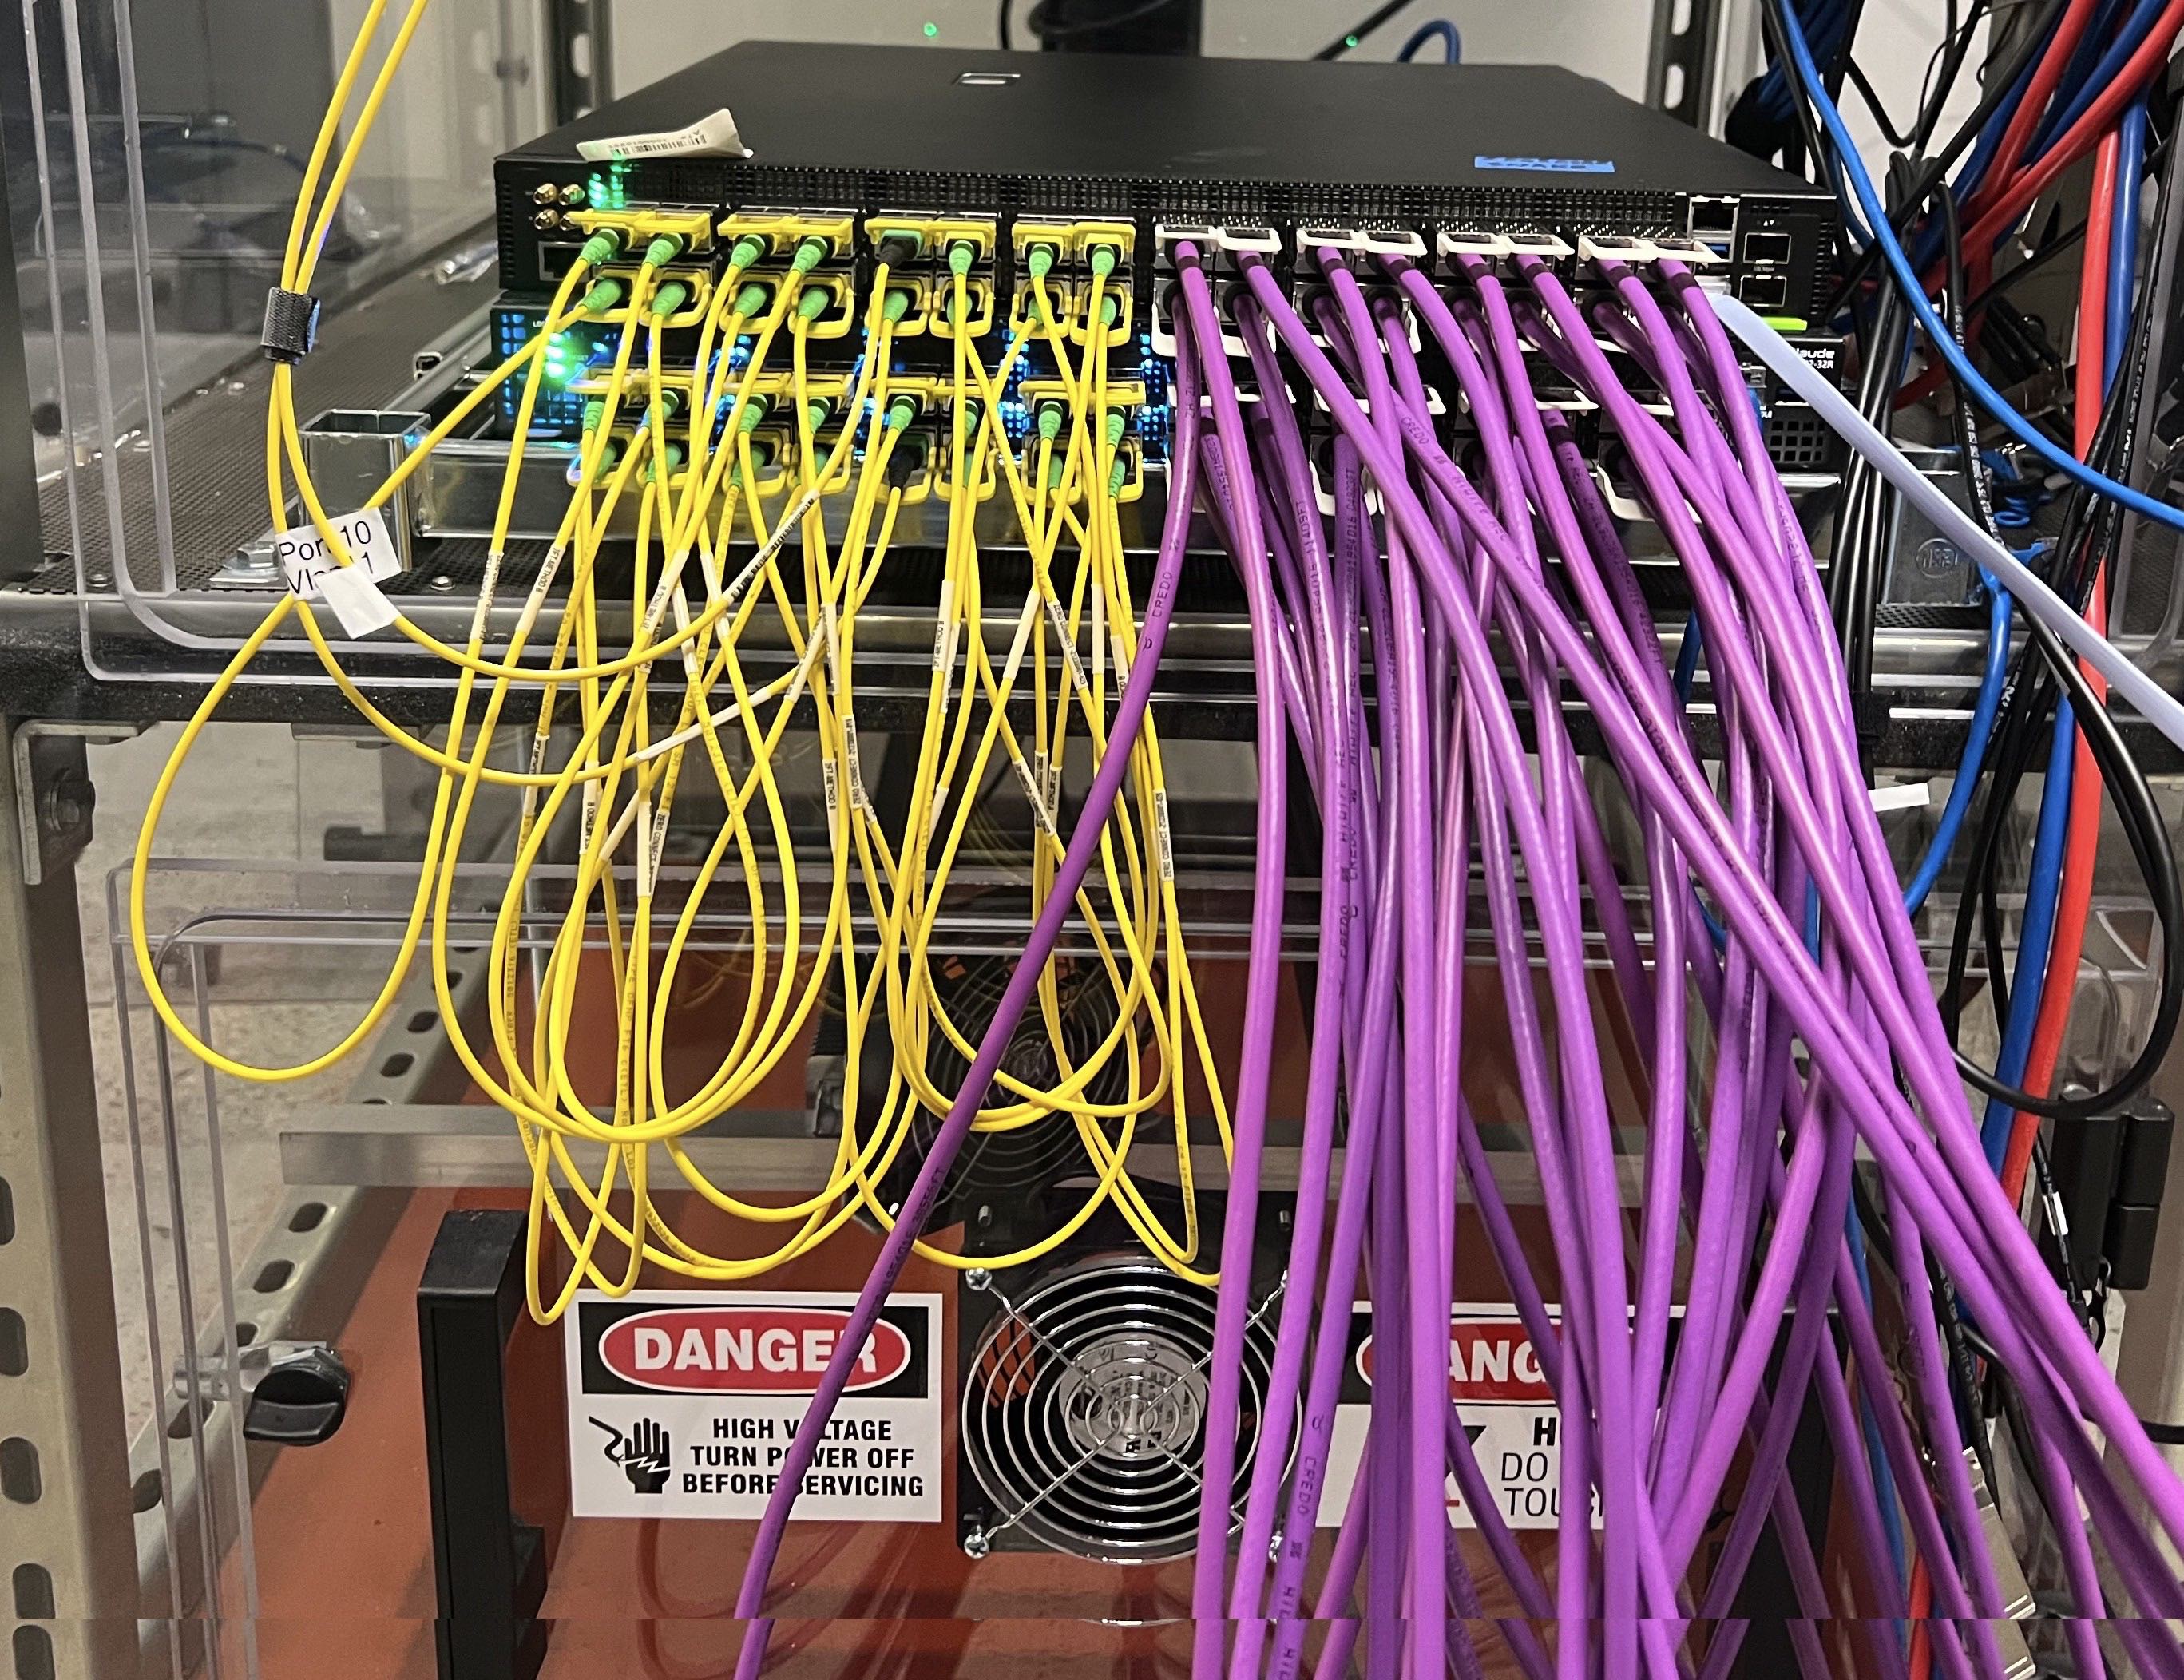
Finally, I updated my core switch to a managed 10G switch with POE+ and 2.5G LAN ports. I purchased a XMG1915-18EP and it seems to do the job well enough. The 180W POE power budget seems like way more than I need but it’s a cool feature and my AP works great.
The biggest annoyance I’ve found is you must configure everything via GUI. It has CLI, but only for show commands! It made setting my network up more challenging that it had to be.
Posted inUncategorized|Comments Off on Lab Upgrade Part Two
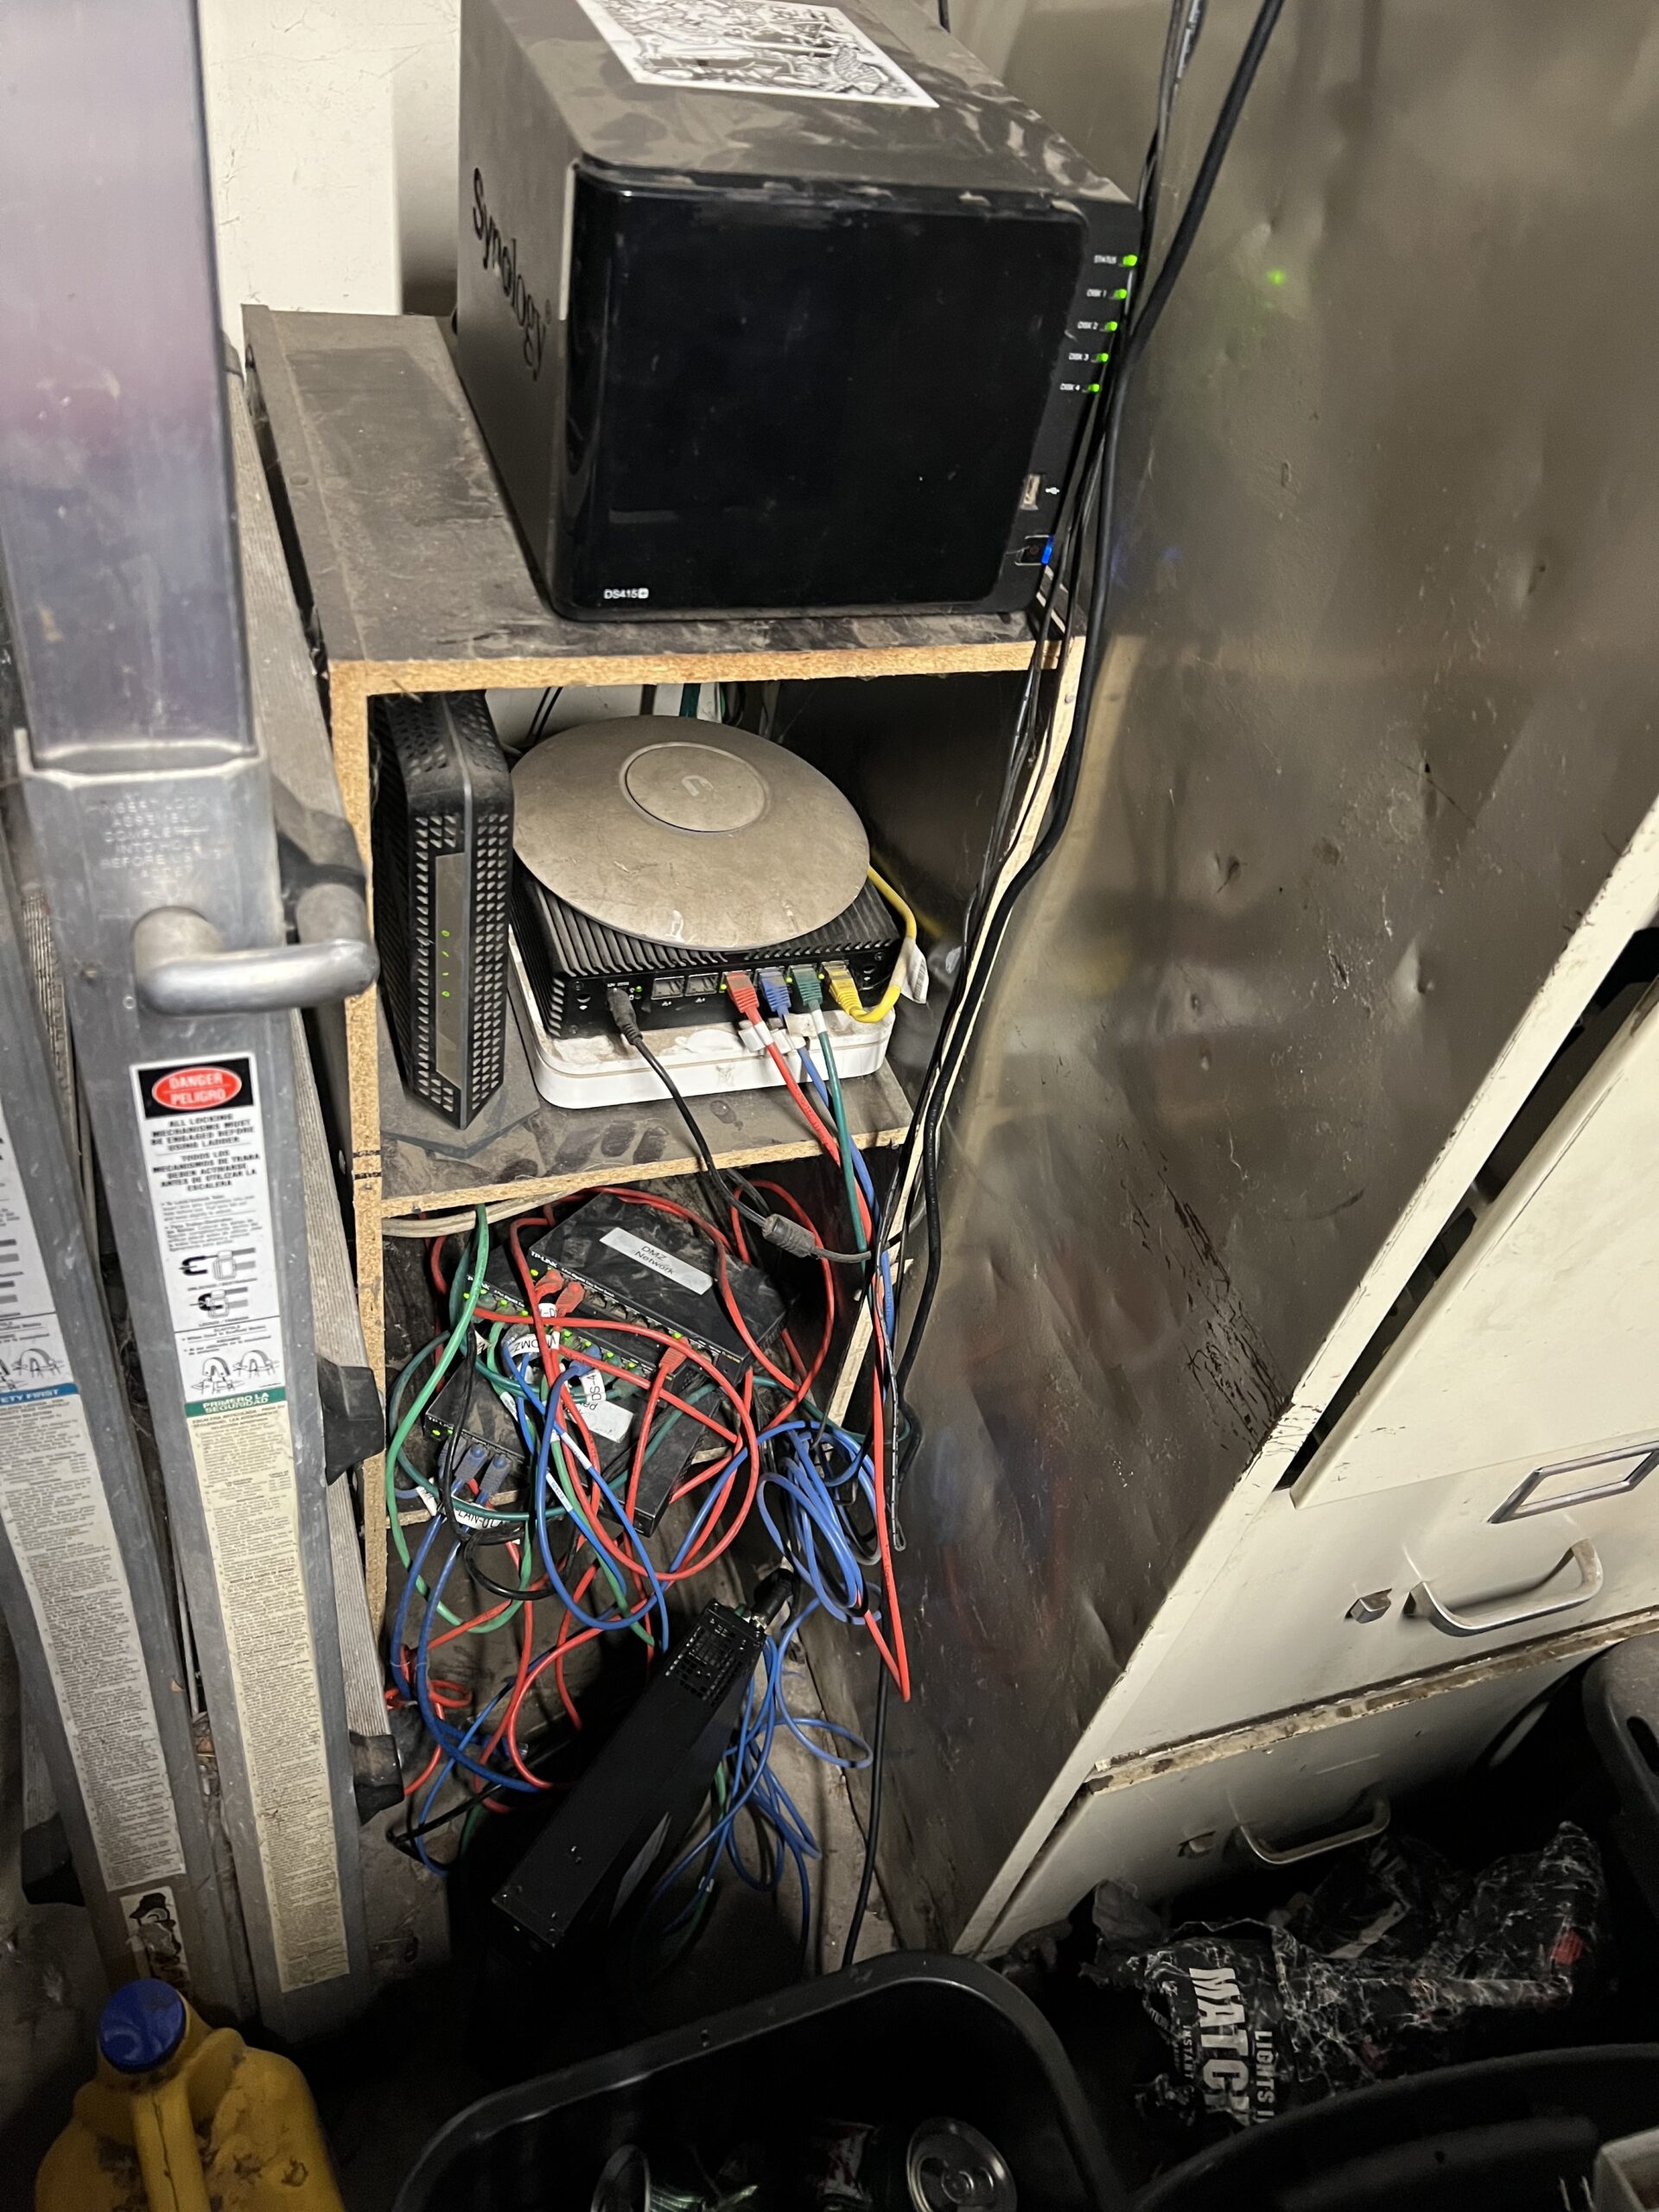
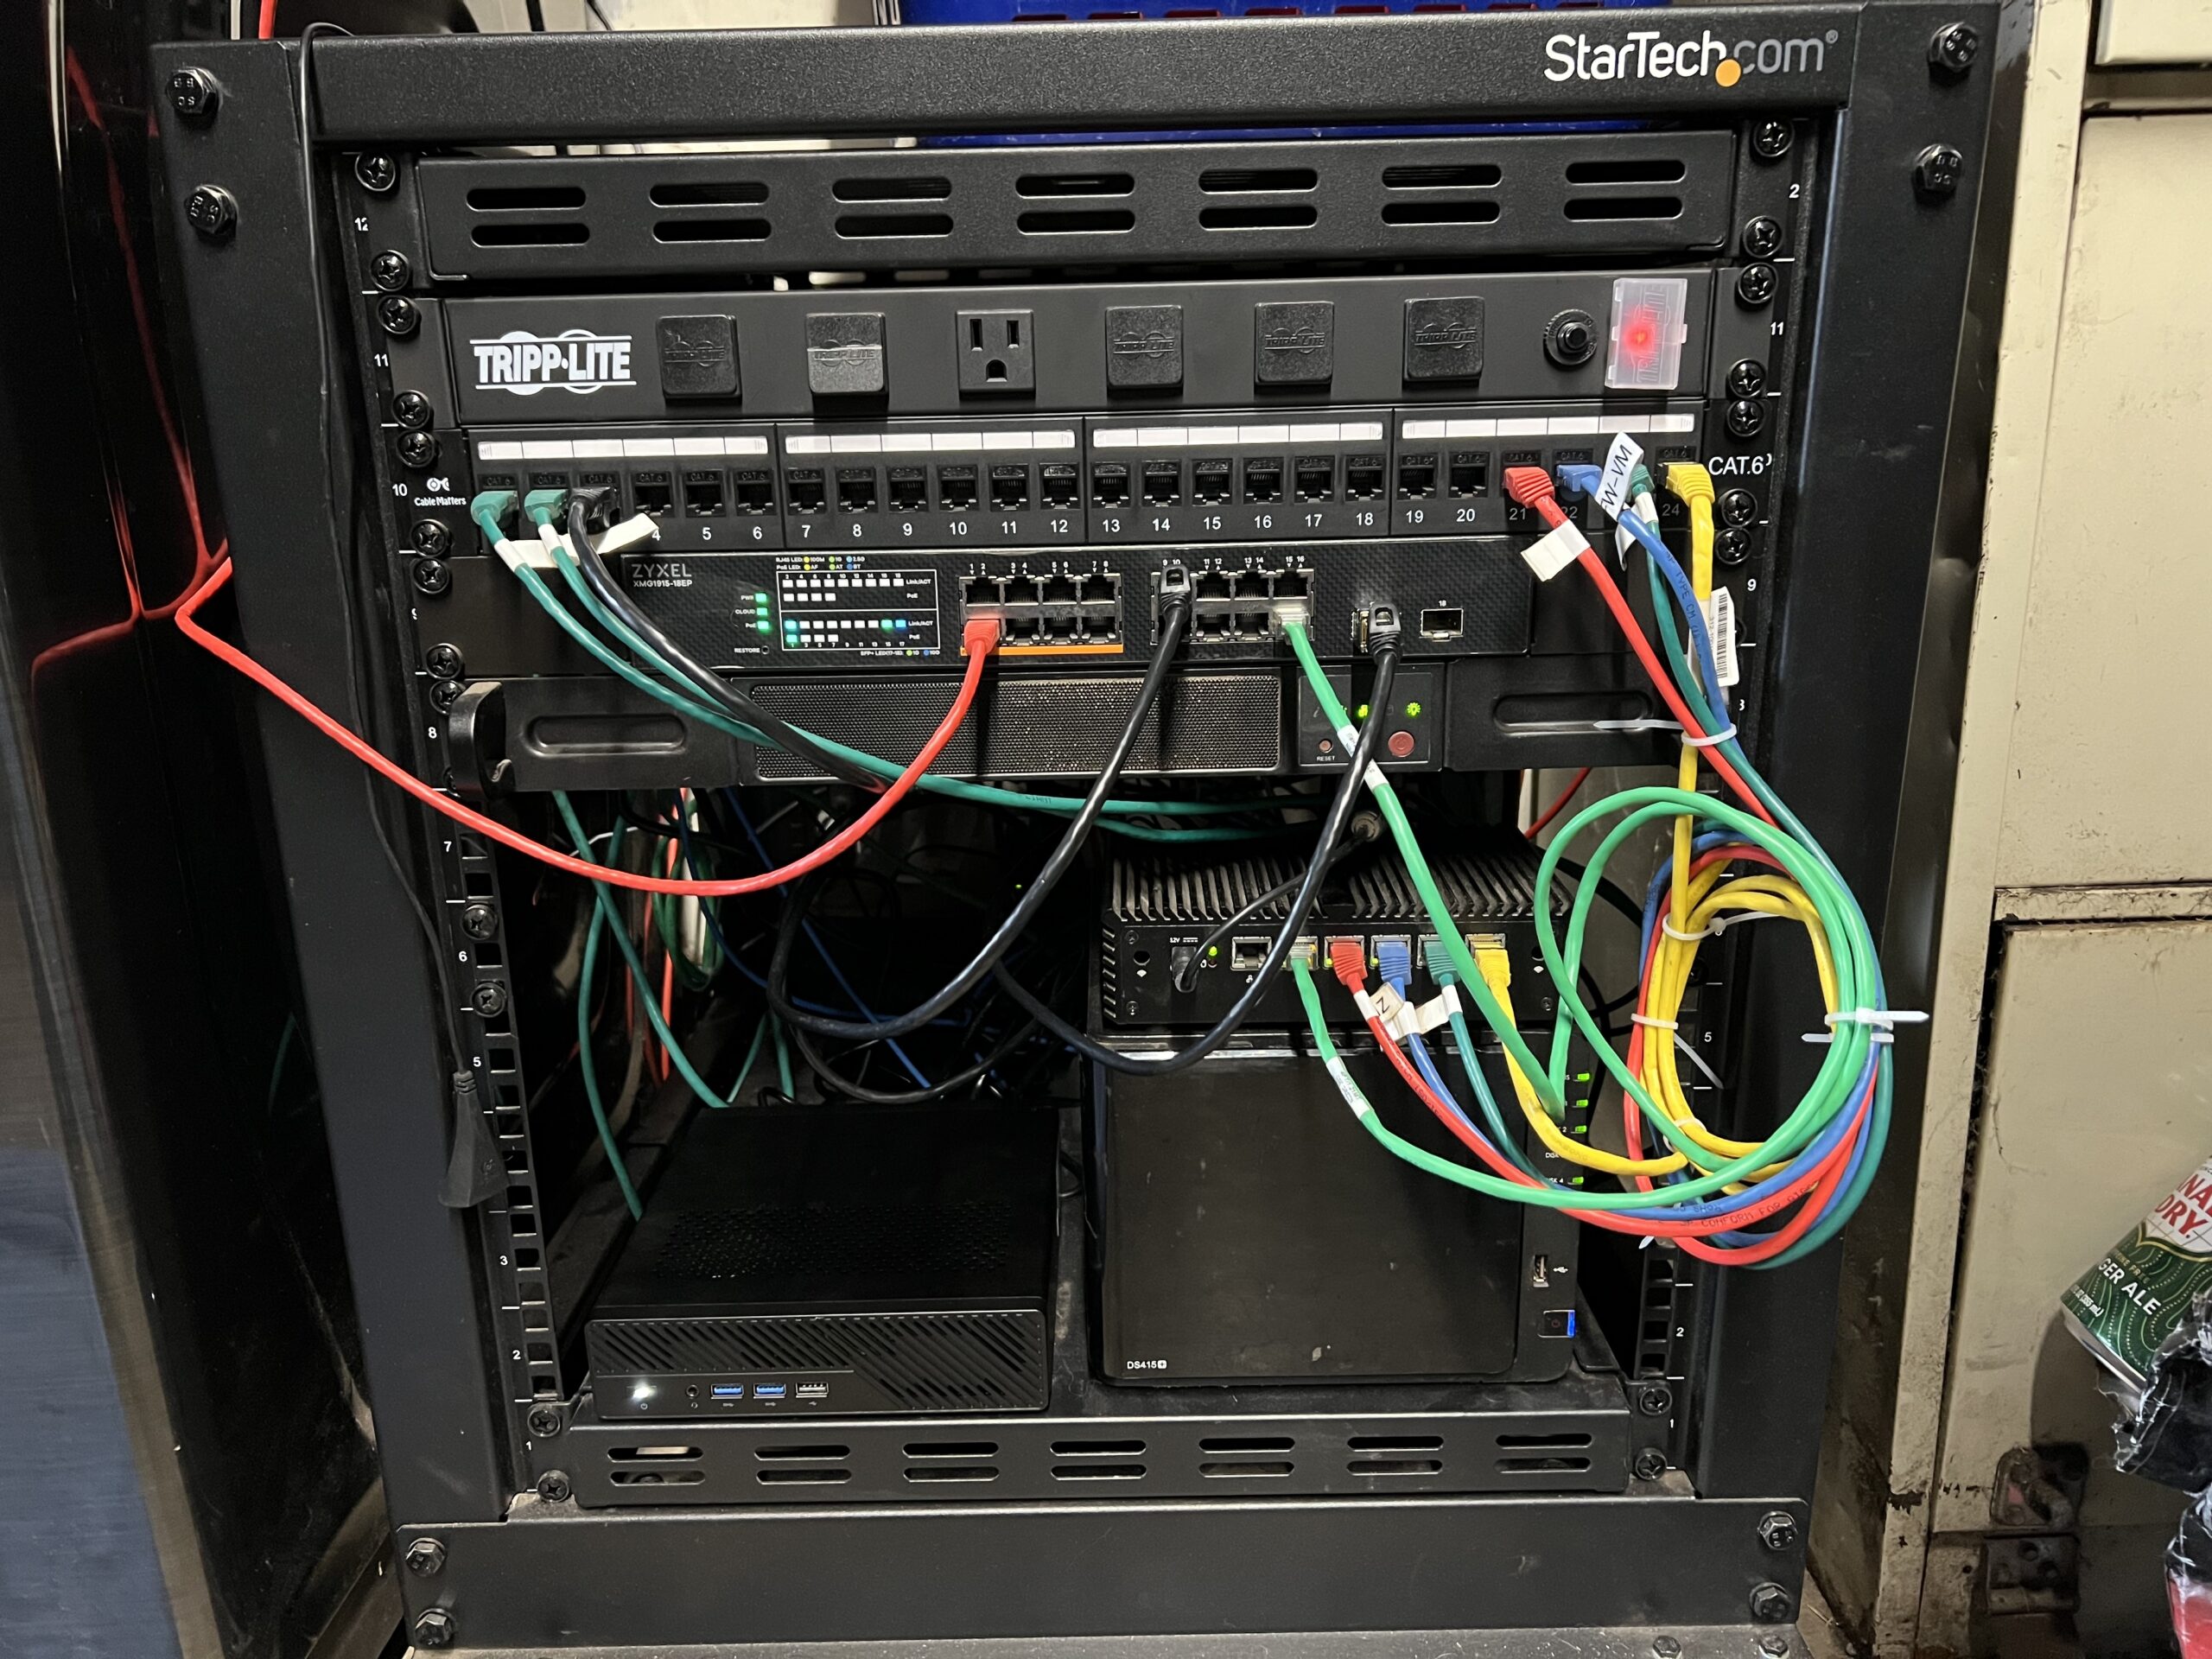
I’m a little embarrassed to say that this was what my home network stack used to look like. It was not too bad until it came time to move some equipment and then it quickly became a rats nest!
After upgrading my ESXi server with 128GB ECC RAM and 2 TB of SSD hard drive, I decided it was time to spend some money on a proper rack for my gear.
I also updated my cheap TP-LINK 1G switches with a new 10G switch! Still need to order a bottom shelf and upgrade my NAS and Firewall, but it’s coming along nicely.
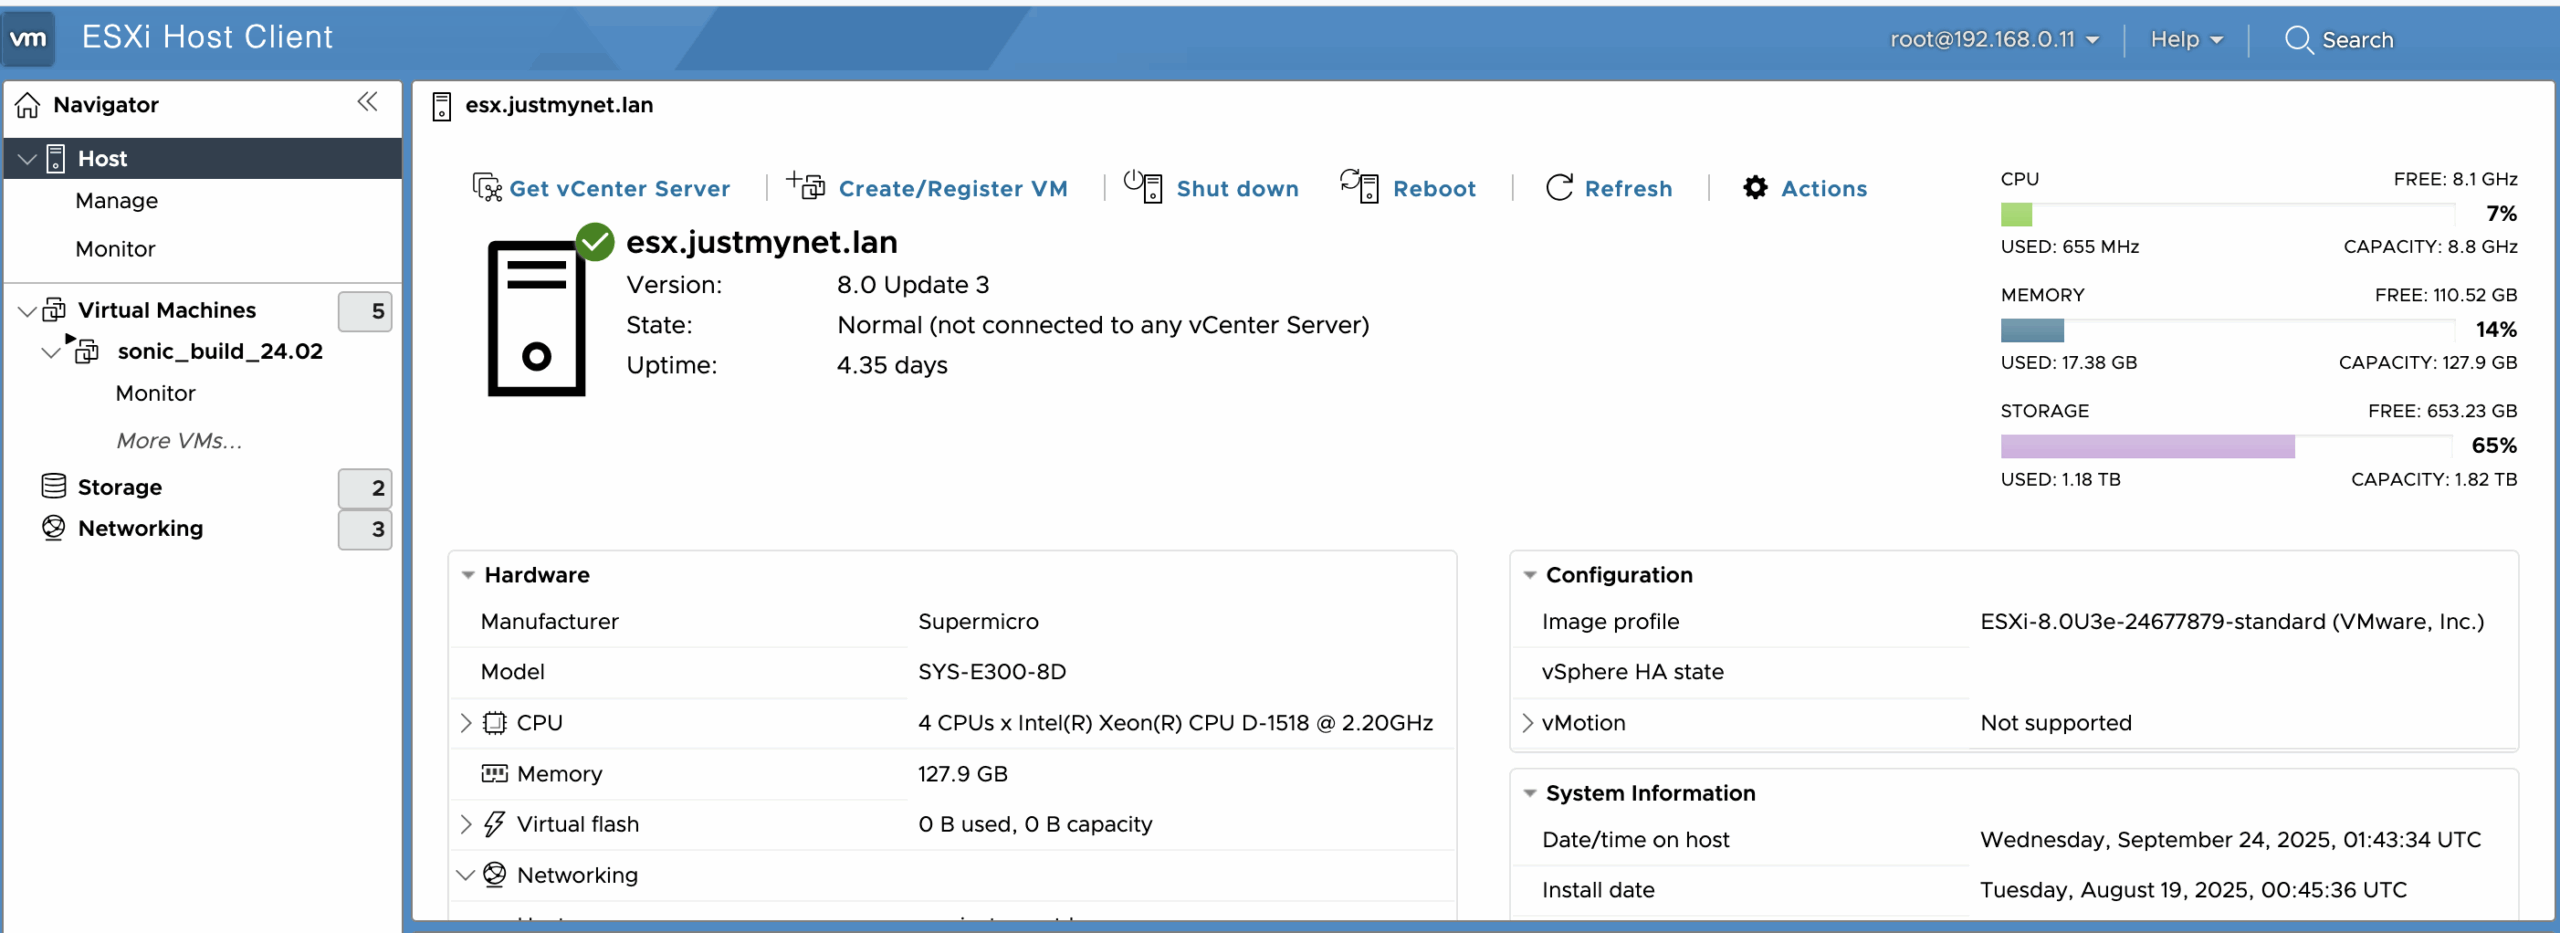
ESXi is free once again as of Aug 2025, but you need to have a broadcom account to download the ISO.
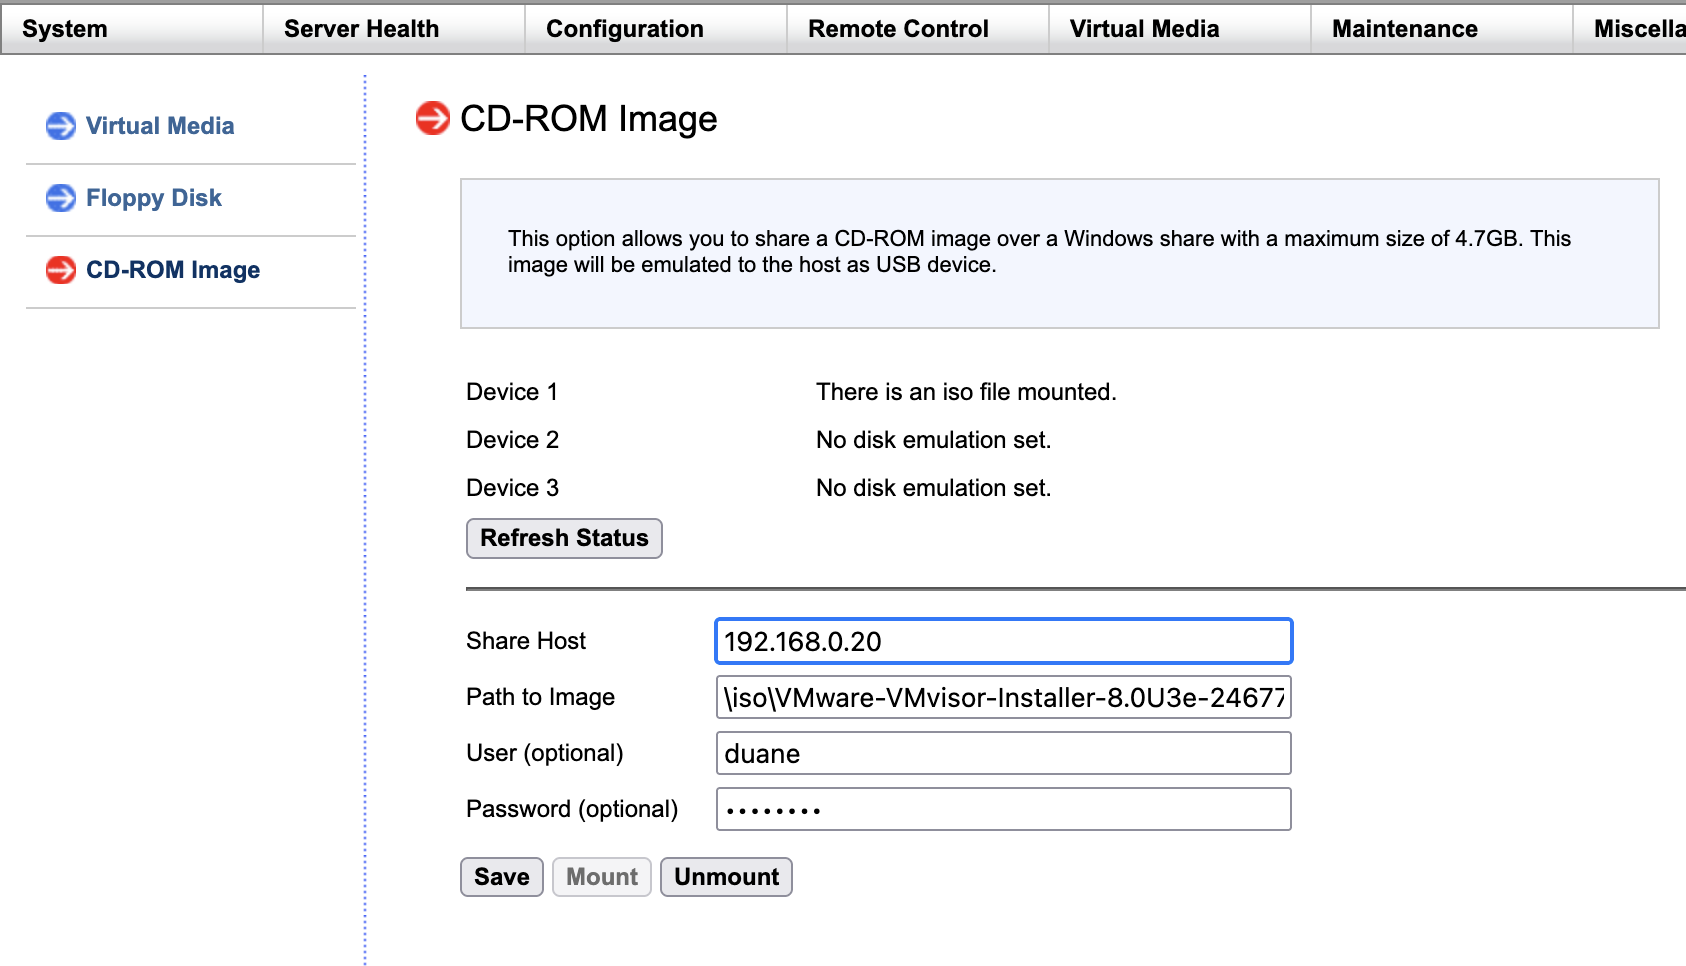
SuperMicro’s IPMI and Virtual CD for mounting ISO’s is a game changer. No more formatting thumb drives for ISO’s!
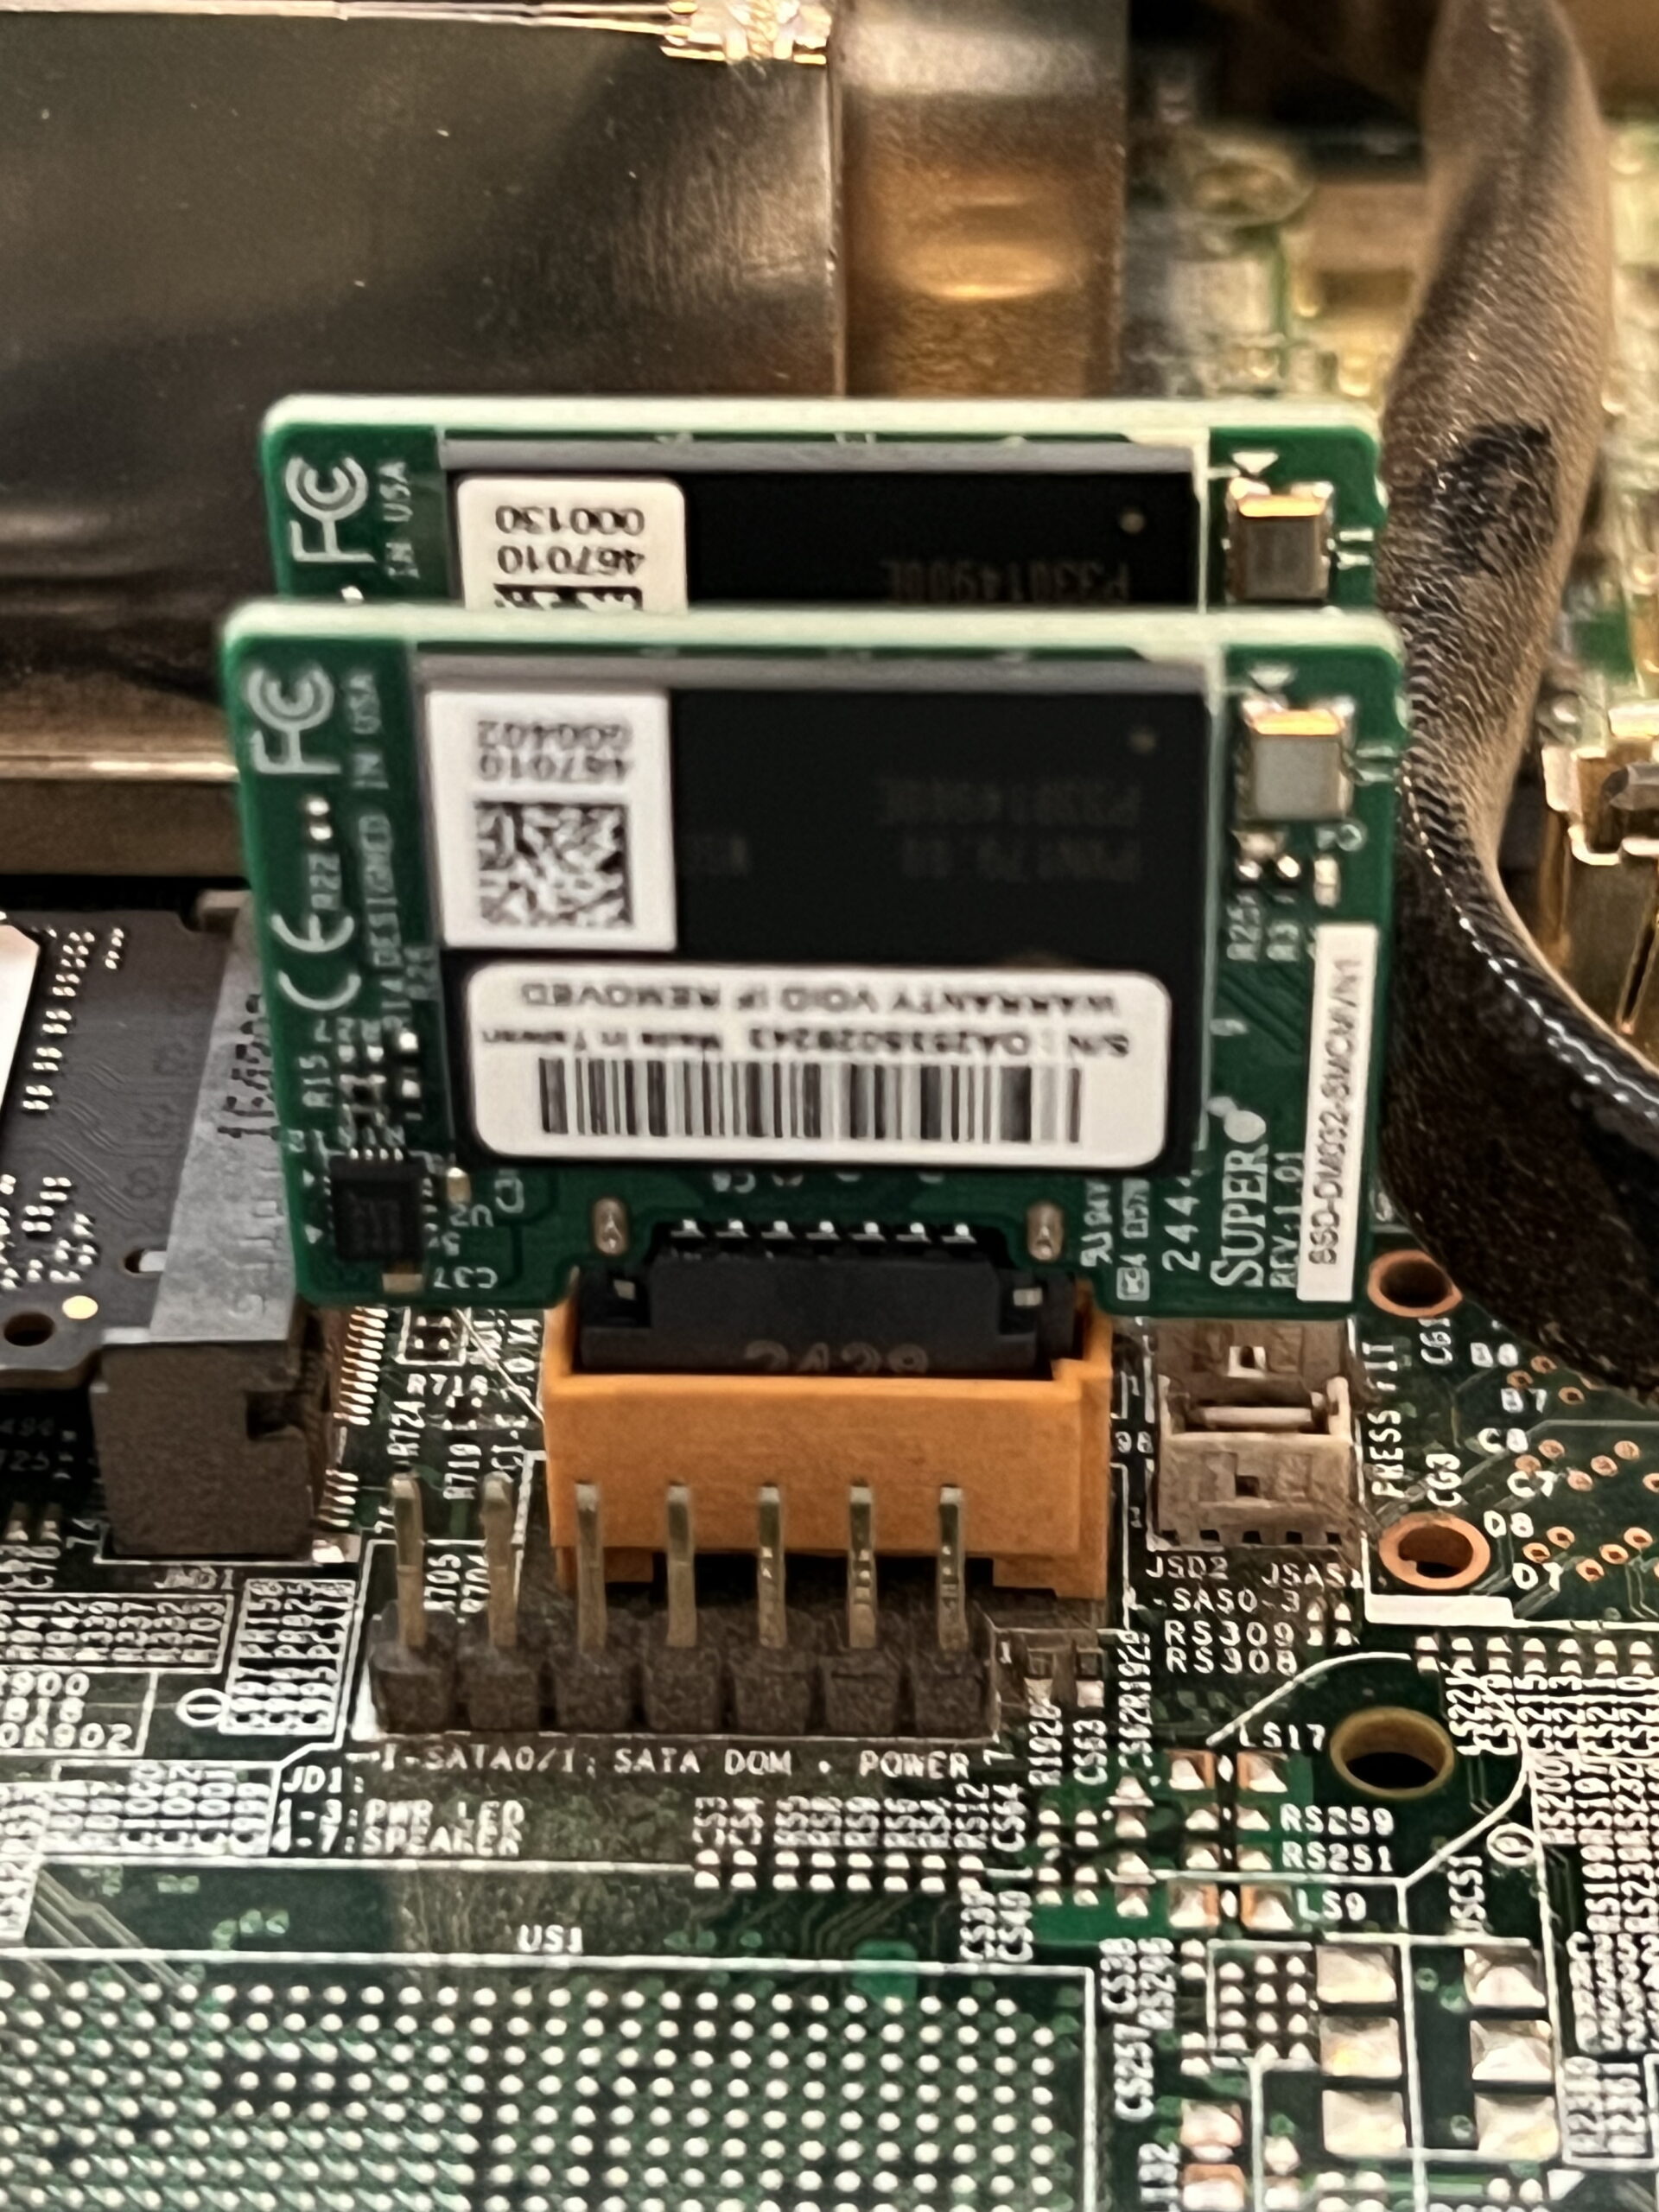
ESXi is running on these (2) Supermicro 32GB SATADOM’s configured in RAID 1. These drives get power directly from the board, so no need for power cables.
Those SATADOM’s are HUGE improvement over the thumbdrive that I had ESXi 7 running on.
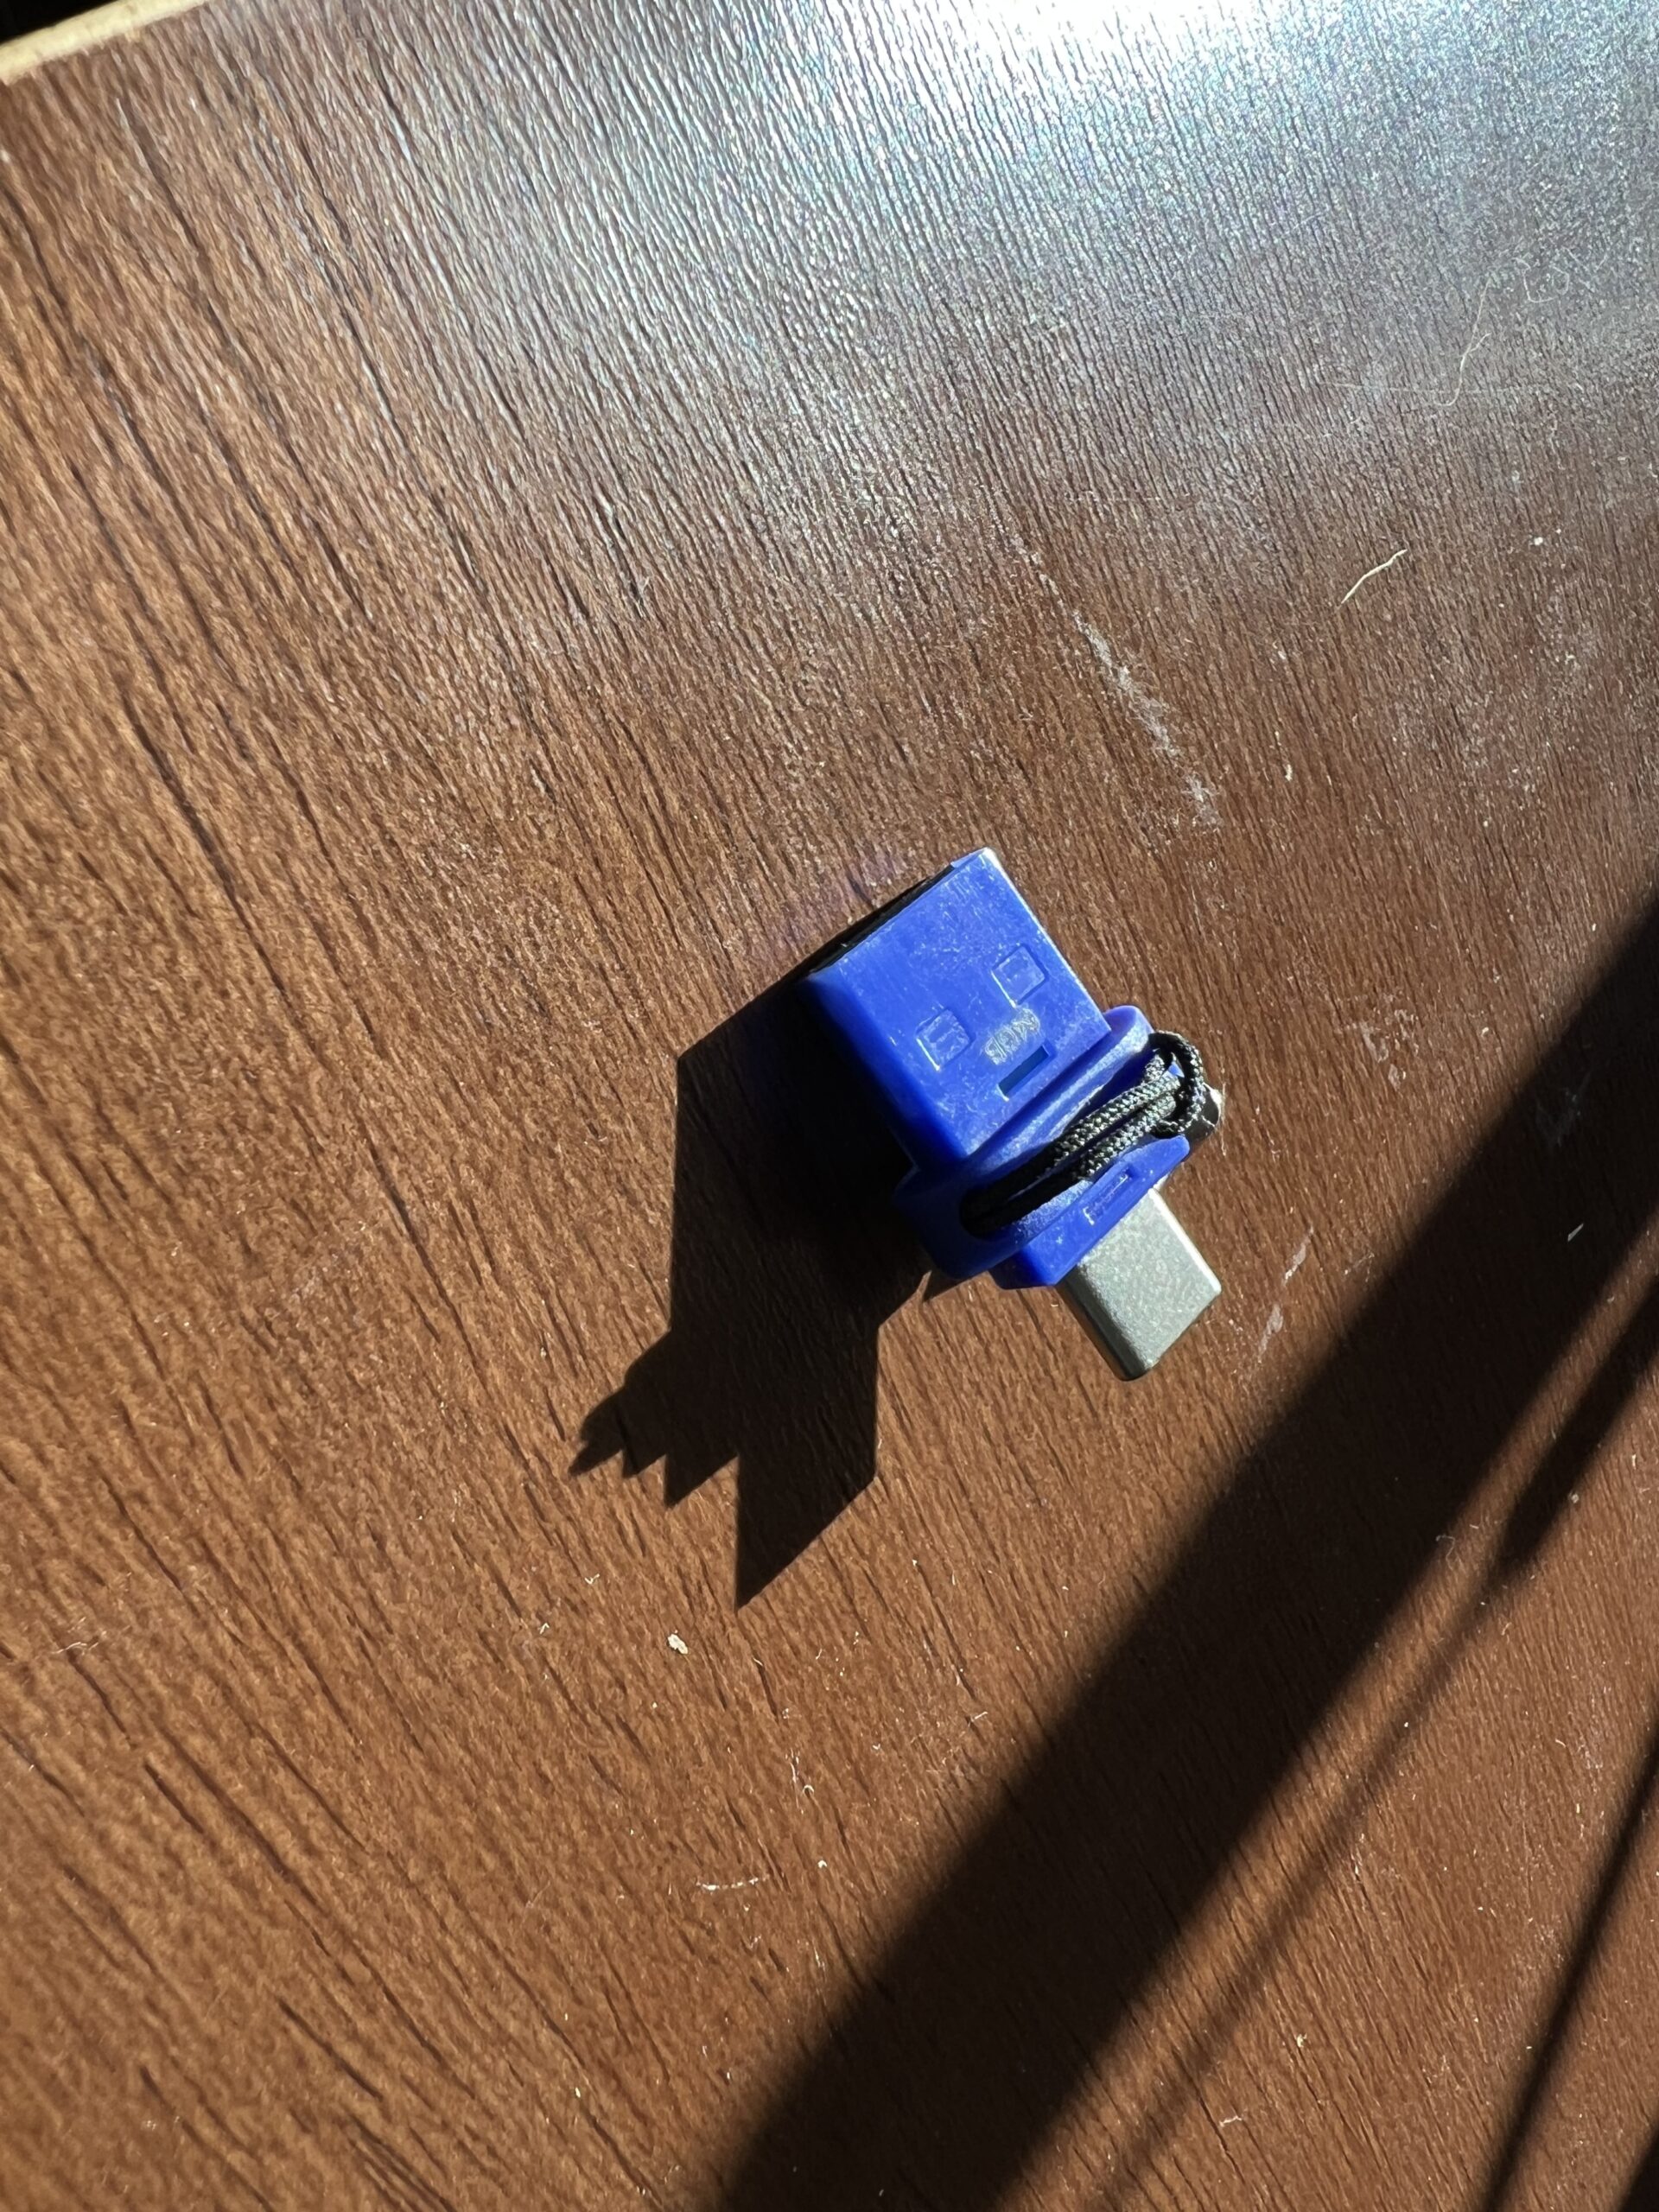
After 3 years of not using the server, I pulled this blue thingy out of my server not knowing what the hell it was, turns out it was the boot disk where ESXi was running…..DOh!
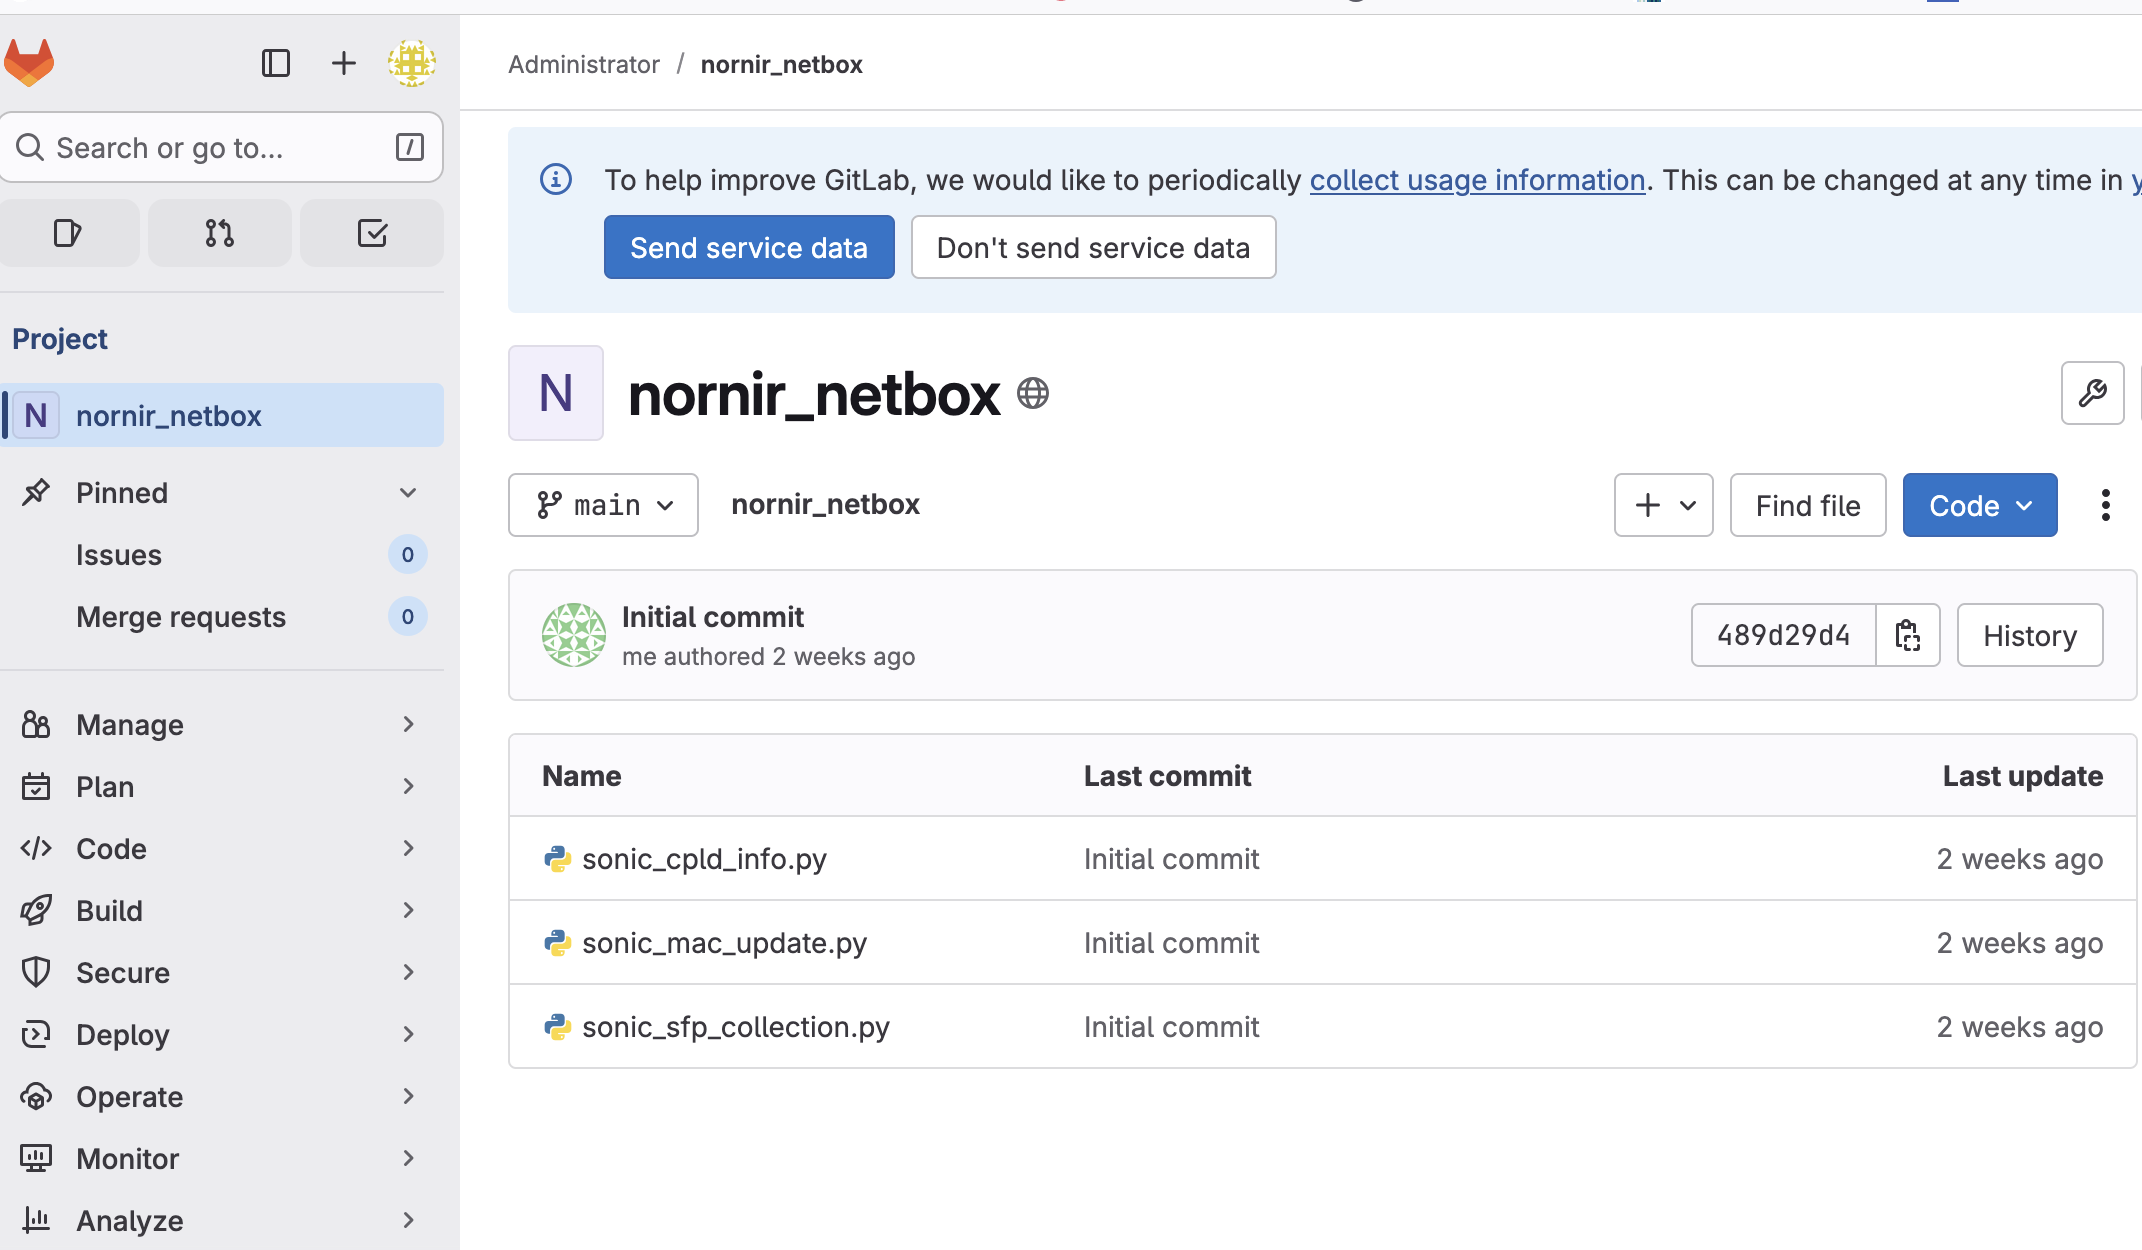
Gitlab running in a docker container took all of 10 minutes to get setup
“Such a long time to be gone and a short time to be there”
Potter lived with us from Feb 2016 to Aug 7th 2025, we got to spend 9.5 wonderful years with him, he lived to be just over 10. I’m absolutely heartbroken at losing man’s best friend.
Posted inUncategorized|Comments Off on Rest in Peace Potter
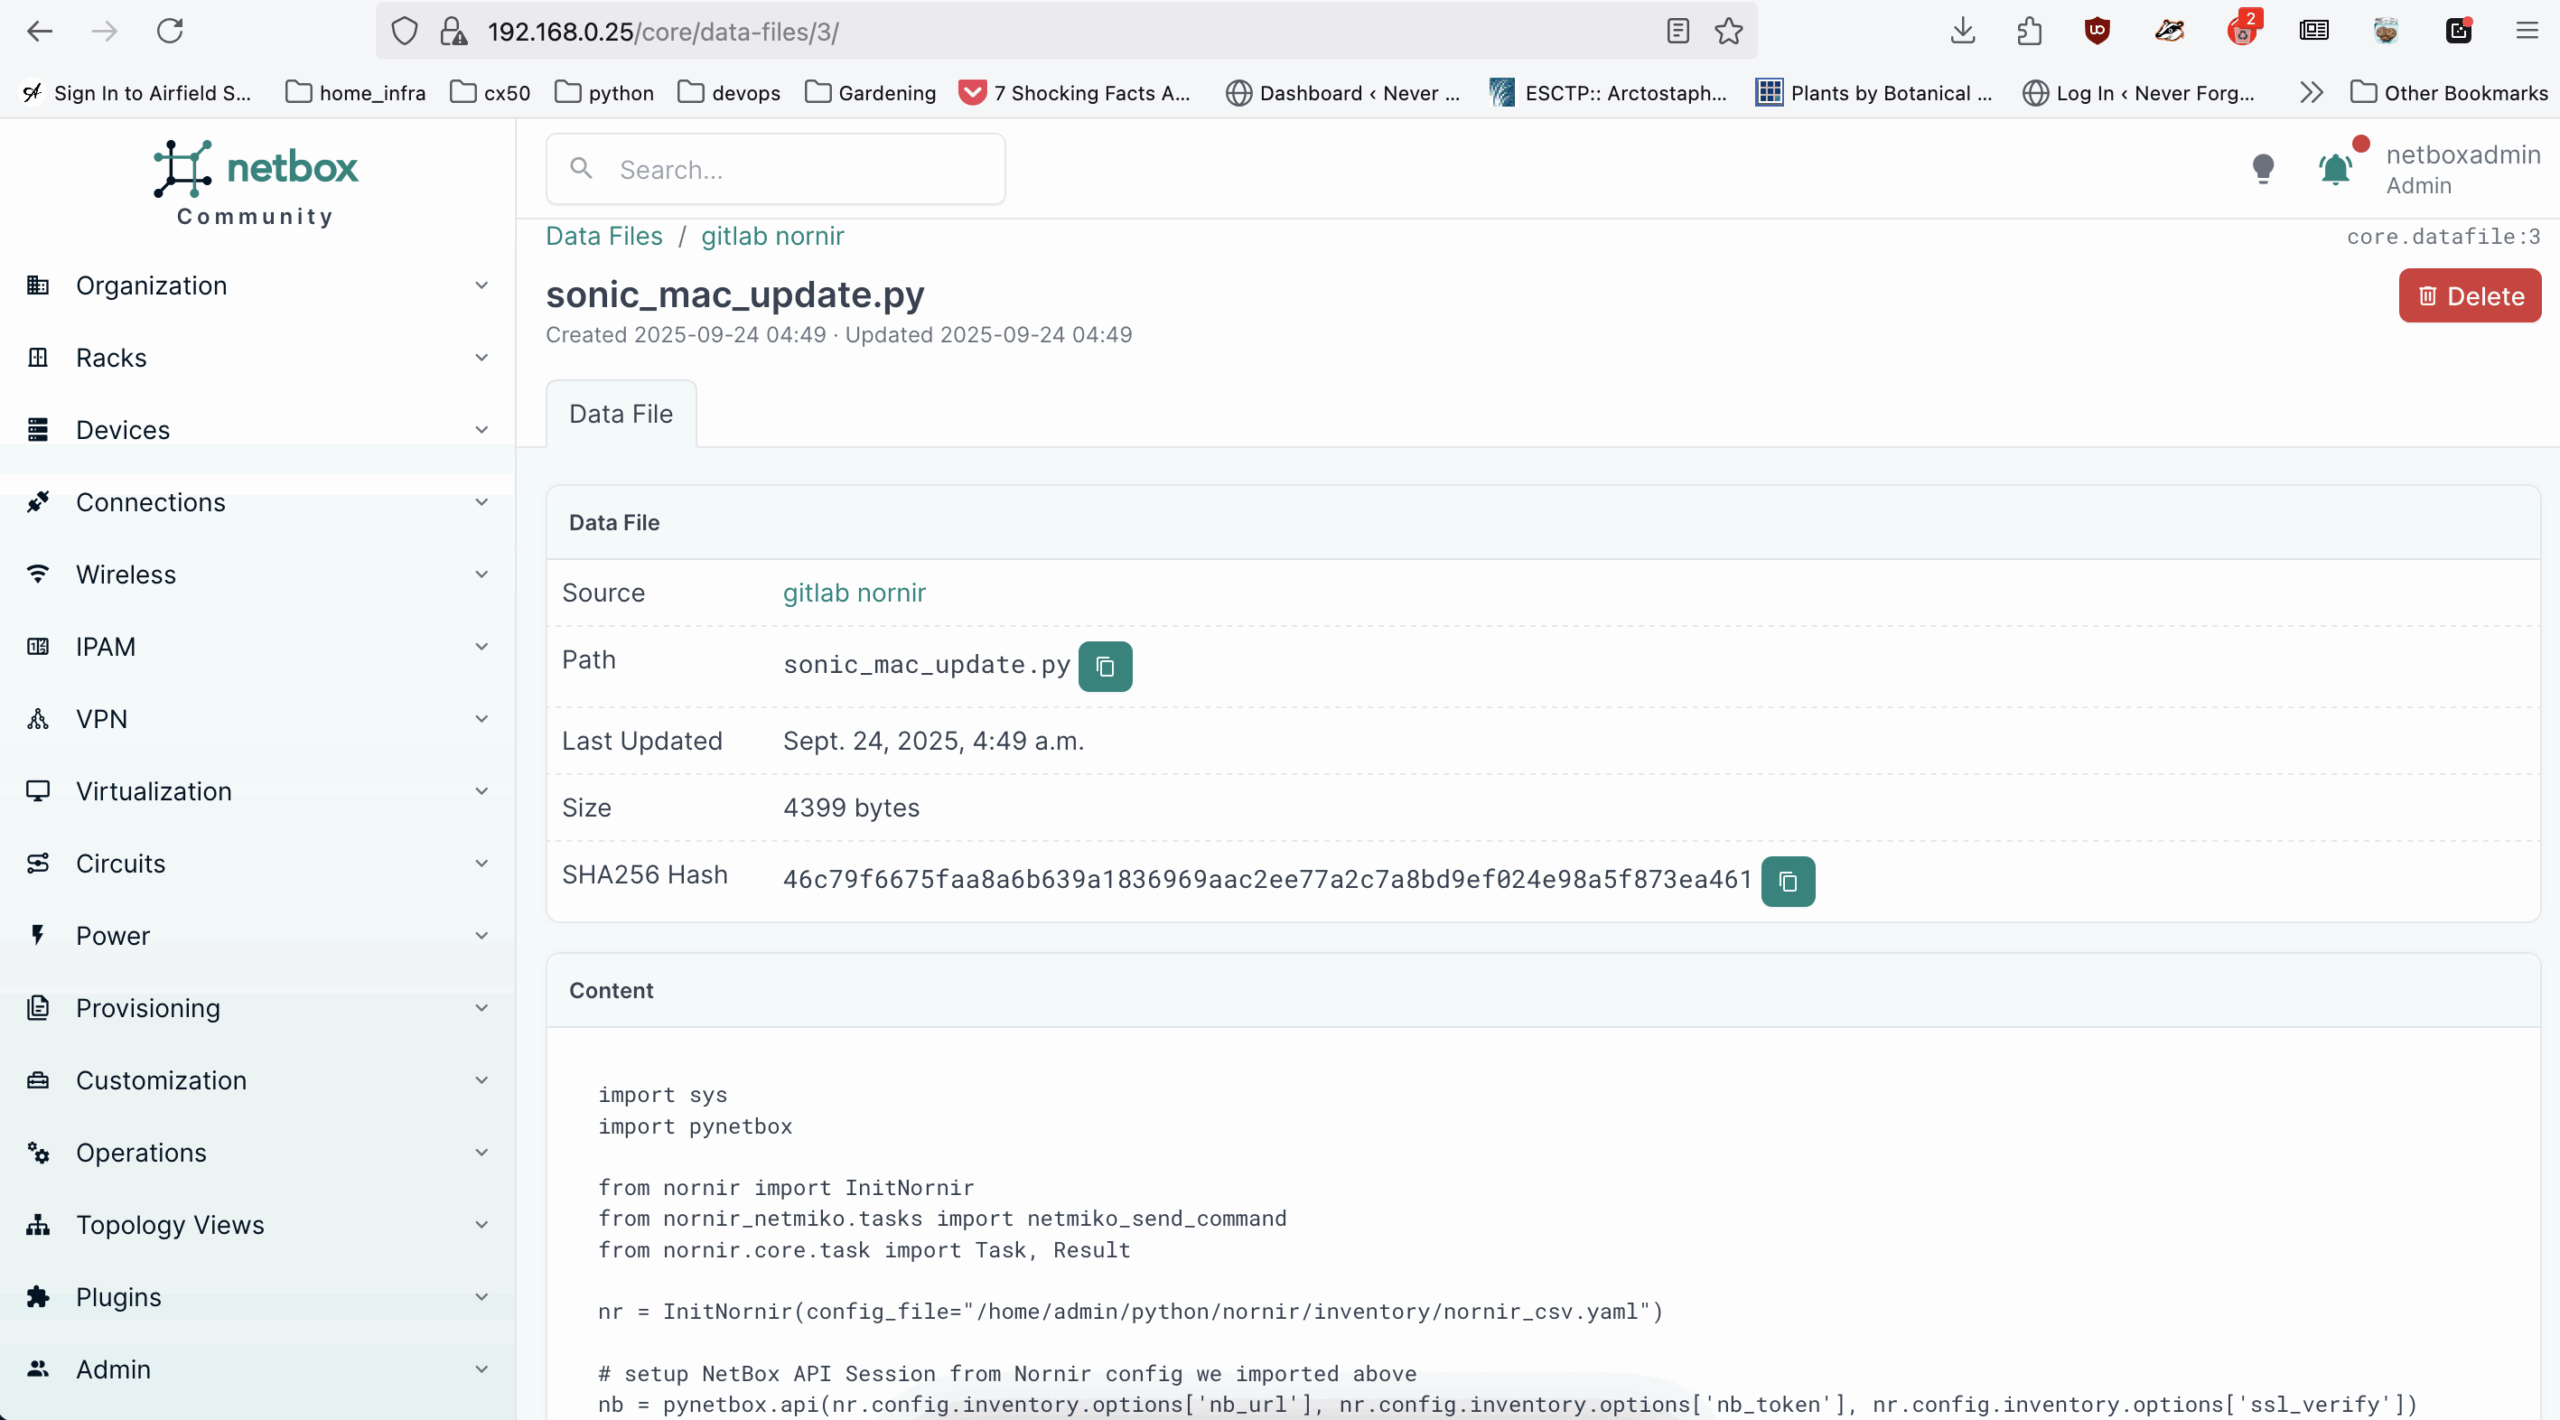
In my last blog I wrote about building ZTP configurations for SONiC switches using the data in NetBox. This post will explain how those configurations are served to these devices without the need for any human intervention.
The key elements are:
DHCP Server (to receive requests from new devices and point to software/config locations)
KEA class definitions (unique for each vendor and platform)
HTTP Server (send firmware)
GIT Server (send configuration files)
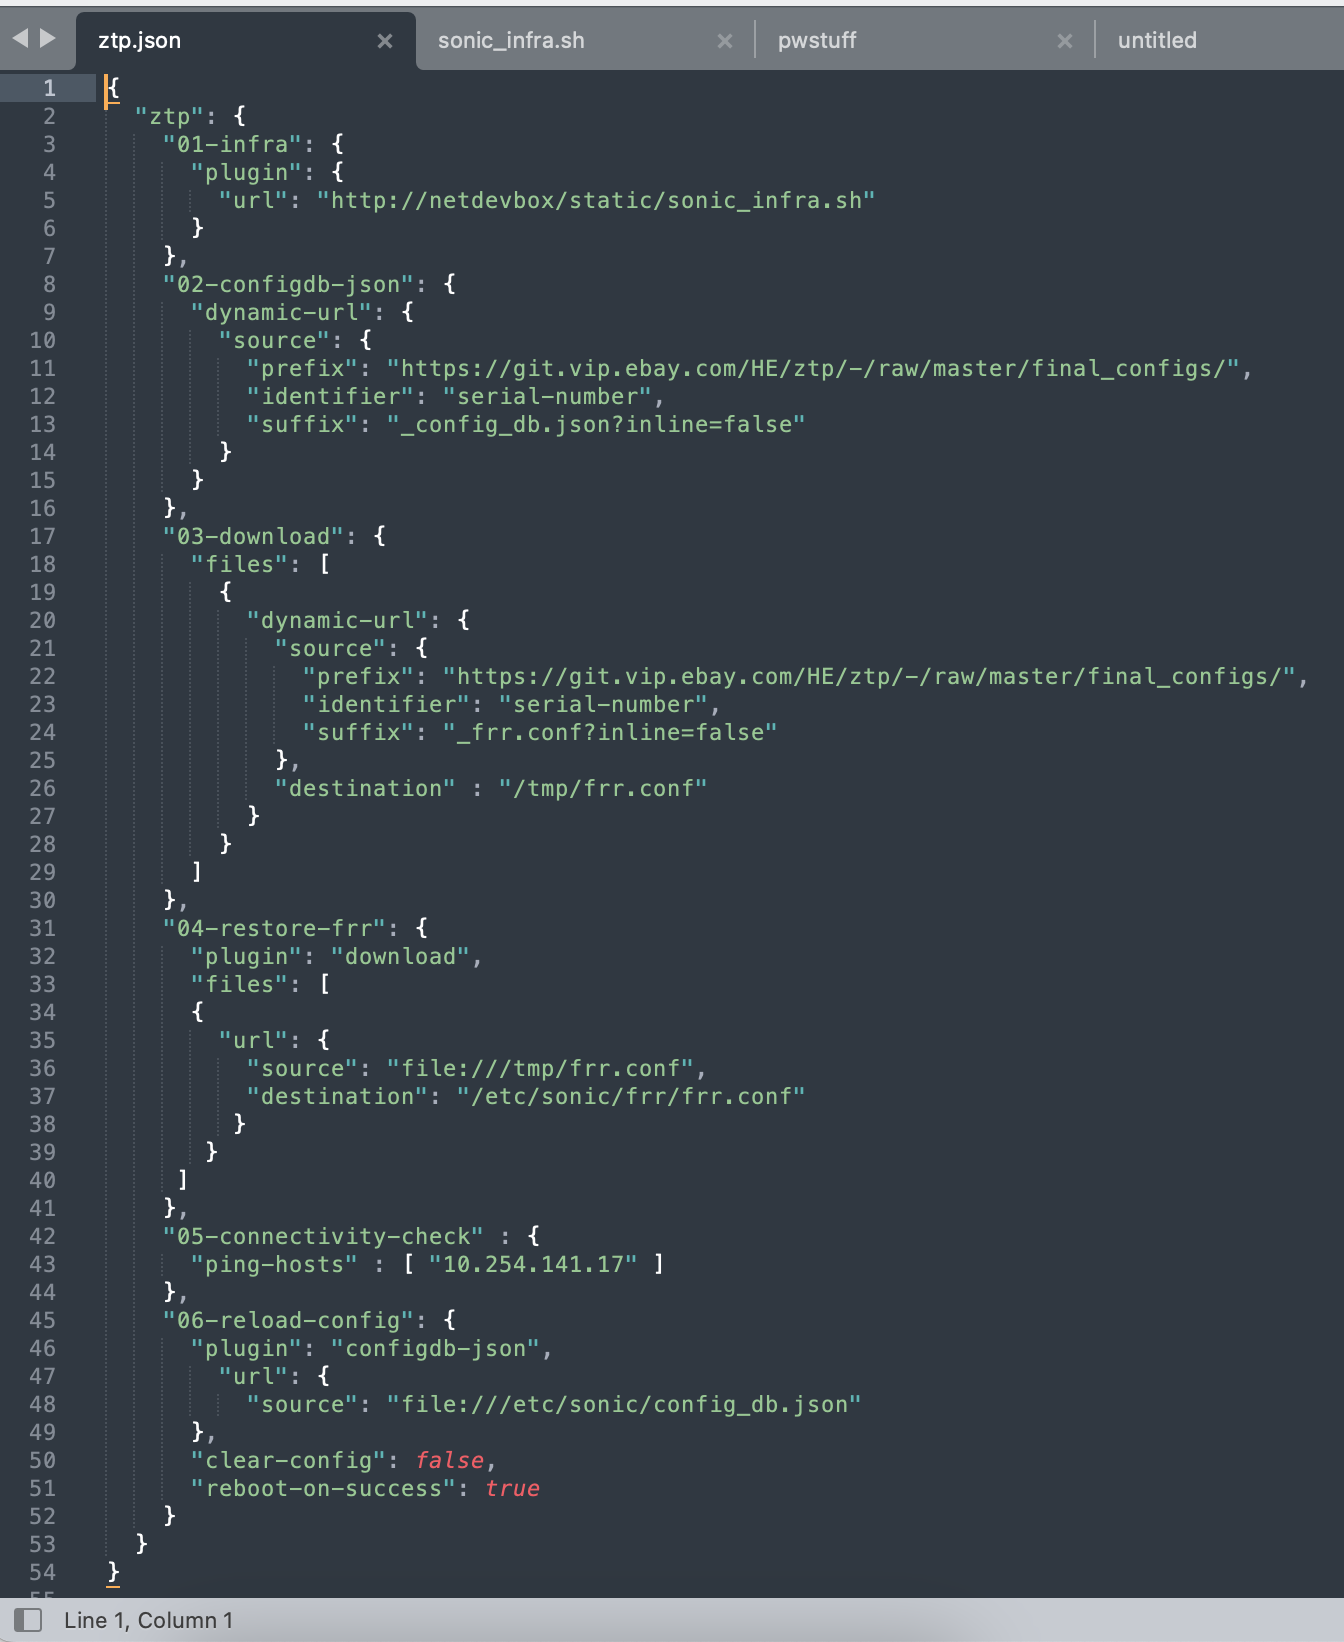
ztp.json file that defines the final steps needed to fully configure a SONiC switch
The ZTP process is as follows:
New switch is plugged into the network and DHCP request is sent requesting software (ONIE)
DHCP server determines hardware vendor/type and sends the correct software to switch
Switch loaded with new software, reboots & requests configuration file from DHCP server
DHCP server responds with the correct configuration file (based on serial number)
Switch applies the configuration file and reboots before completing ZTP
Switch looks at ZTP configuration file for further configuration instructions and or QA
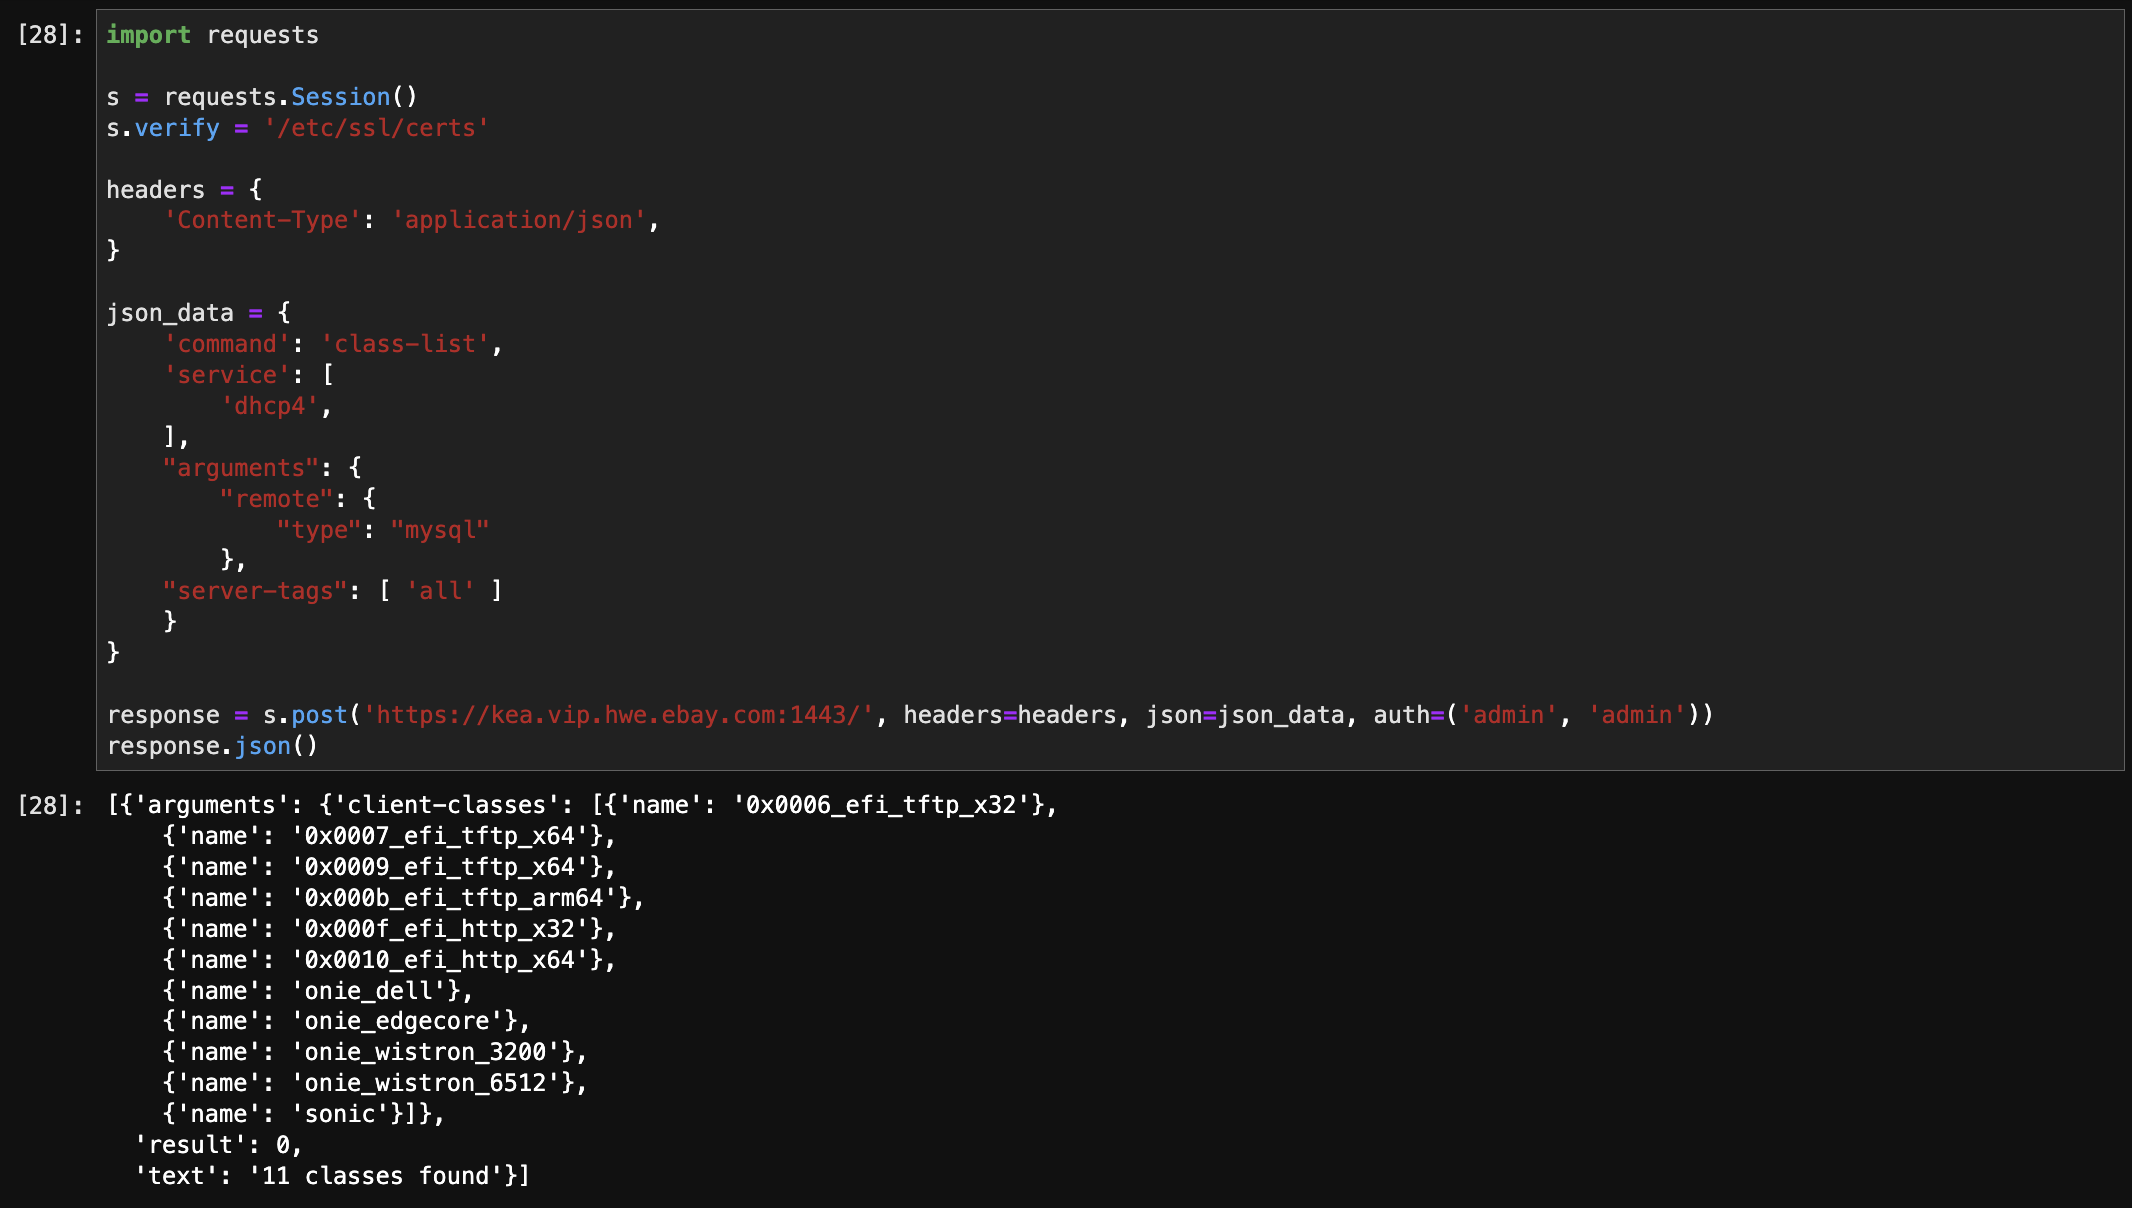
KEA example of the various classes that define the different vendors and platforms. This is just a list of all the classes currently defined in KEA.
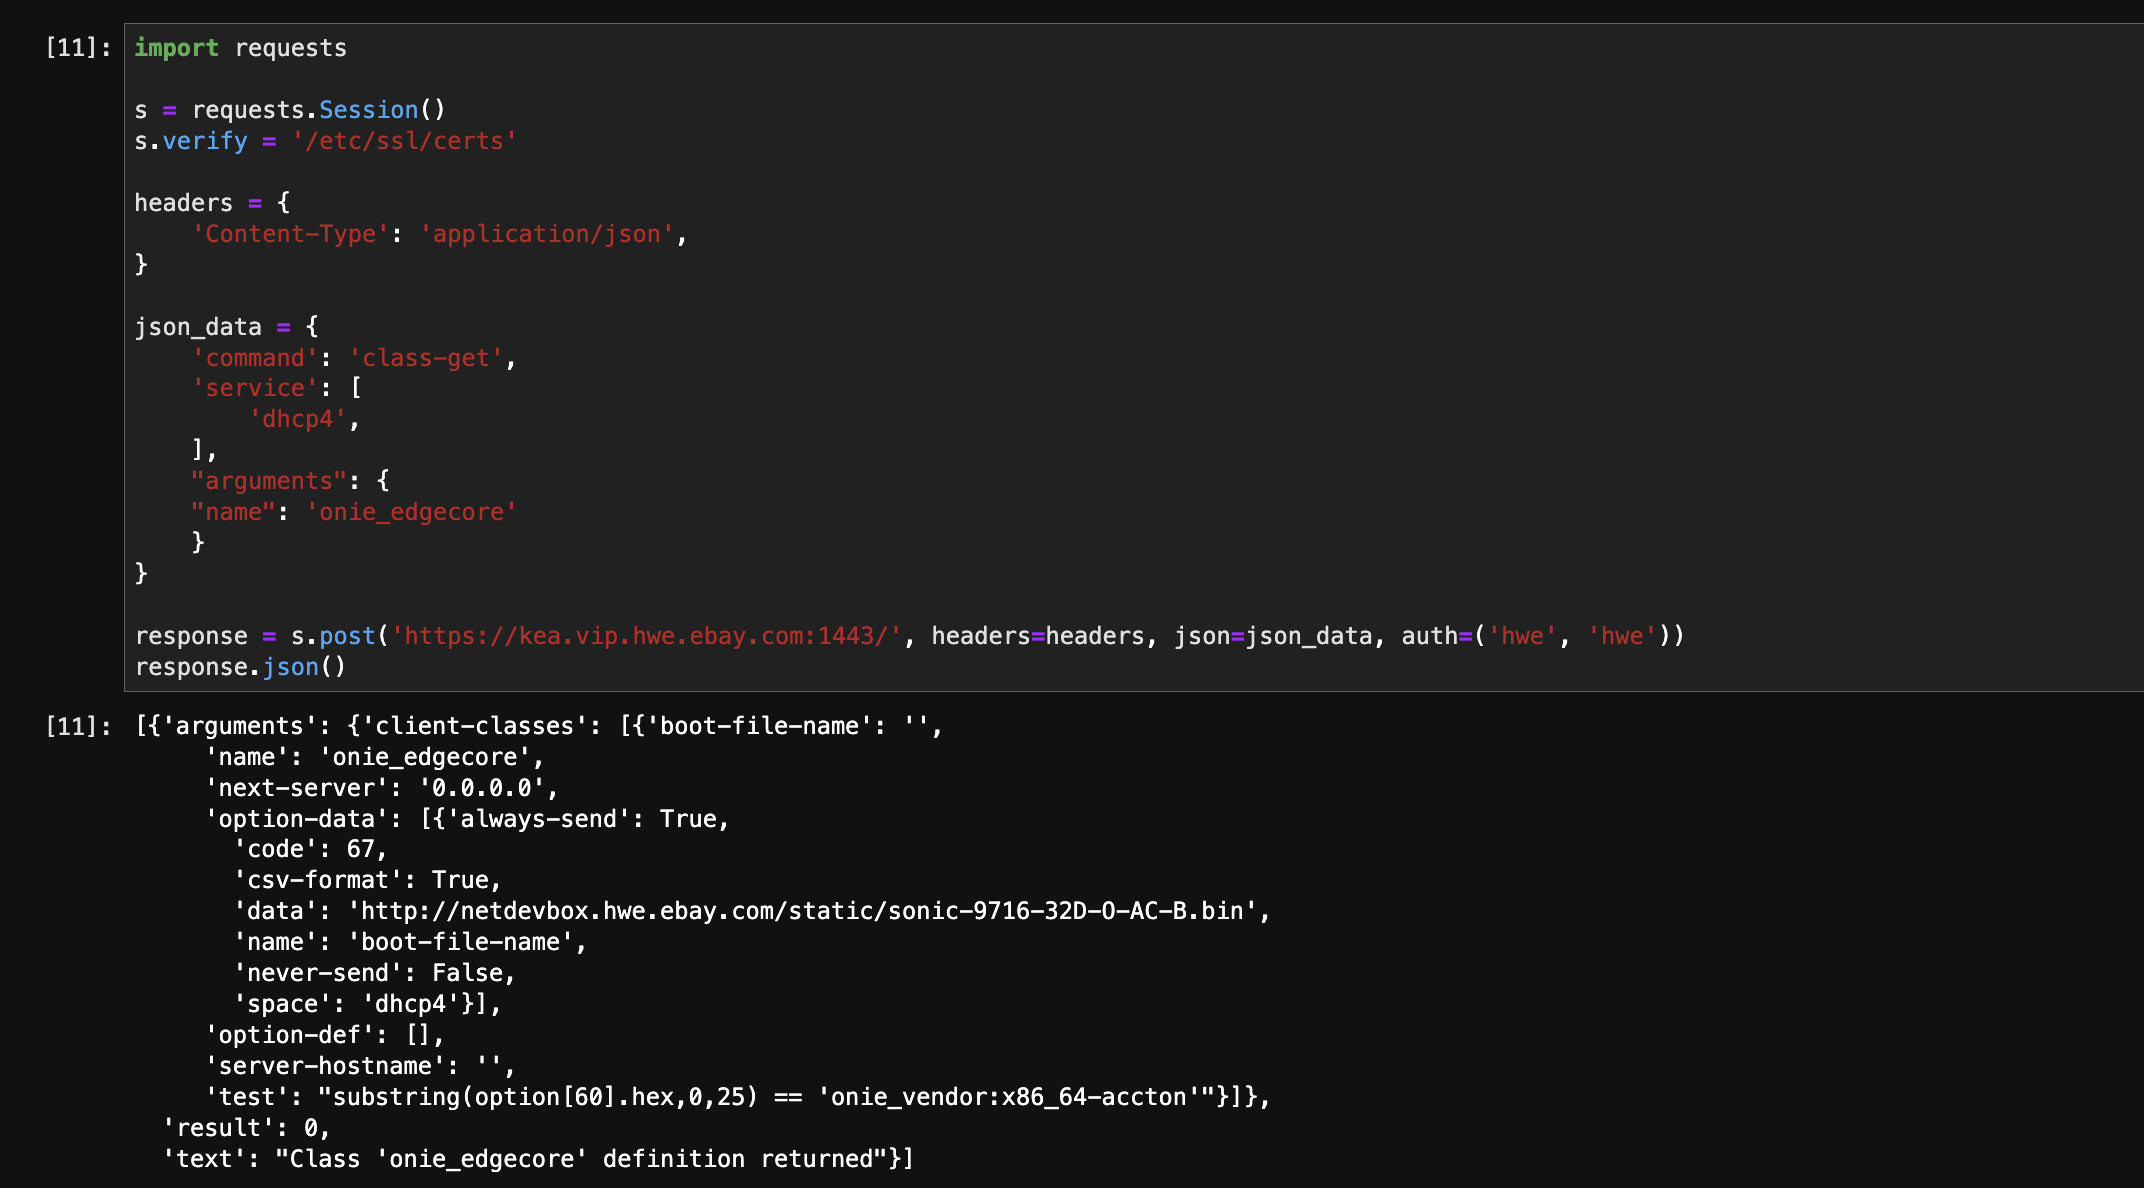
Drilling down into the class for Edgecore we can see the location of the software file and also the vendor and platform ID which determines the actual hardware type.
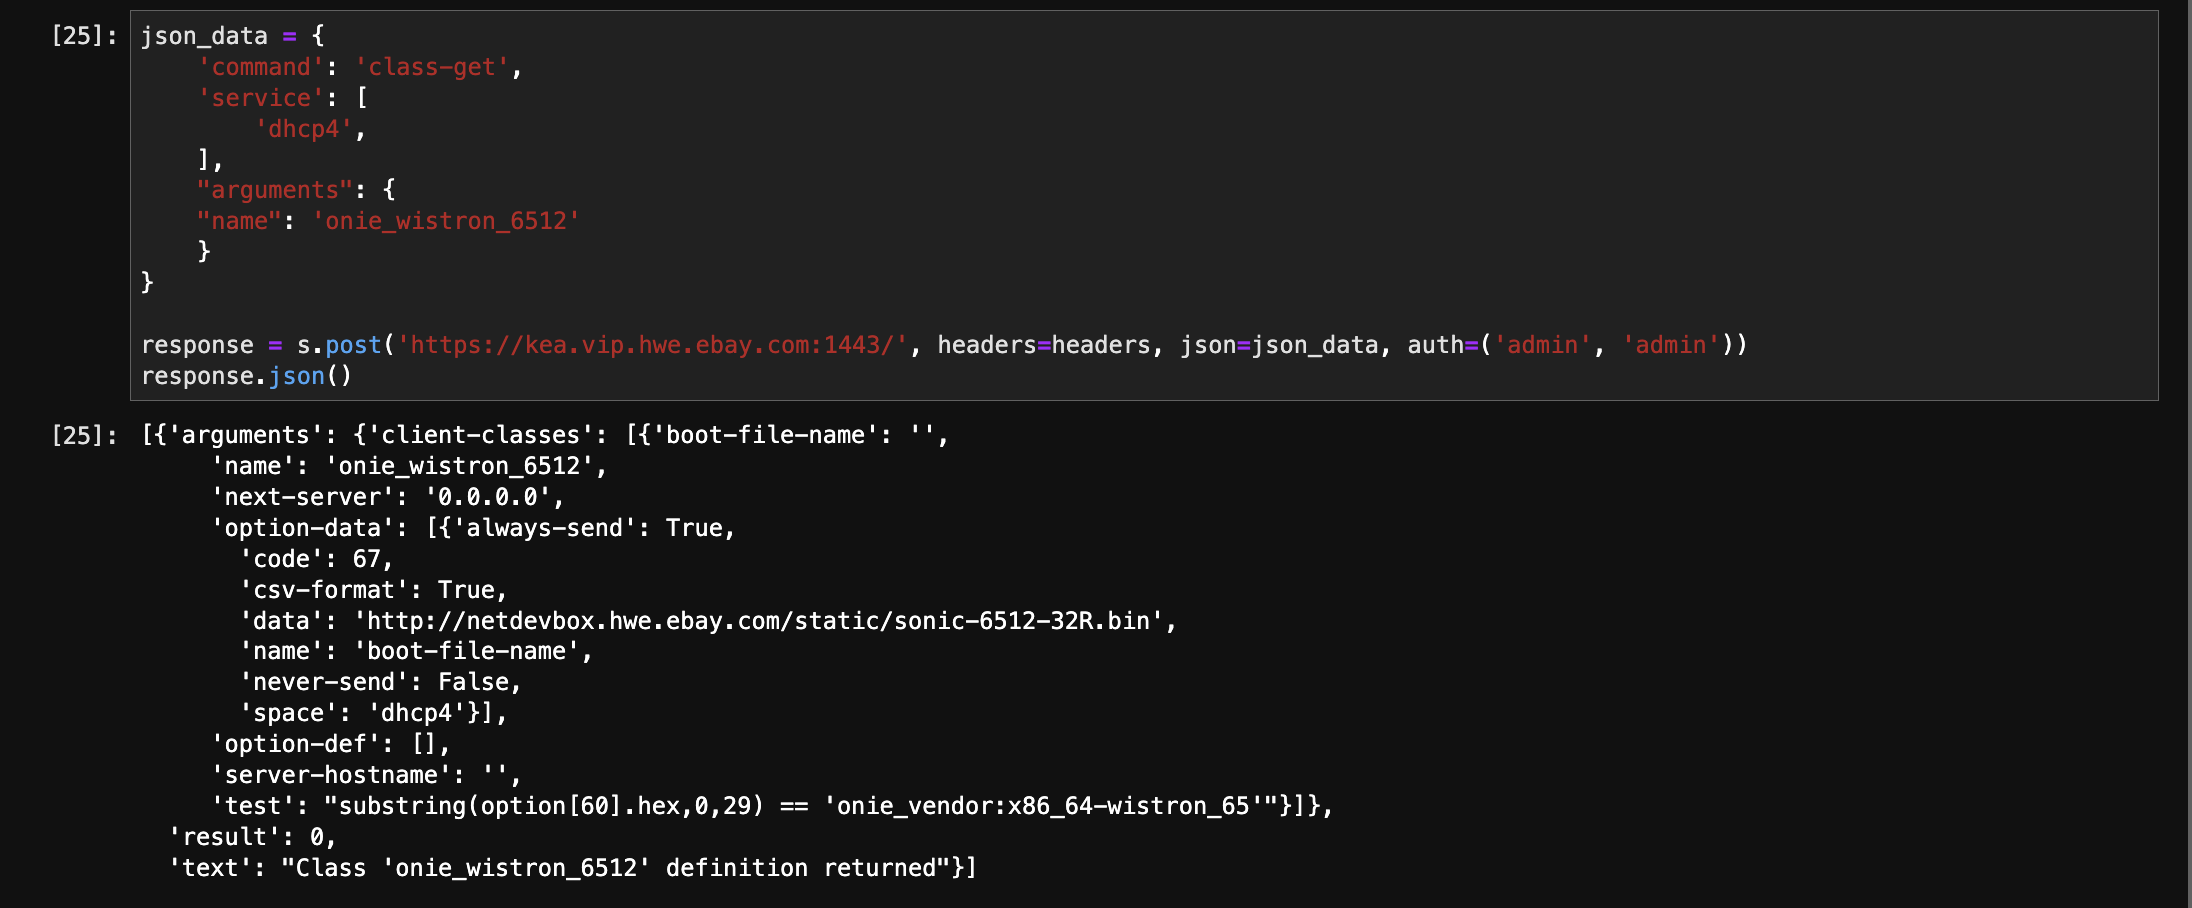
Class definition for Wistron. The unique HEX value is how the DHCP server can identify the correct hardware.
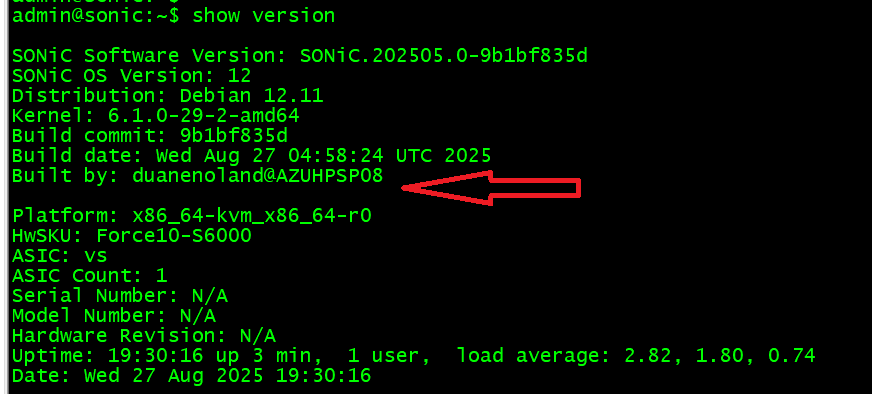
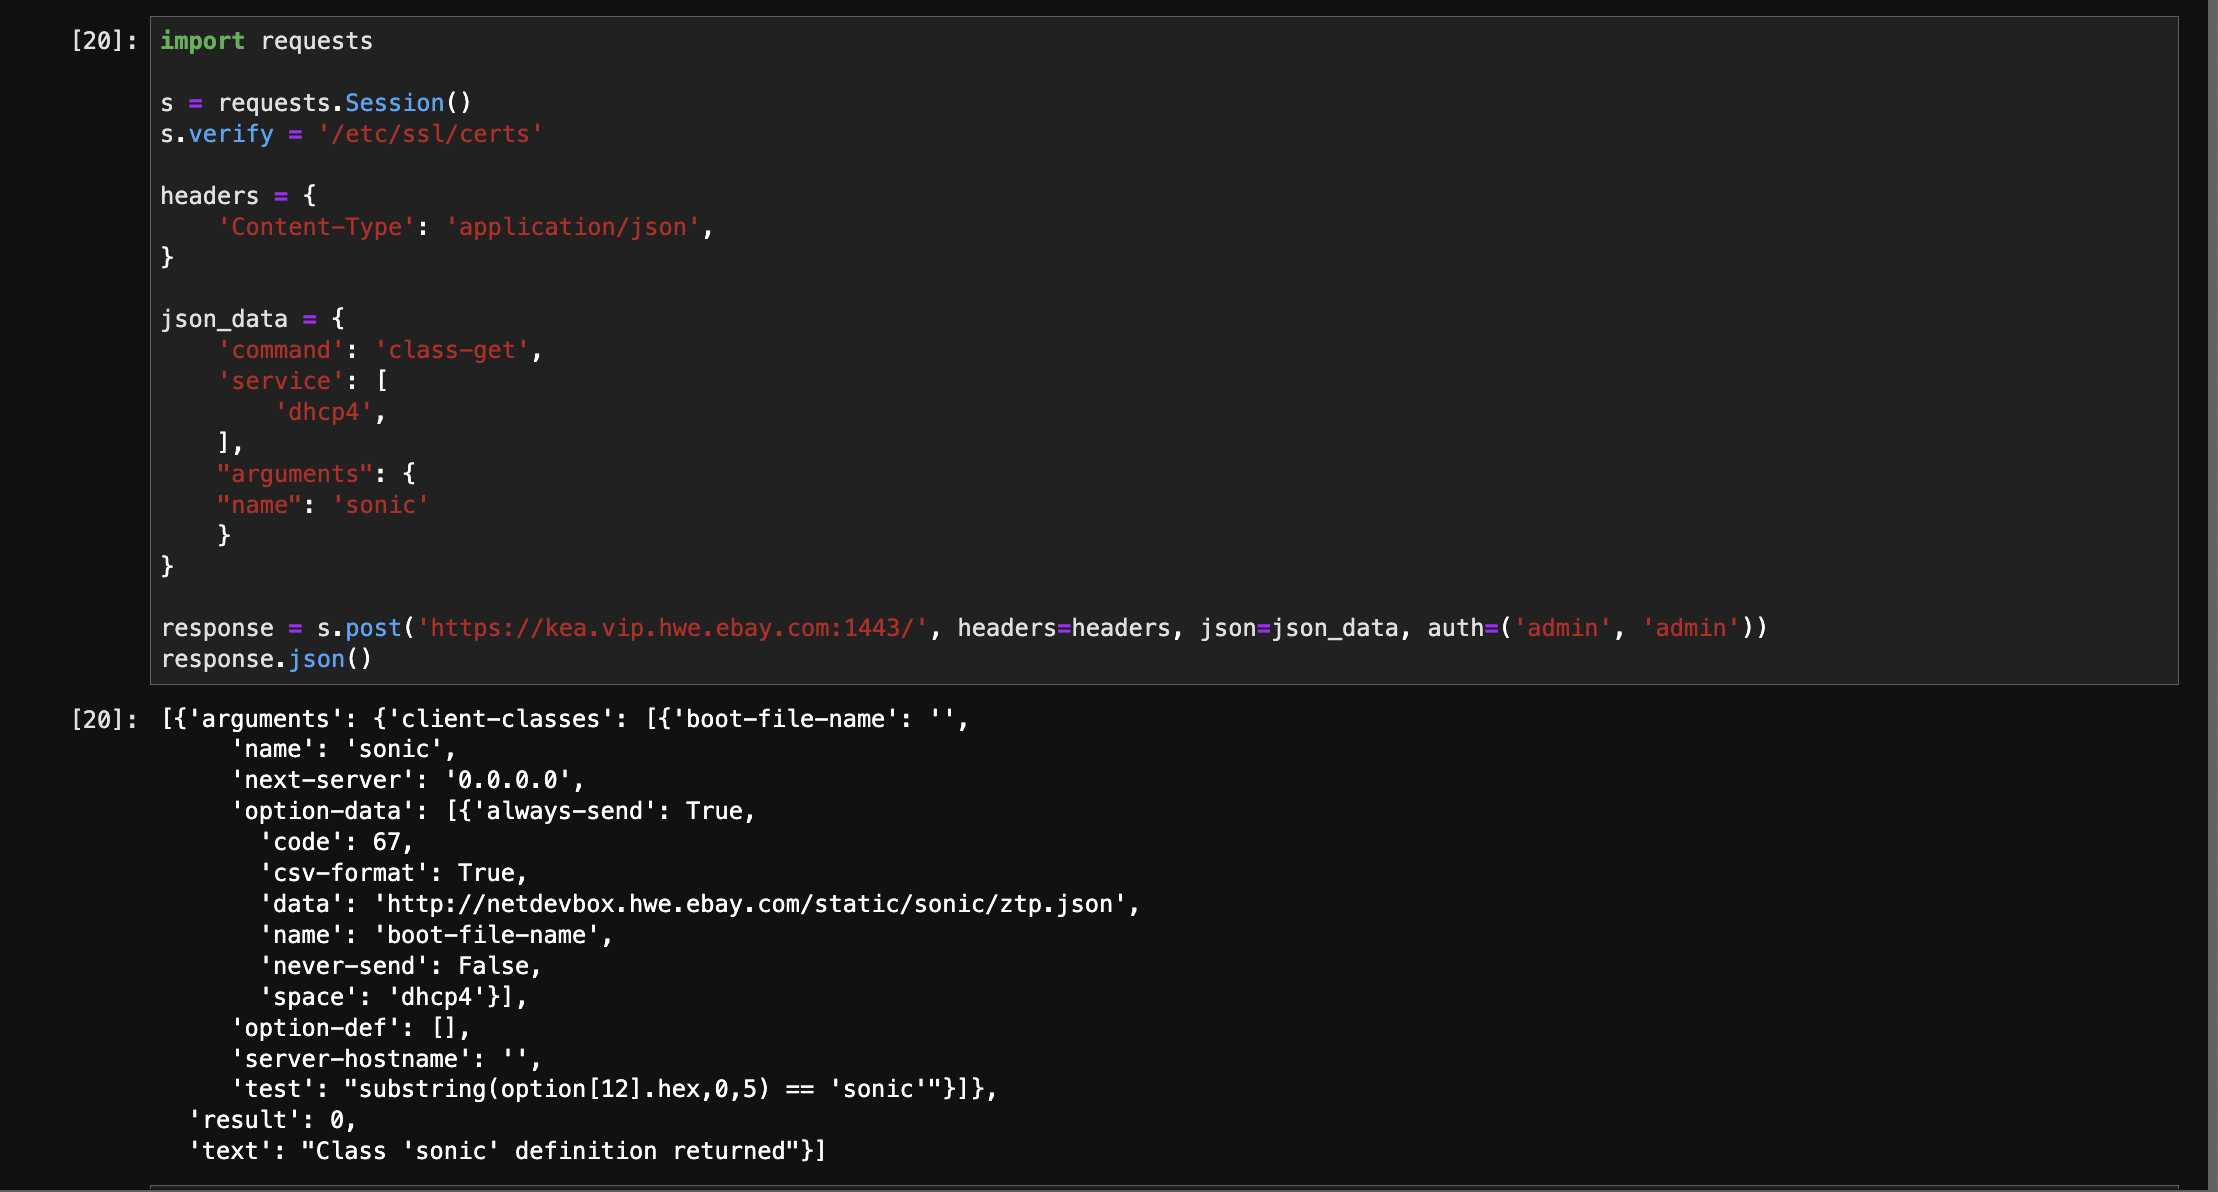
Once the switch has the correct software applied and has rebooted, then the ZTP process can begin. All switches default to the name “sonic” after having the software upgraded so this is the key piece of info the DHCP server is looking for in this step of the process.
This is the ztp.json file that contains the instructions to configure the switch. The configs are stored on git and the serial number is the unique identifier to ensure the correct config ends up on the proper device. In addition to the main configuration file, there is also the routing portion of the config (FRR). Finally there is a basic connectivity check via ping.
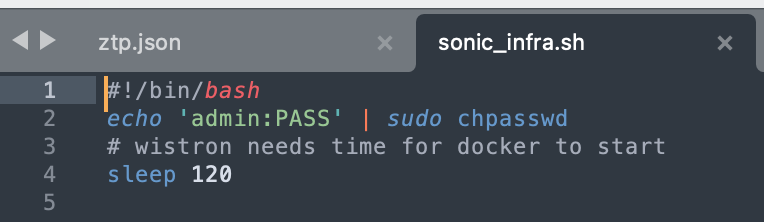
You can add any instructions you might need for your infra. The first step in the ZTP process was a password change and setting a sleep timer.
That’s all there is to Zero Touch Provisioning a SONiC switch using KEA DHCP server. I will write another blog post on KEA in the near future since it’s very helpful when managing infrastructure.
Posted inUncategorized|Comments Off on Zero Touch Provisioning with DHCP (KEA)
When I was hired at eBay one of the first tasks I was given was to find an easy way to swap switches within a rack to help facilitate testing of various SONiC platforms. I knew this as ZTP from my years as a network engineer but I was not sure how it was all going to work considering the Hardware Engineering team had no automation at the time with regards to infrastructure. They were still working off spreadsheets and wiki pages, all manually updated.
The first step to realize the goal of ZTP required a “Source of Truth” for all of the assets in the hardware lab. Luckily I had just watched a NANOG video that talked about the open source tool called NetBox. I setup NetBox in my first week and started the process of adding in all of the lab assets. At first we entered a lot of stuff by hand but quickly all of the info was collected via python automation using Nornir and Netmiko. Nornir is a python automation framework with plugins for NetBox that greatly simplifies the process of connecting to various devices within the infrastructure.
Zero Touch Provisioning is simply automating the configuration and deployment of an end device like a network switch. There are several steps in the process but one critical piece is building the configurations. If you have several of the same devices in your infrastructure your configs will have a static portion that is the same across all devices and a dynamic portion that is unique to each device. I will be showing off how I built the dynamic portions of the configuration using Infrastructure as Code concepts achieved with open sources tools like NetBox and the Jinja2 template language.
Dynamic “interface” section of the SONiC switch configuration using Jinja2
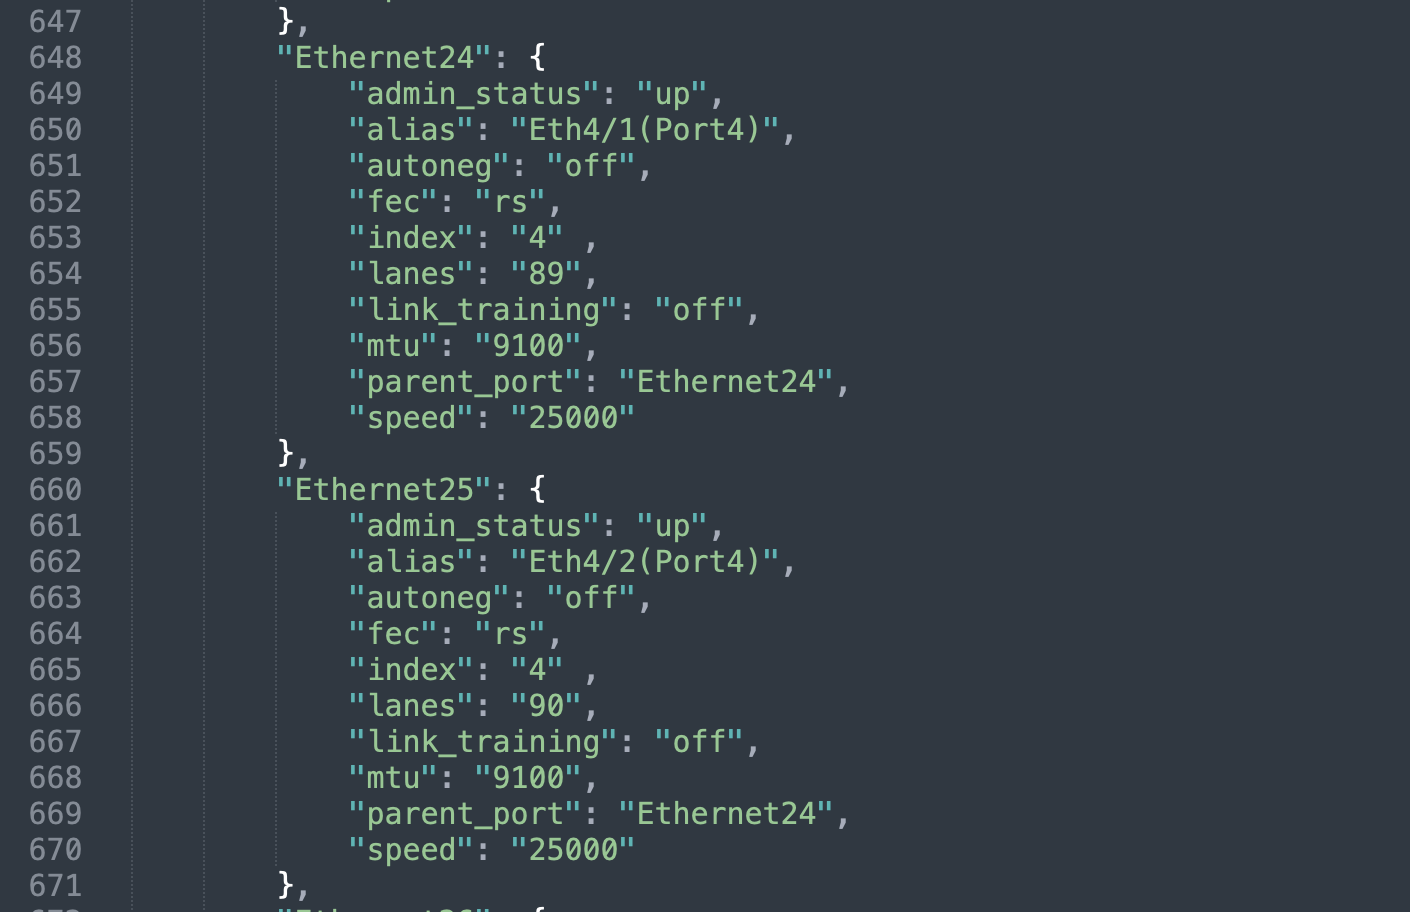
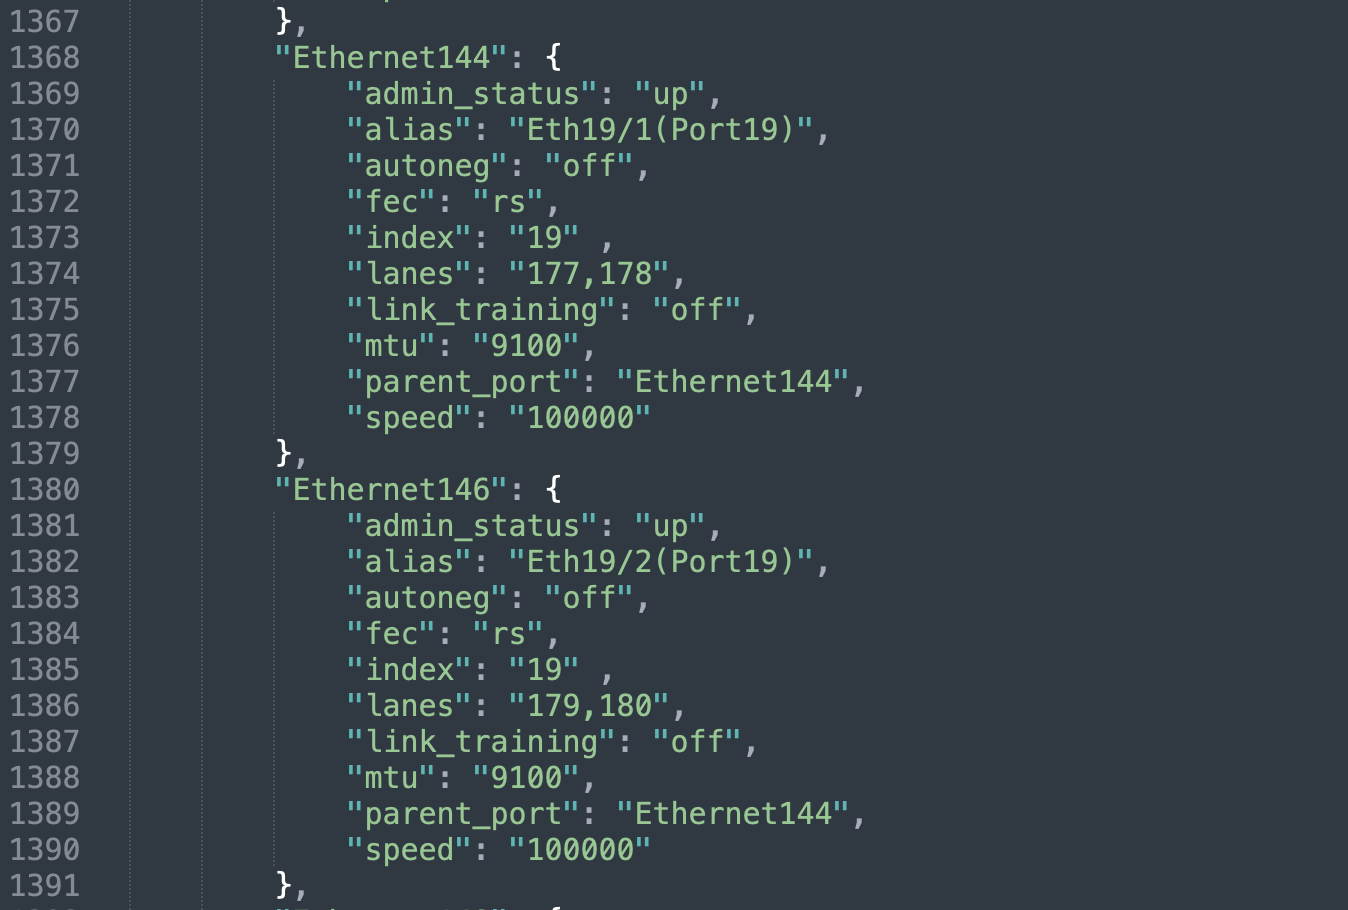
Final rendered dynamic interface configuration for the SONiC switch
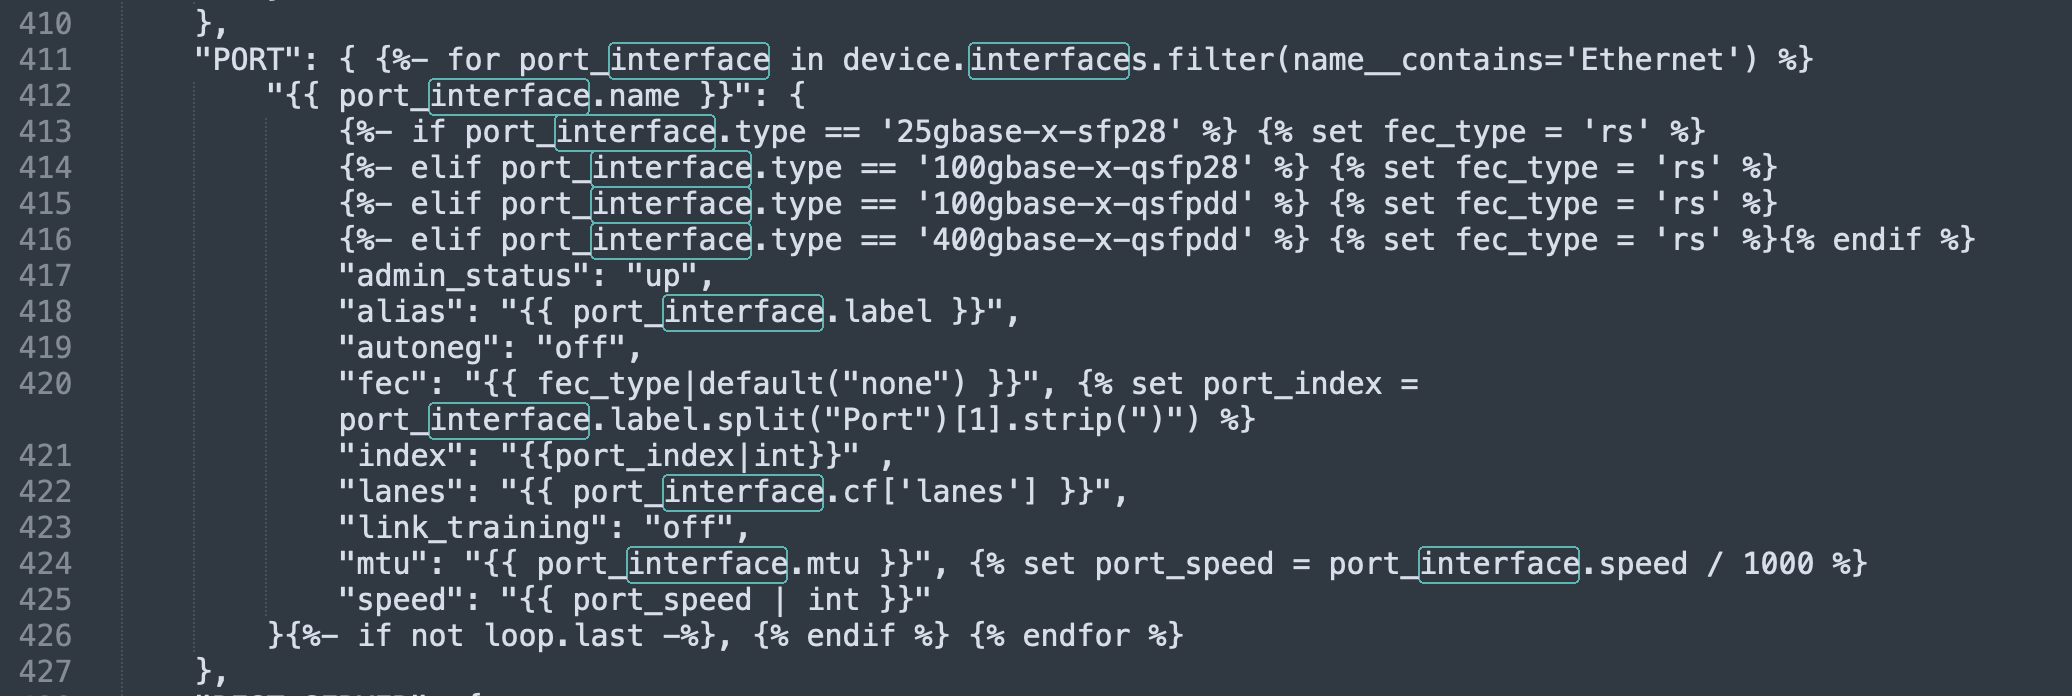
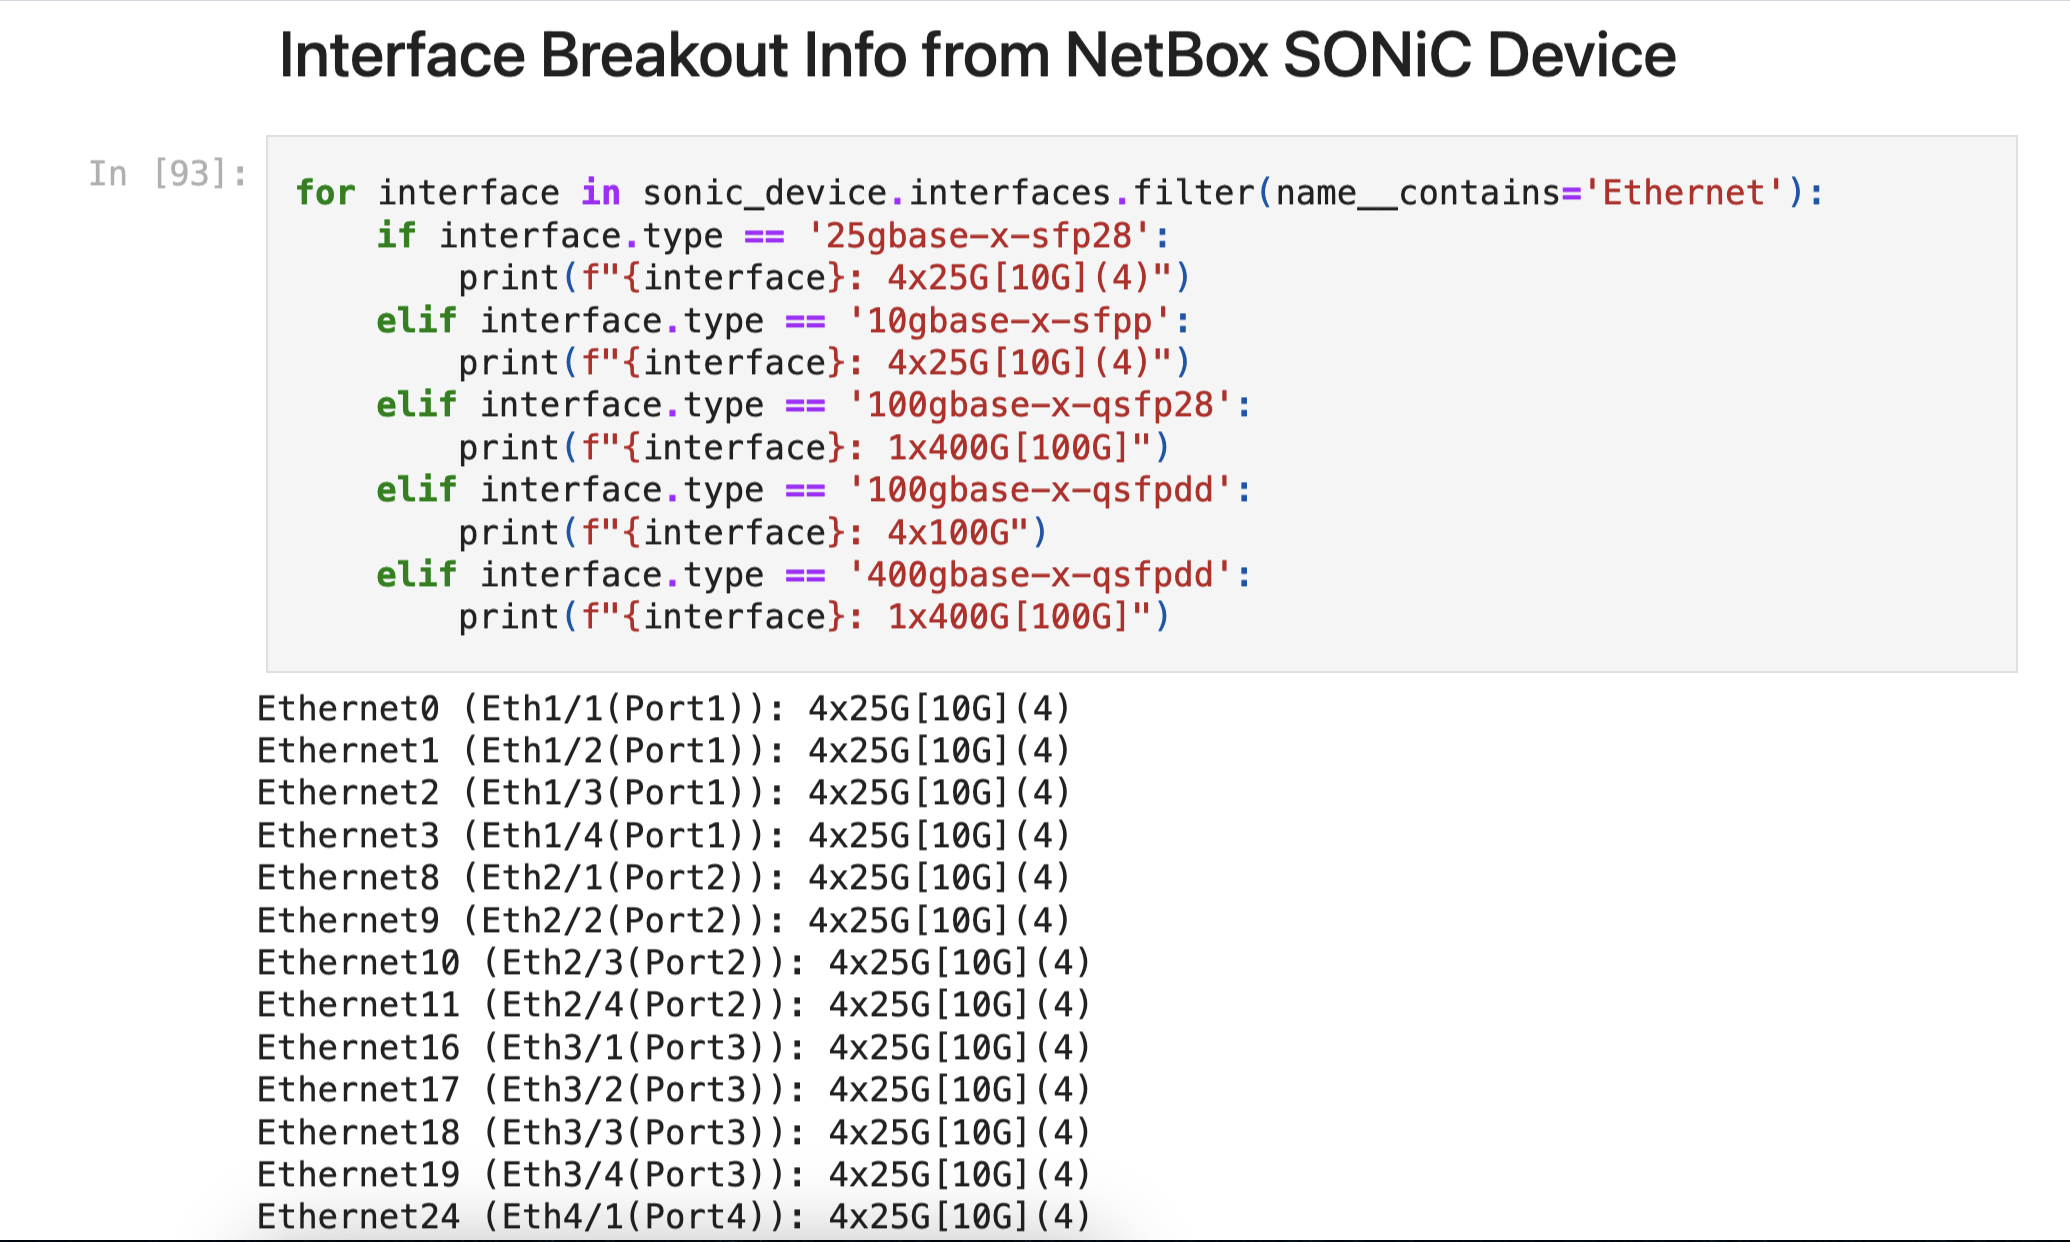
Dynamic “port” section of the SONiC switch configuration using Jinja2
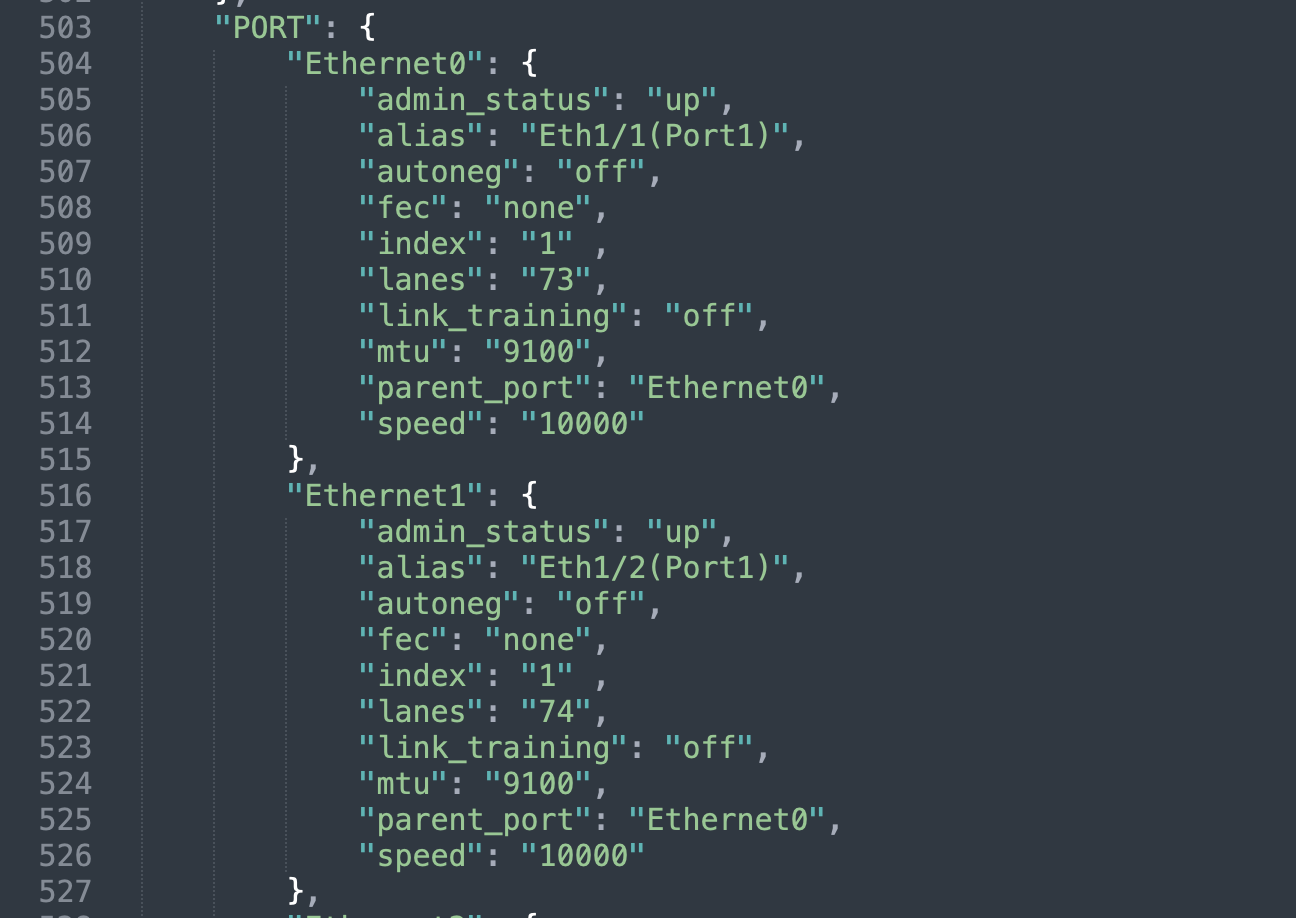
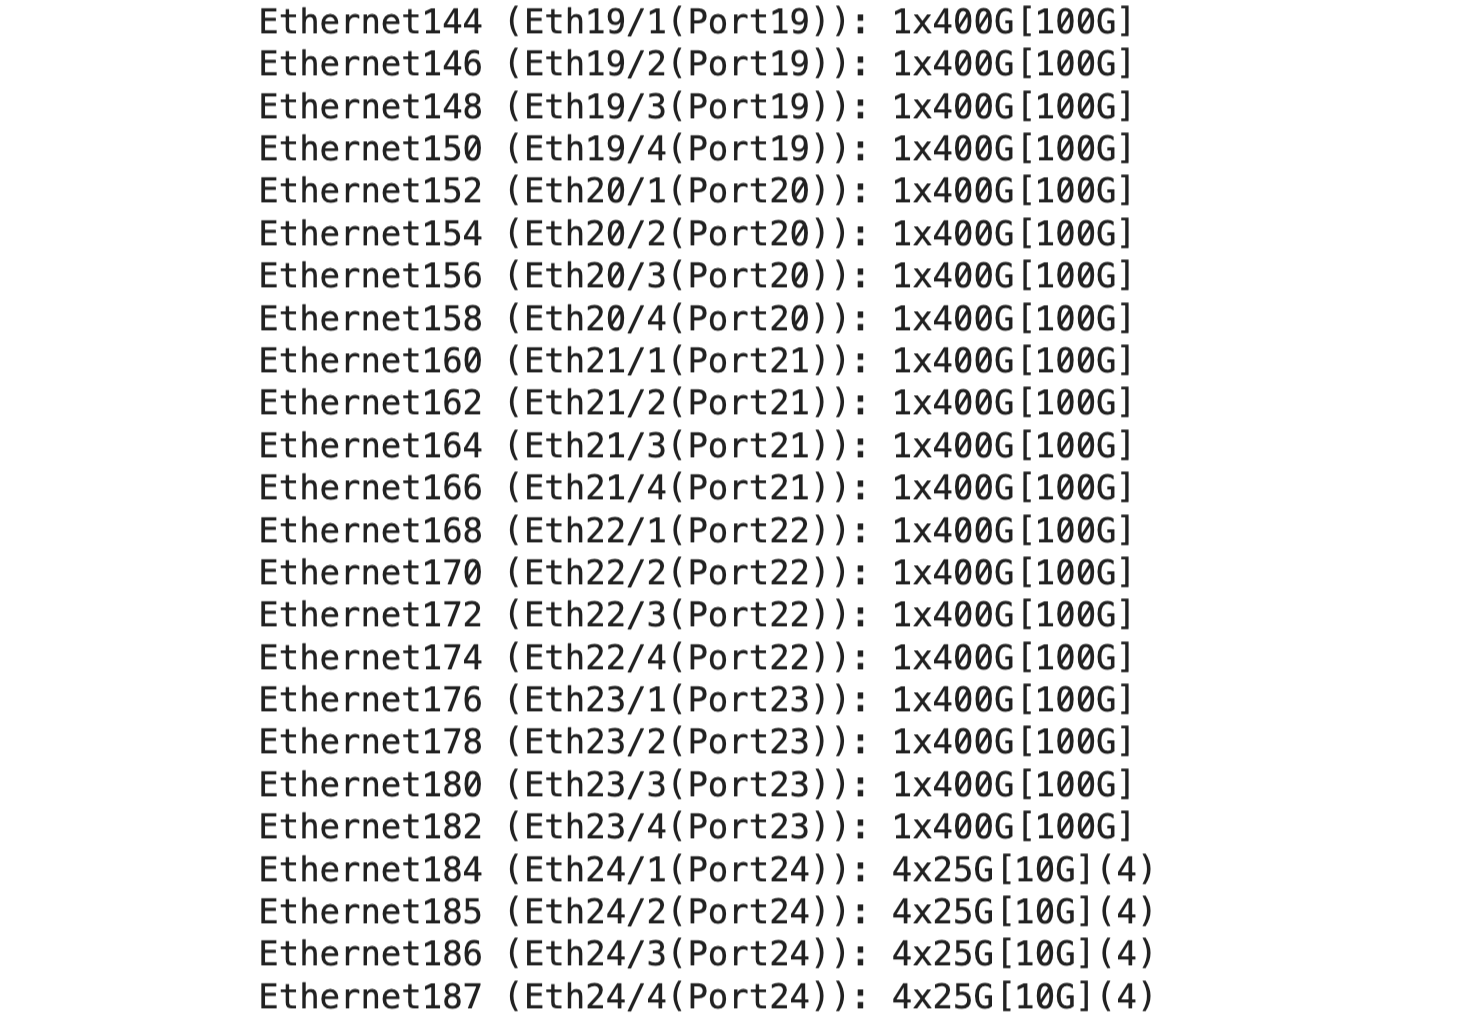
Final rendered dynamic port configuration for the SONiC switch 10G, 25G,100G & 400G ports
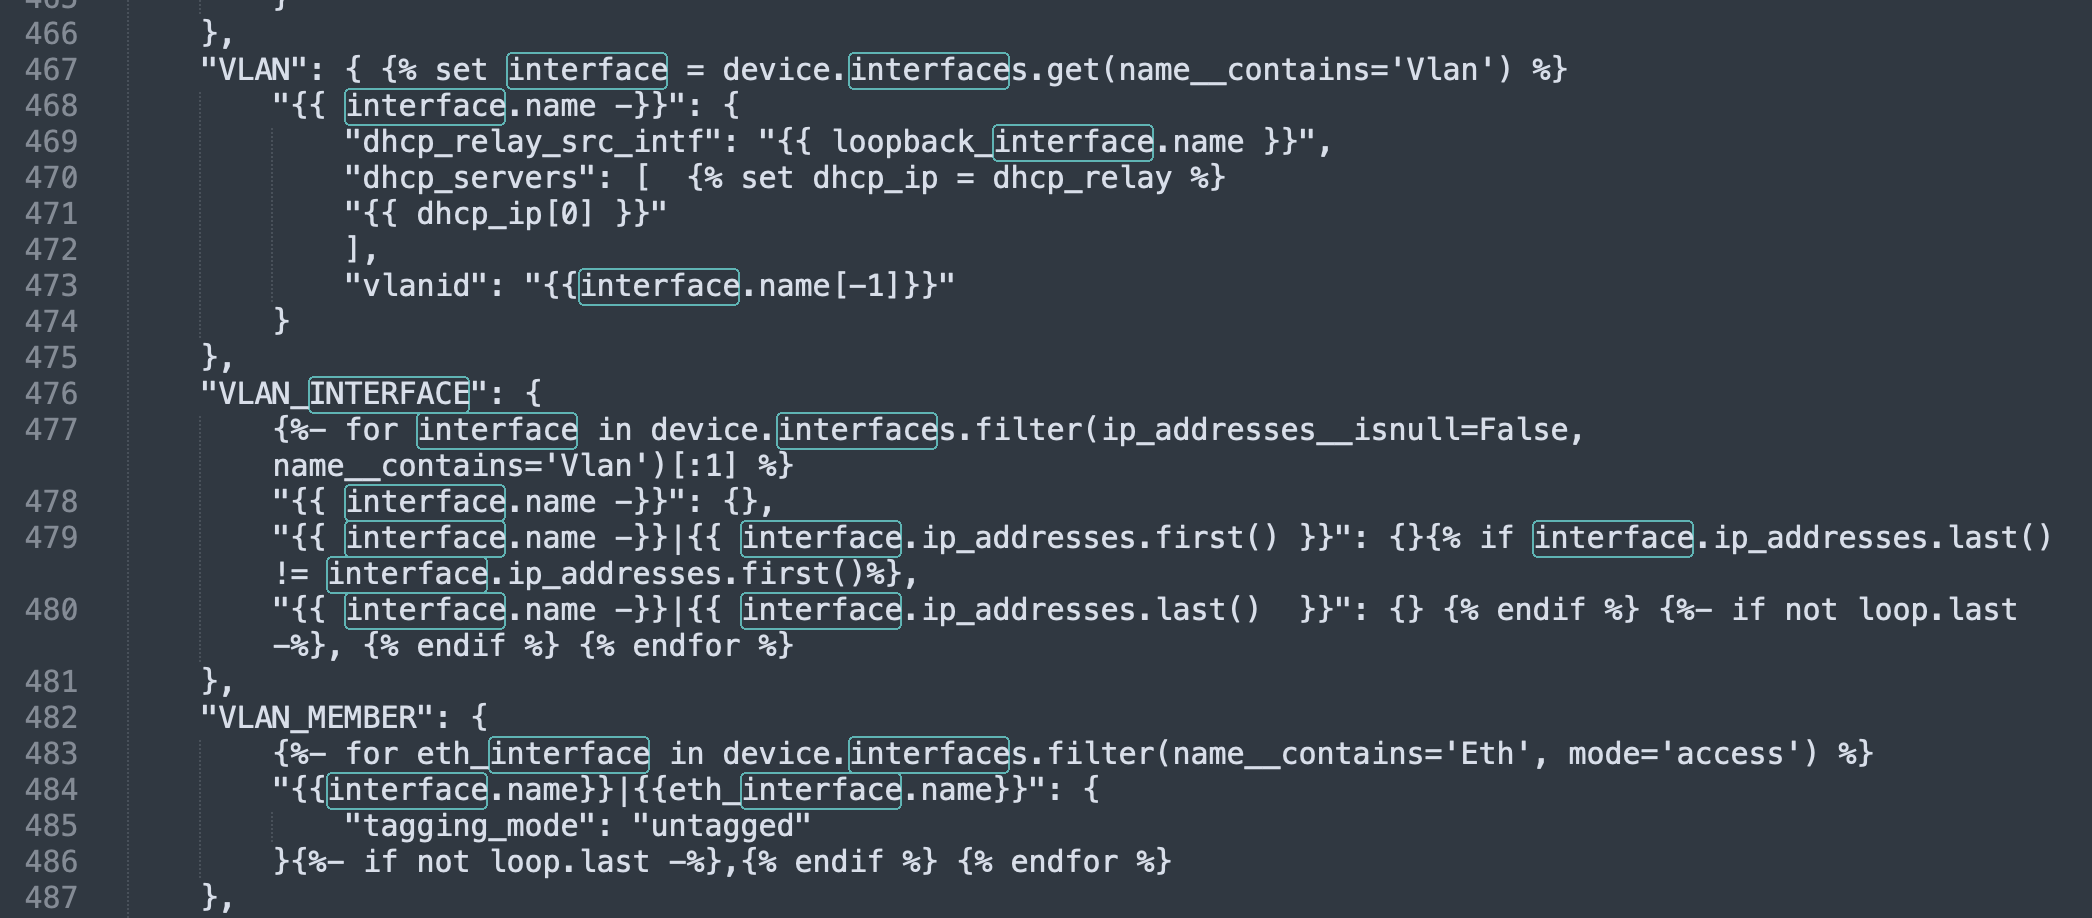
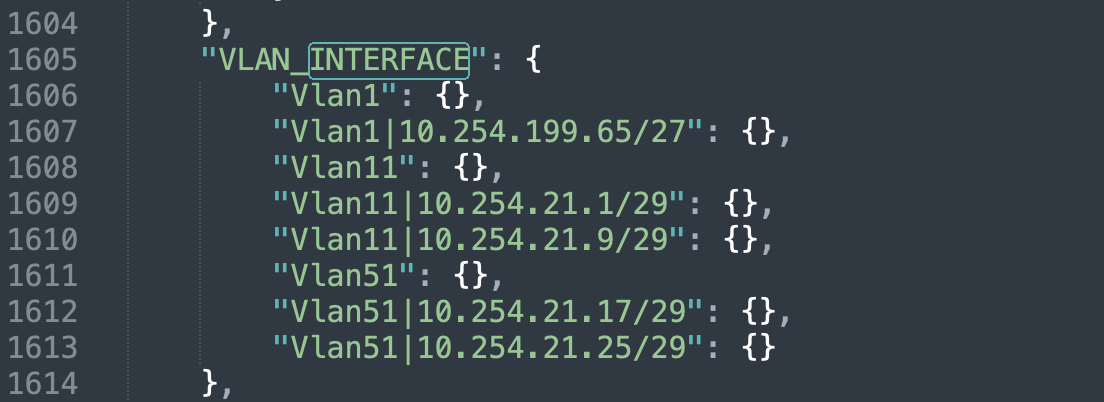
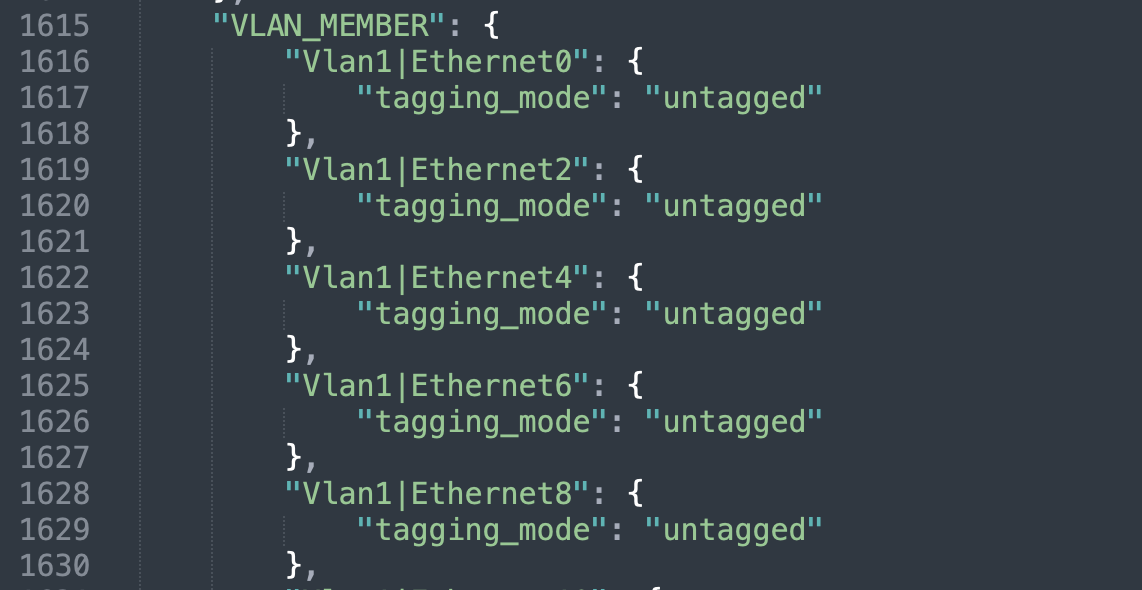
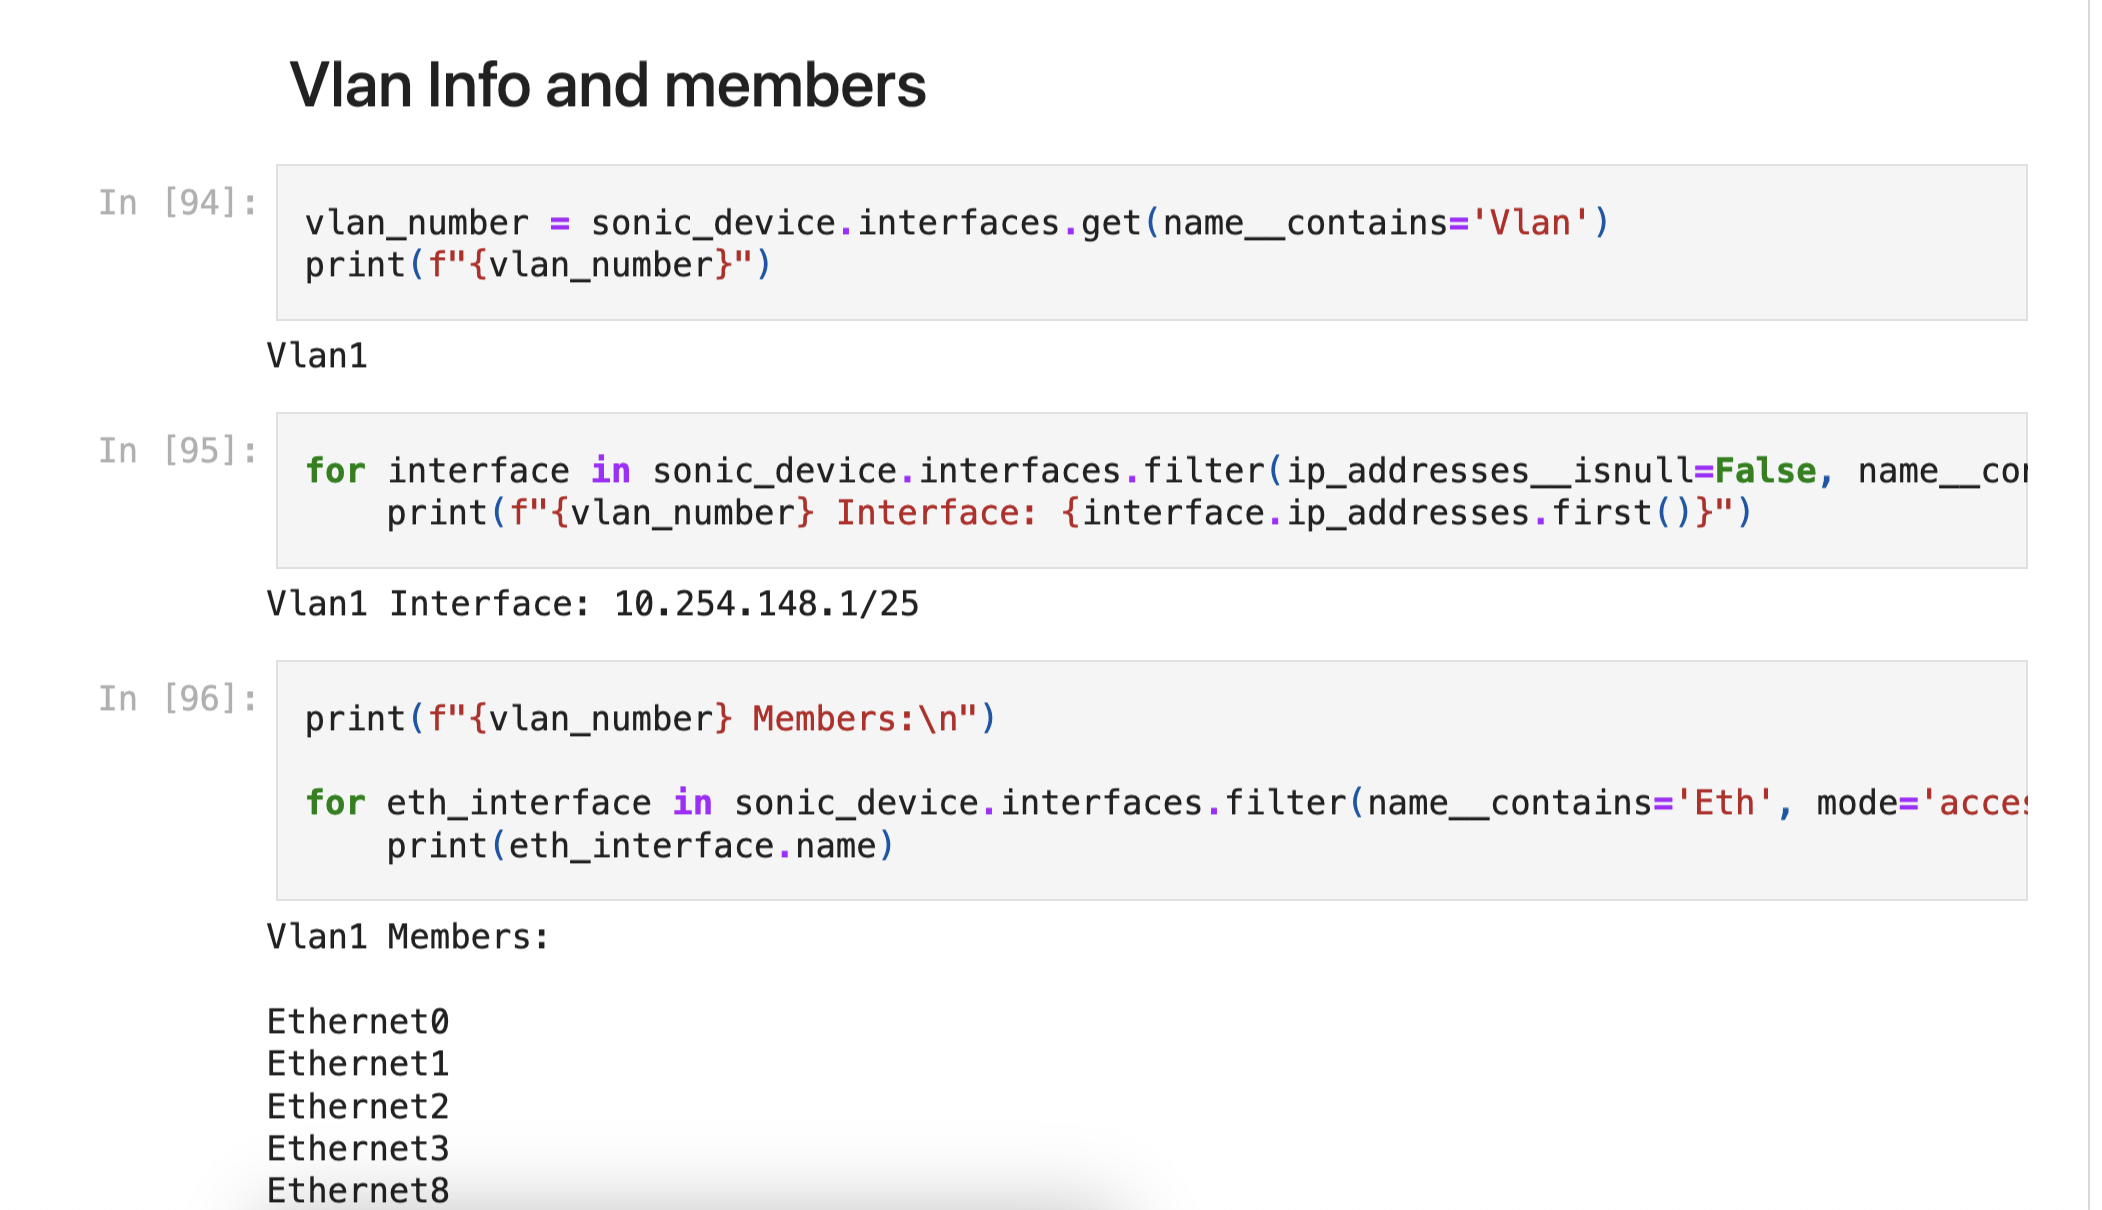
Dynamic “VLAN” section of the SONiC switch configuration using Jinja2
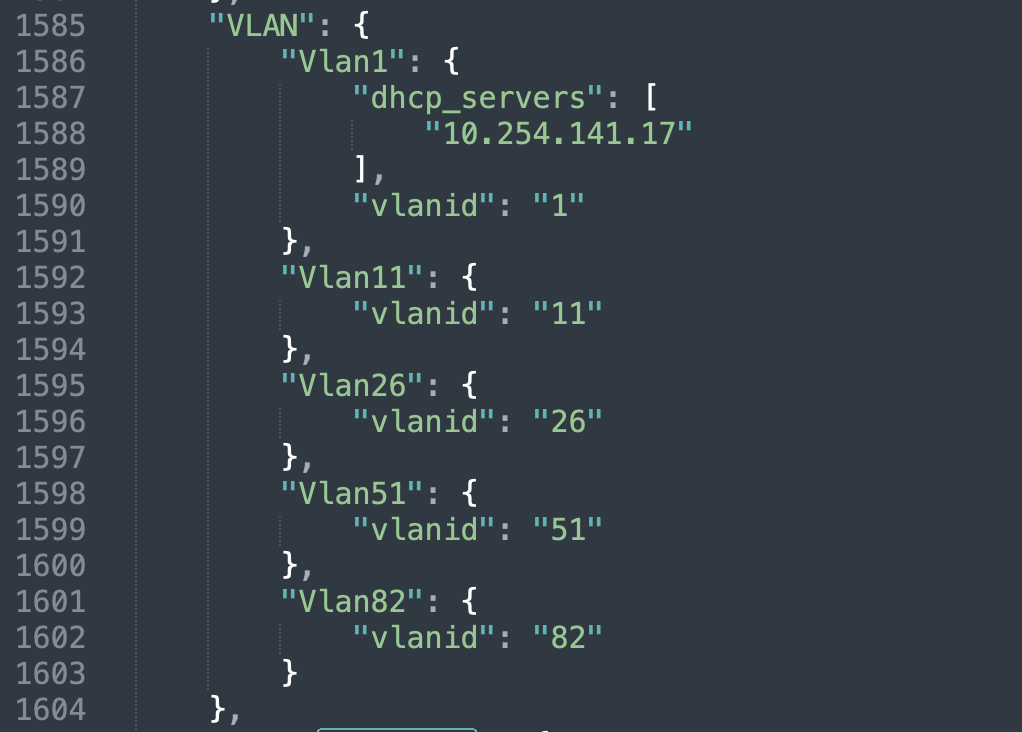
Final rendered dynamic vlan configuration for the SONiC switch 25G,100G & 400G ports
Posted inUncategorized|Comments Off on Infrastructure as Code: Using NetBox and Jinja2 to build Zero Touch Provisioning for SONiC switches
When I started working with the hardware team at eBay I was shocked to learn that they were tracking ALL of their assets with Wiki and spreadsheets. Everything was static, all of the IP addresses, the hardware locations, serial numbers, etc and let me tell you it was a nightmare to try and manage that infrastructure or even use the lab for that matter.
One of the things I was most proud of during my time at eBay was how I was able to transform the entire lab with the help of NetBox and a whole lot of Python. In the end I was using NetBox to build real time ZTP configurations for SONiC switches using the data in NetBox along with Jinja2 templates for true Infrastructure as Code deployments.
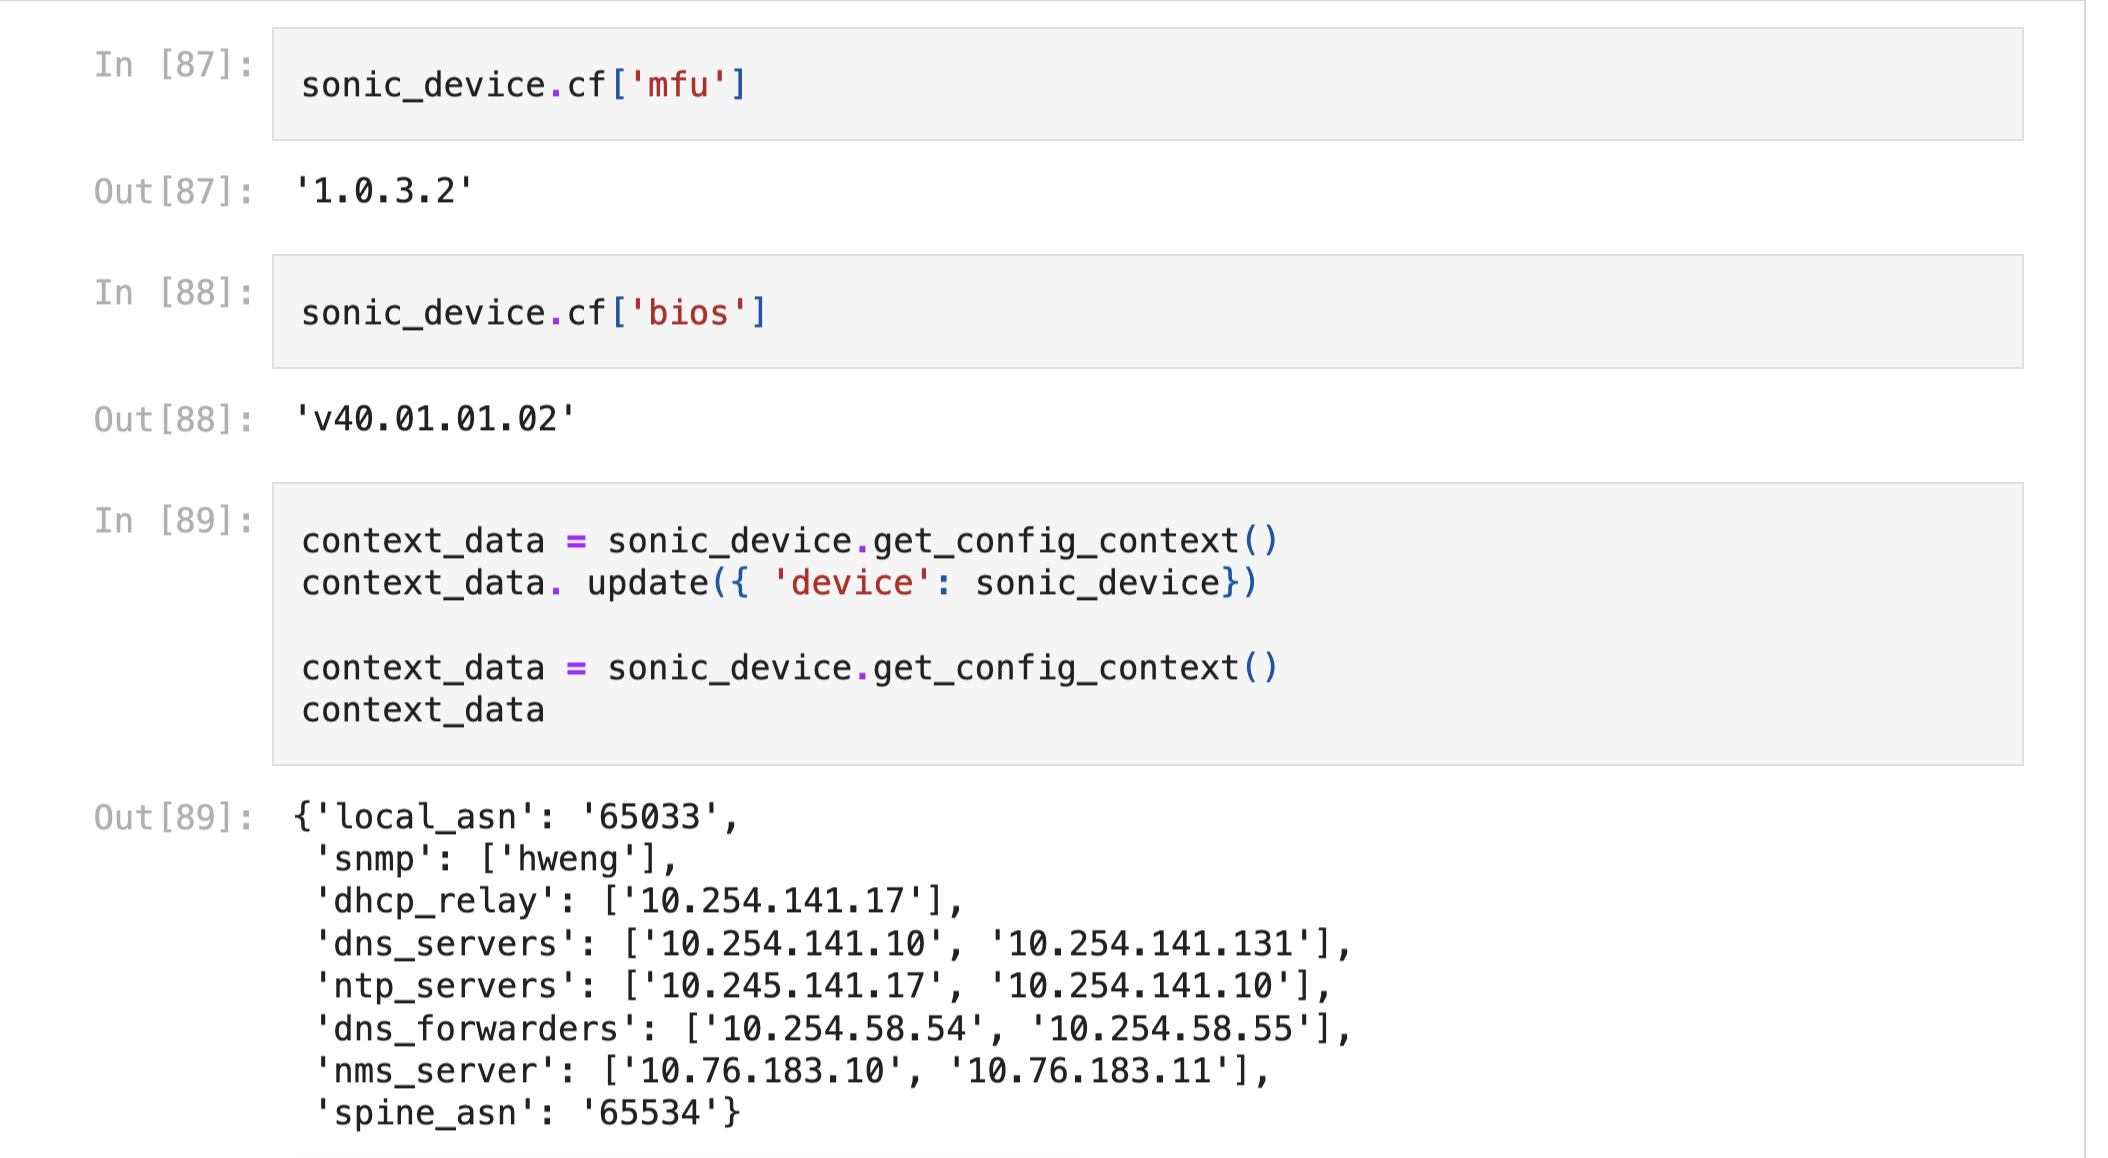
Infrastructure as Code example using NetBox and Jinja2 to build ZTP SONiC configs
I brought that lab into the 21st century and transformed it in such a manner that we could offer Lab as a Service to other teams. If you have not used NetBox you would be AMAZED at what is possible with free and open source software.
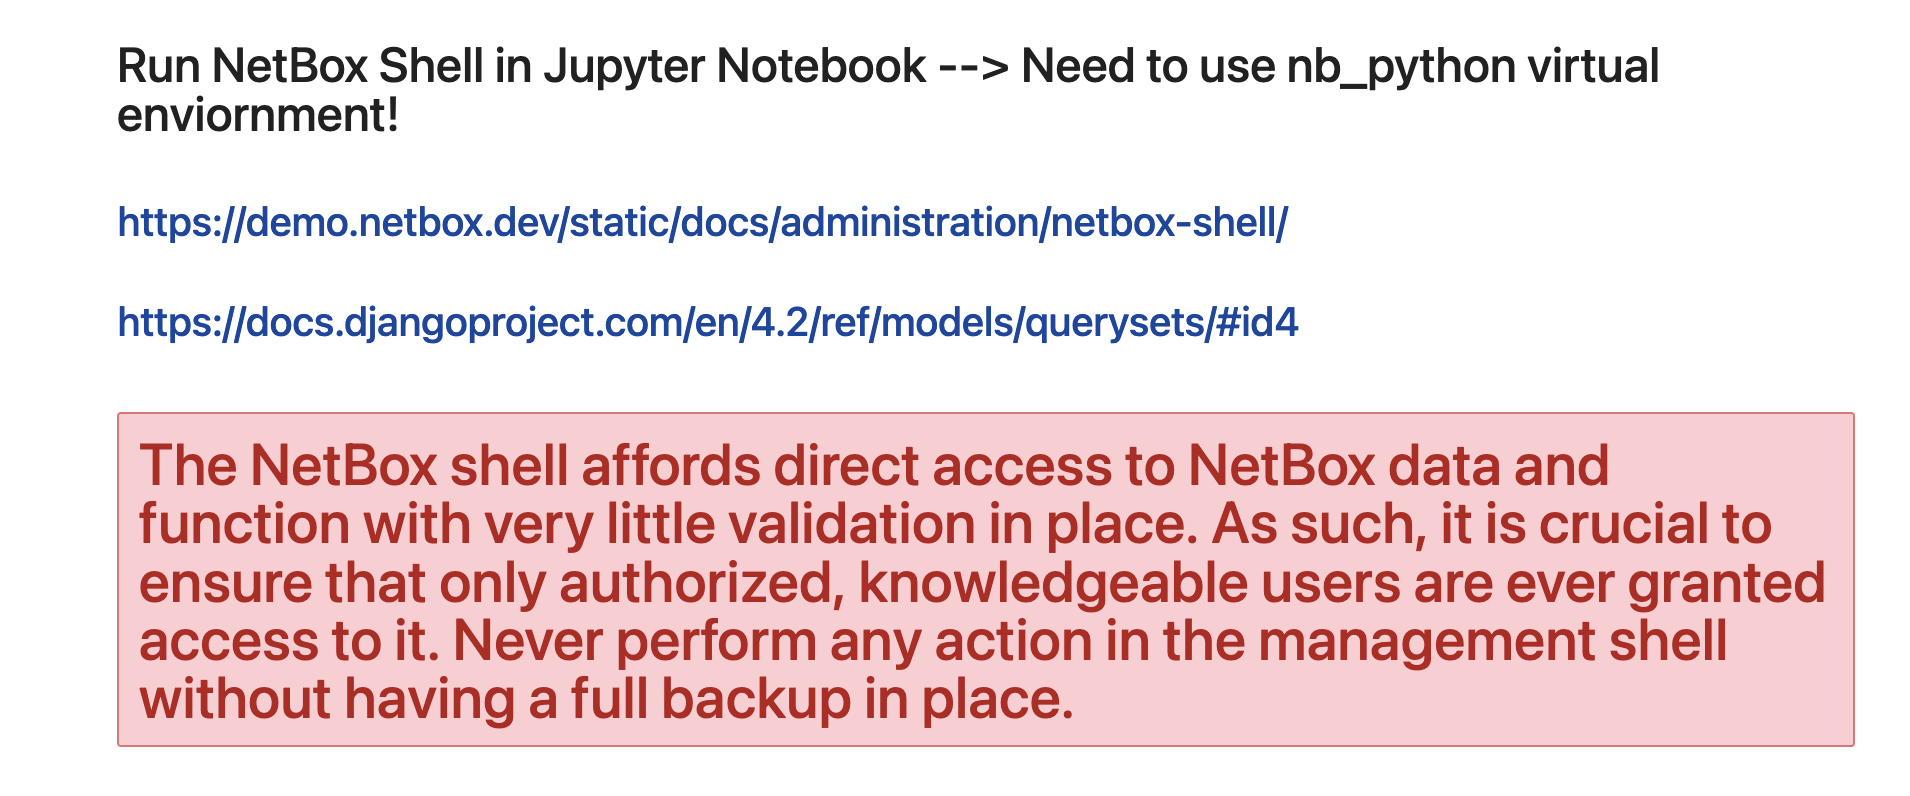
I’ve posted this example on github in case you have Jupyter Notebook and want to download. I’m not going to cover the process of getting these tools working together in this post but it’s not too difficult. In this blog post I will just be using screenshots taken from the notebook I created.
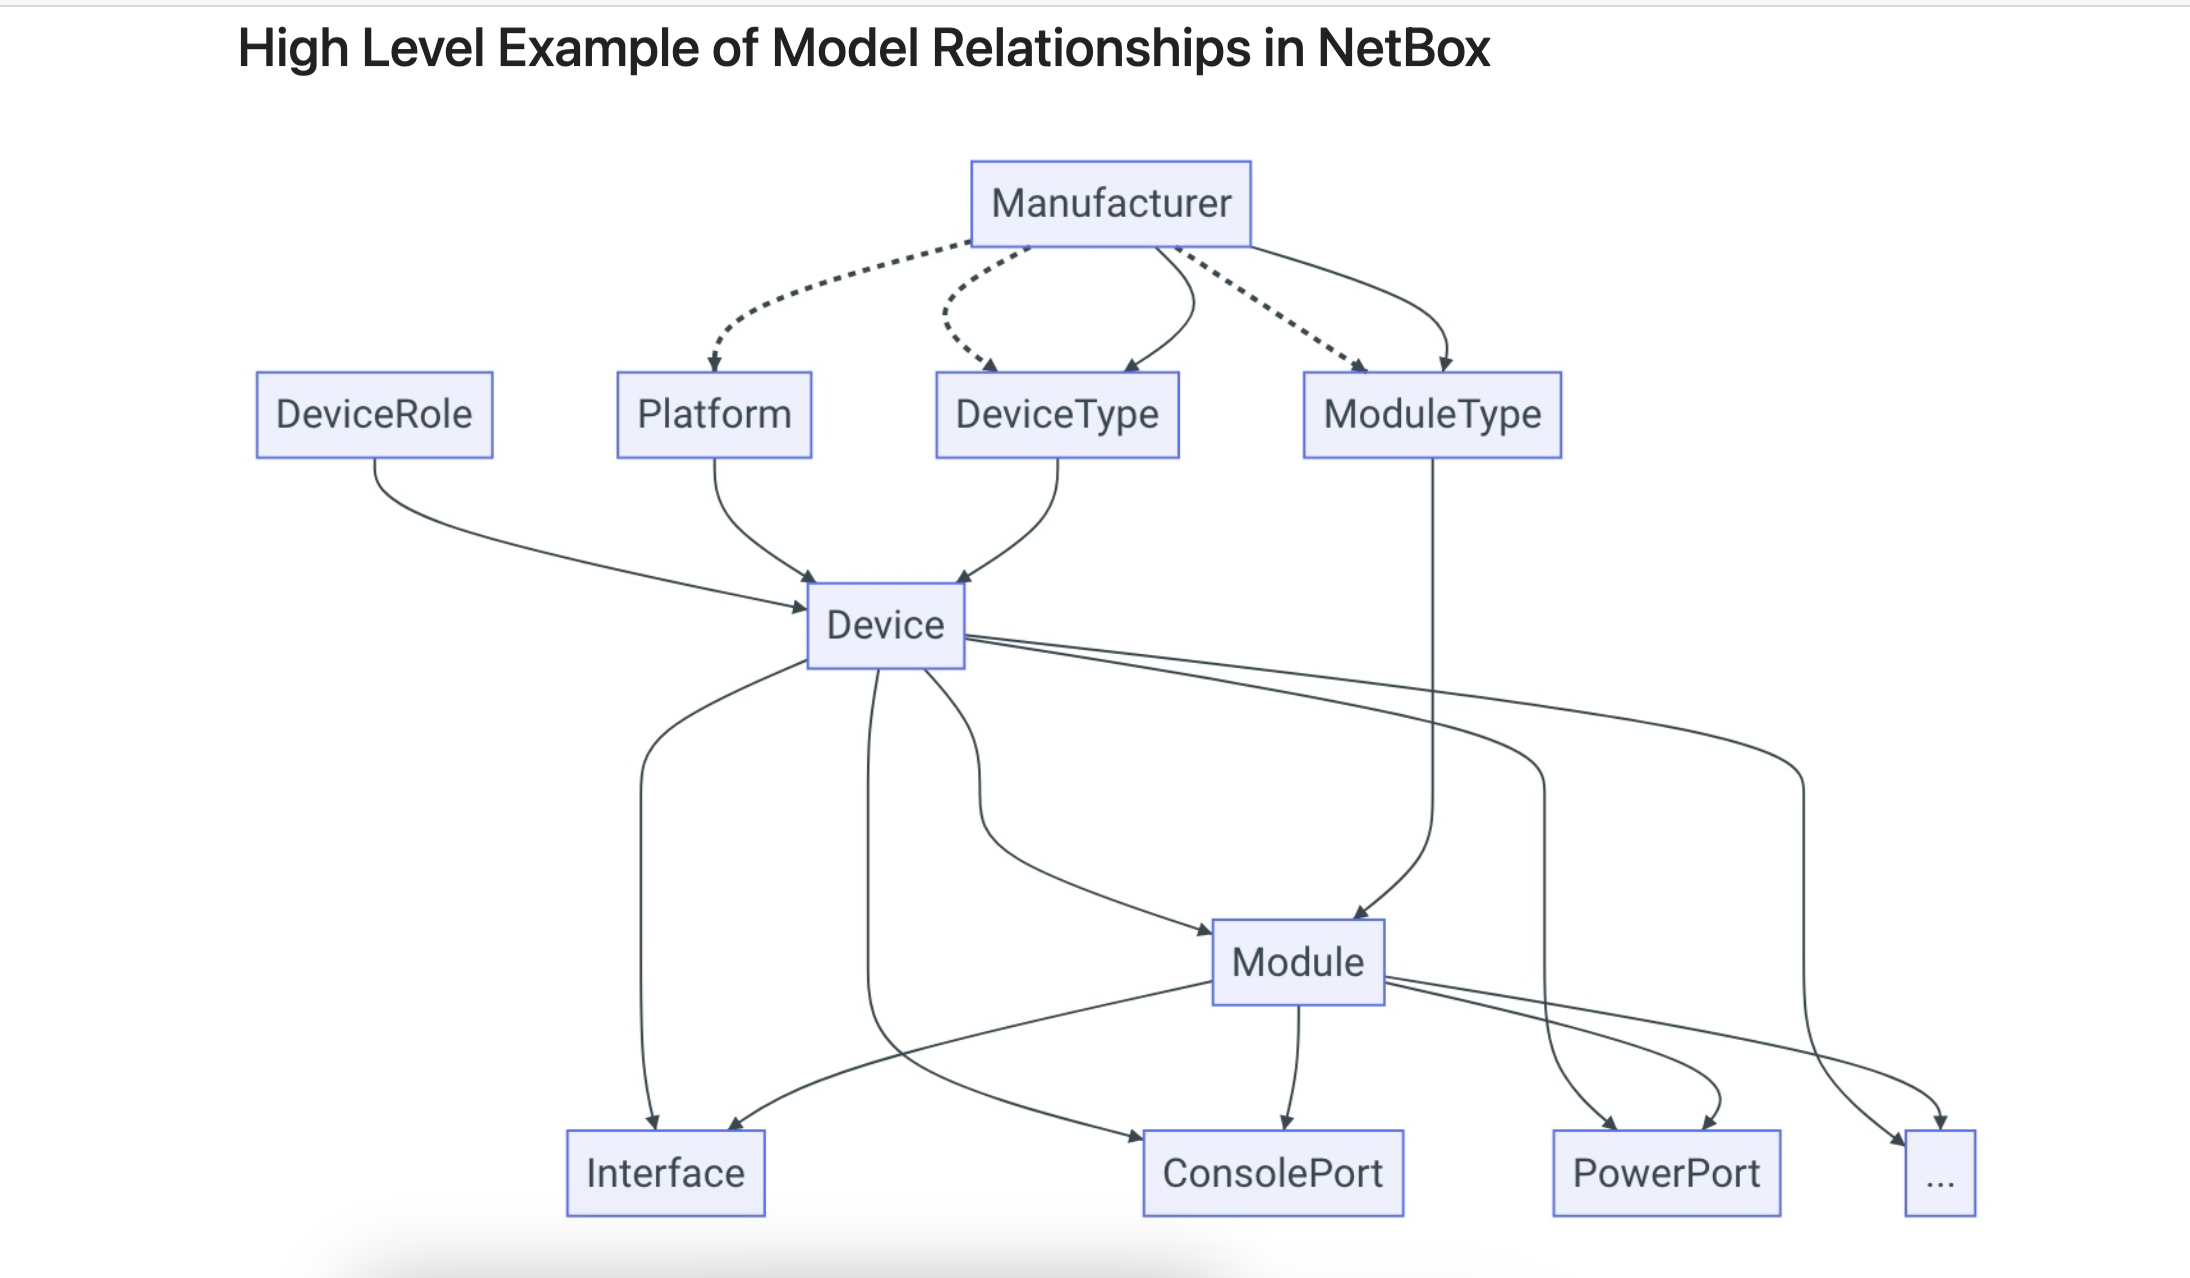
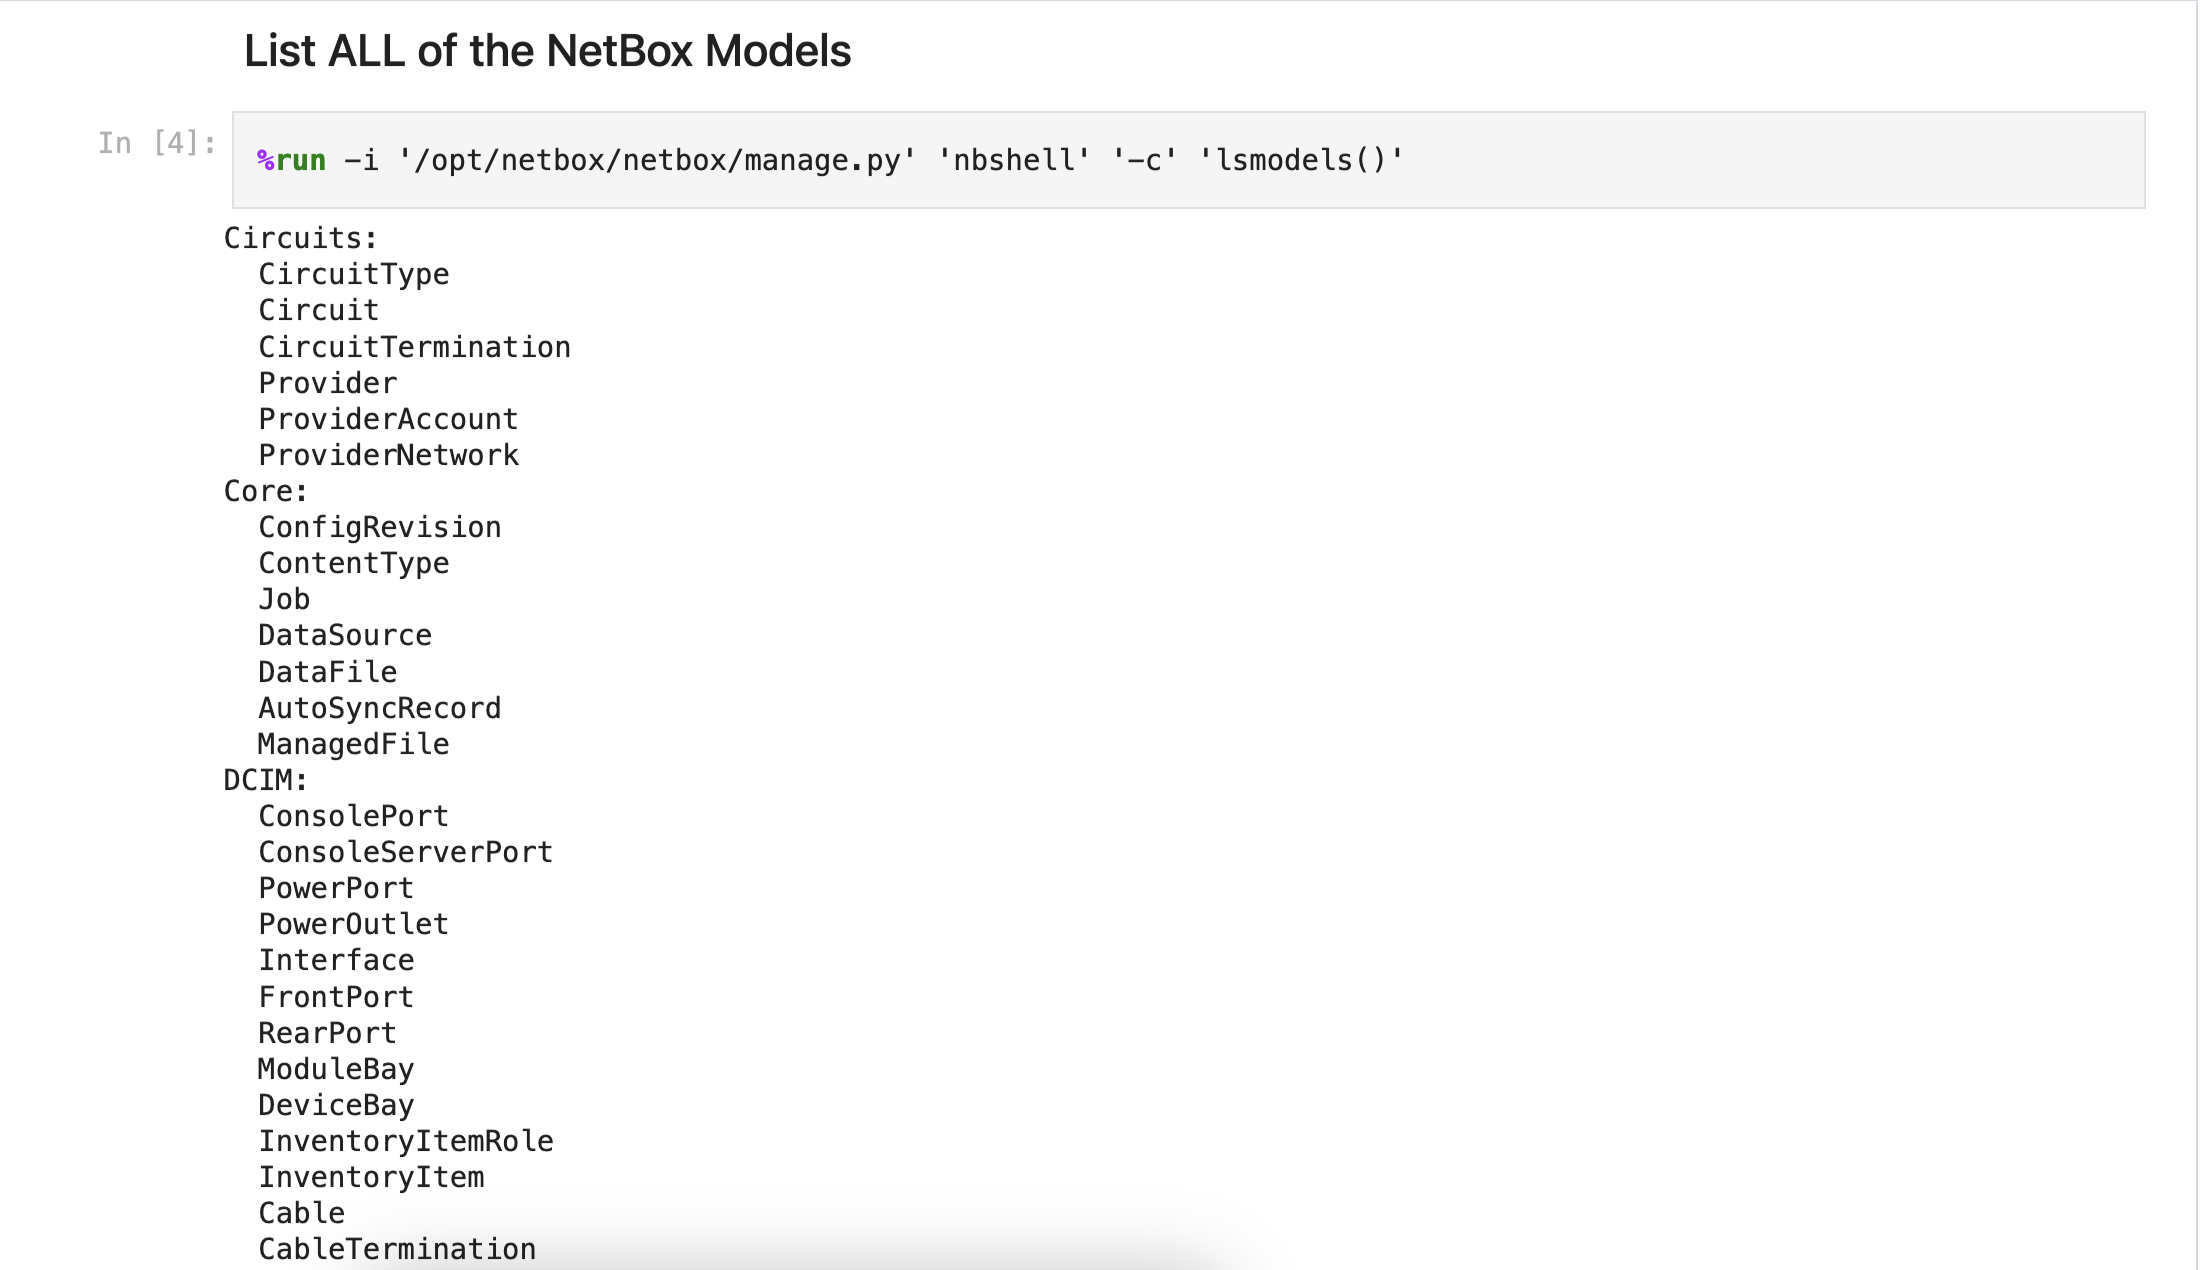
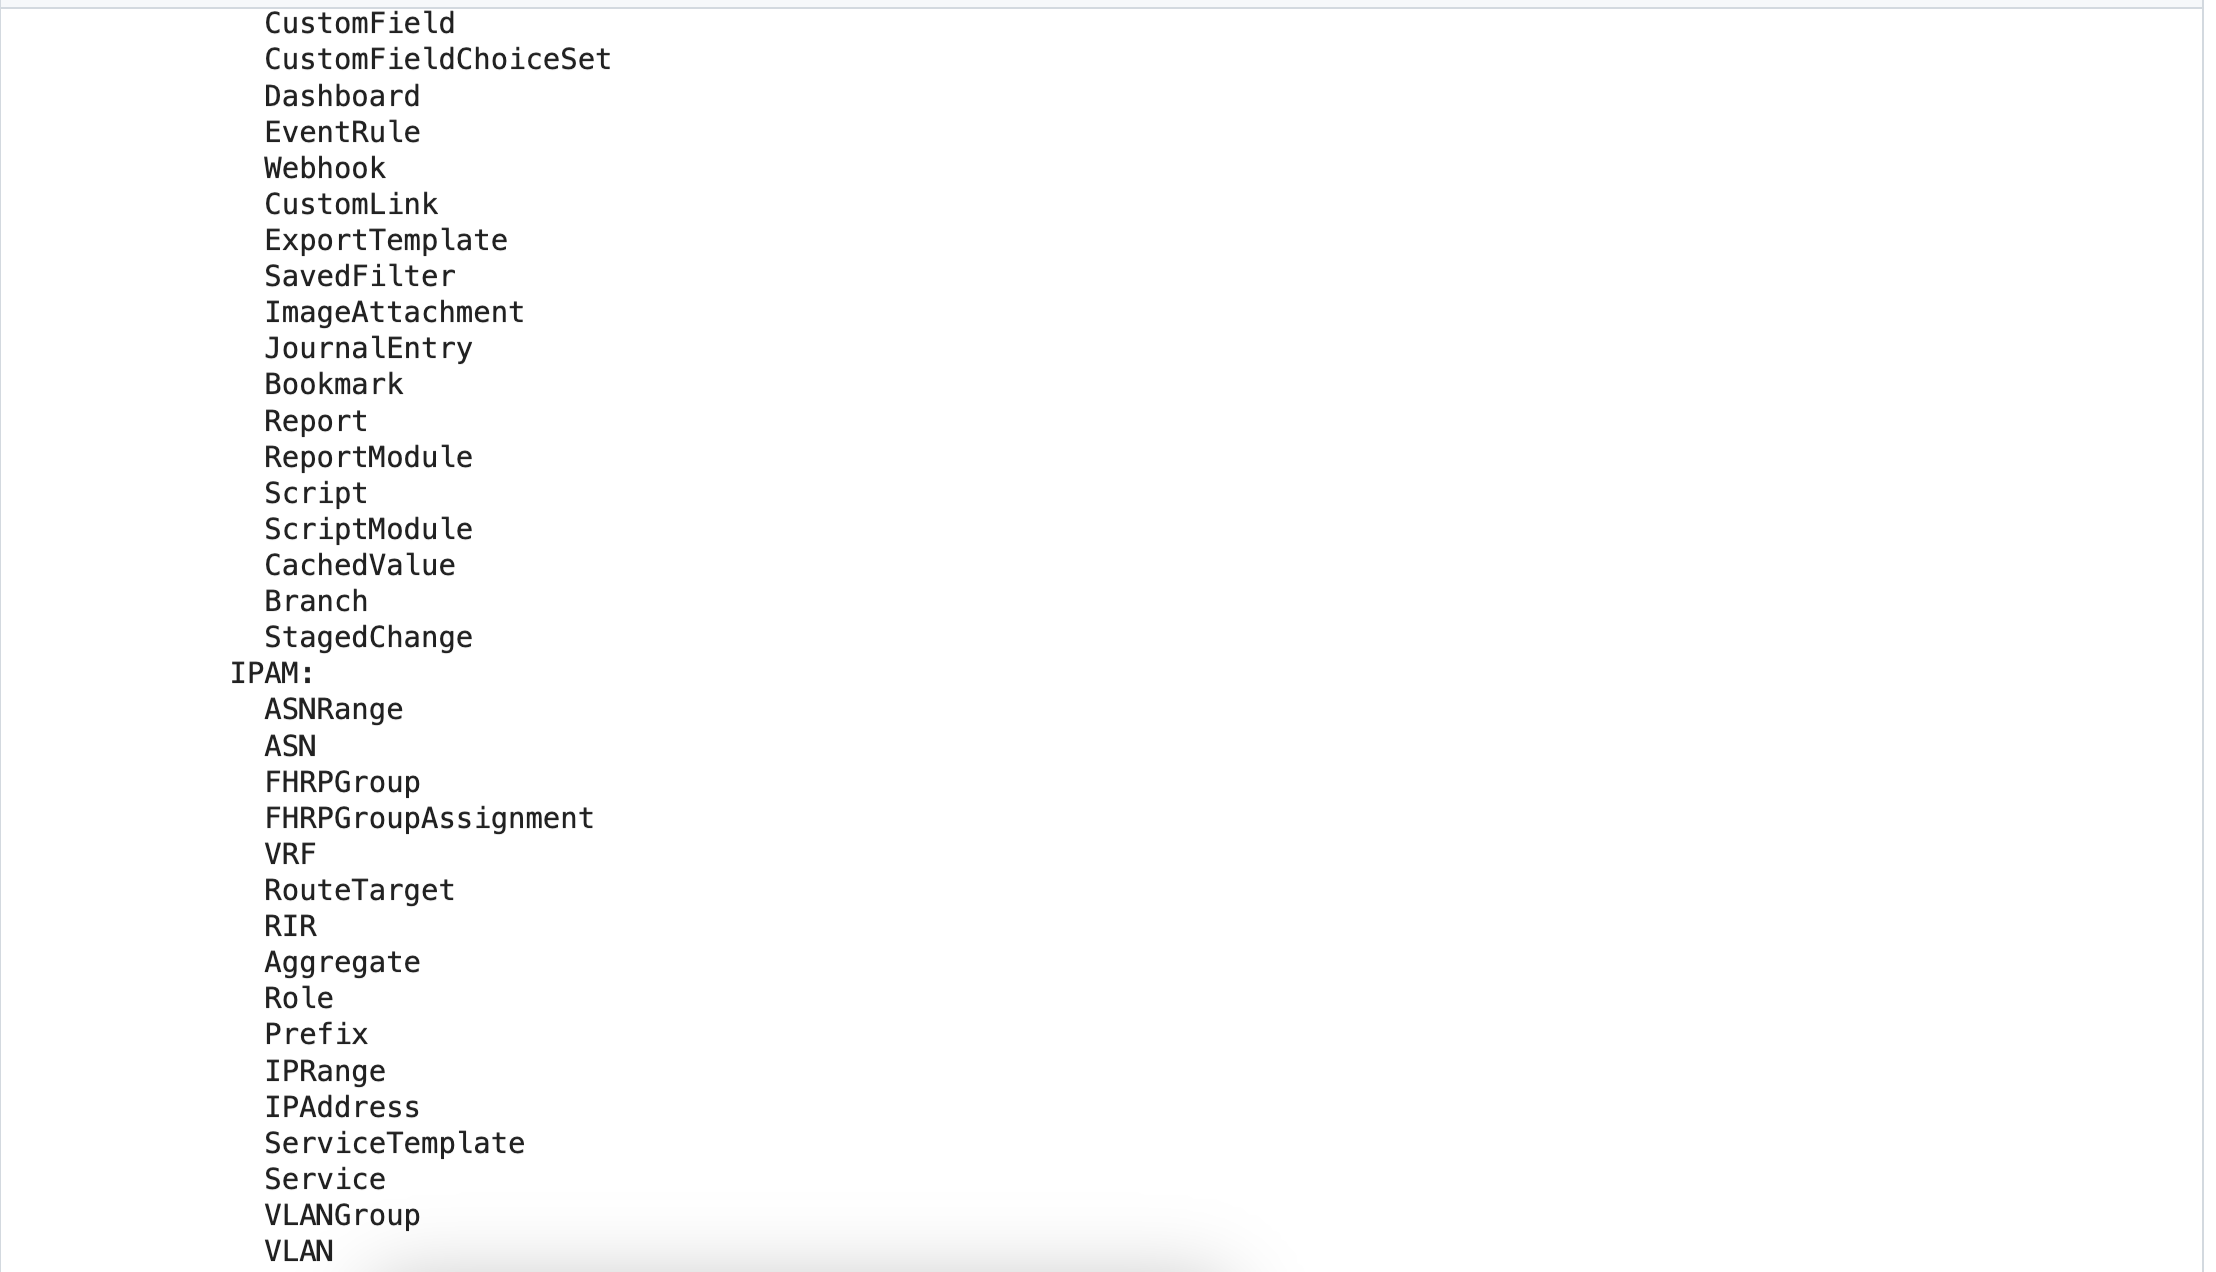
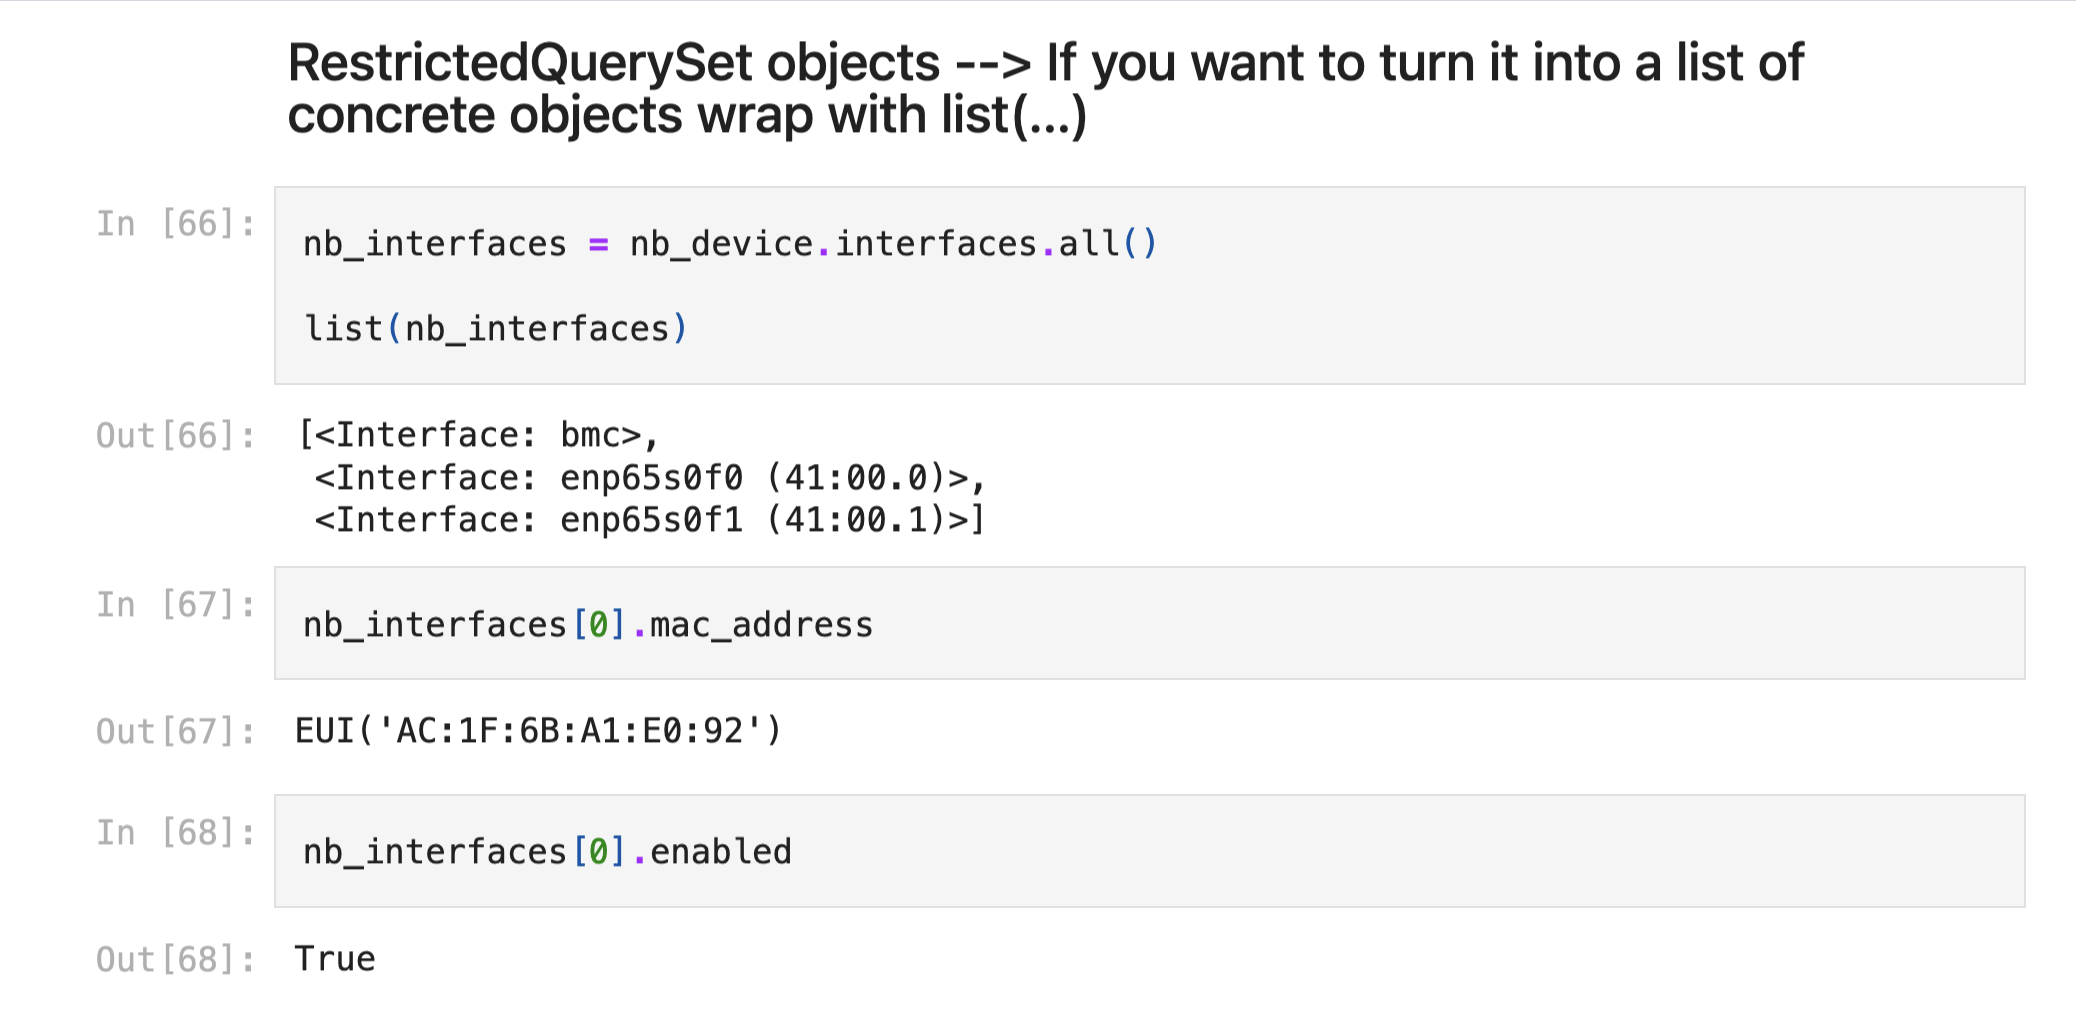
List all of the NetBox Models that are available
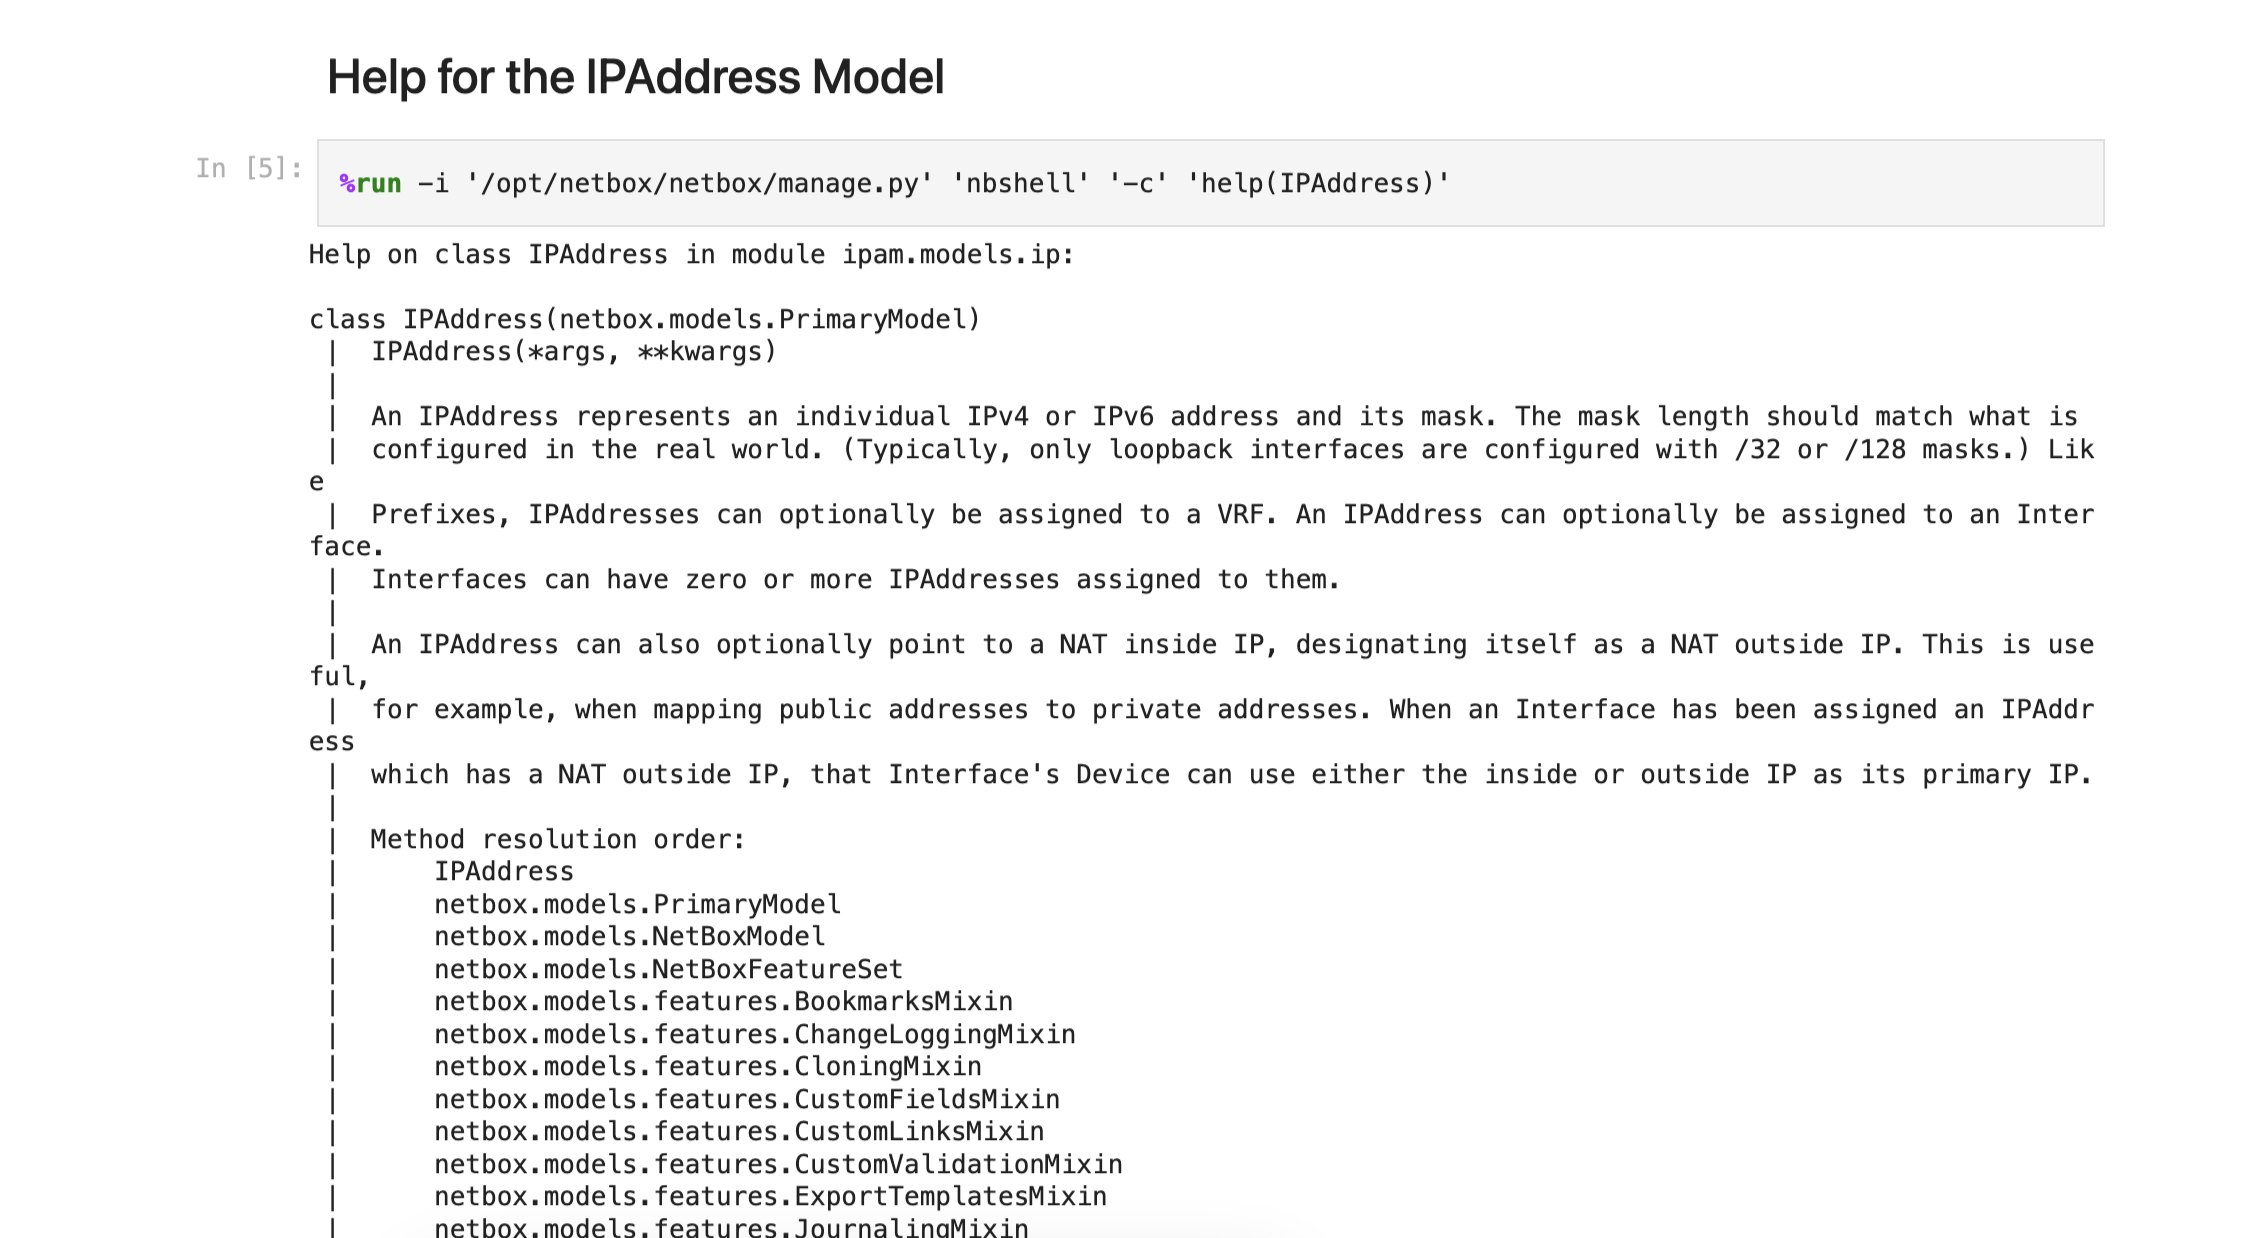
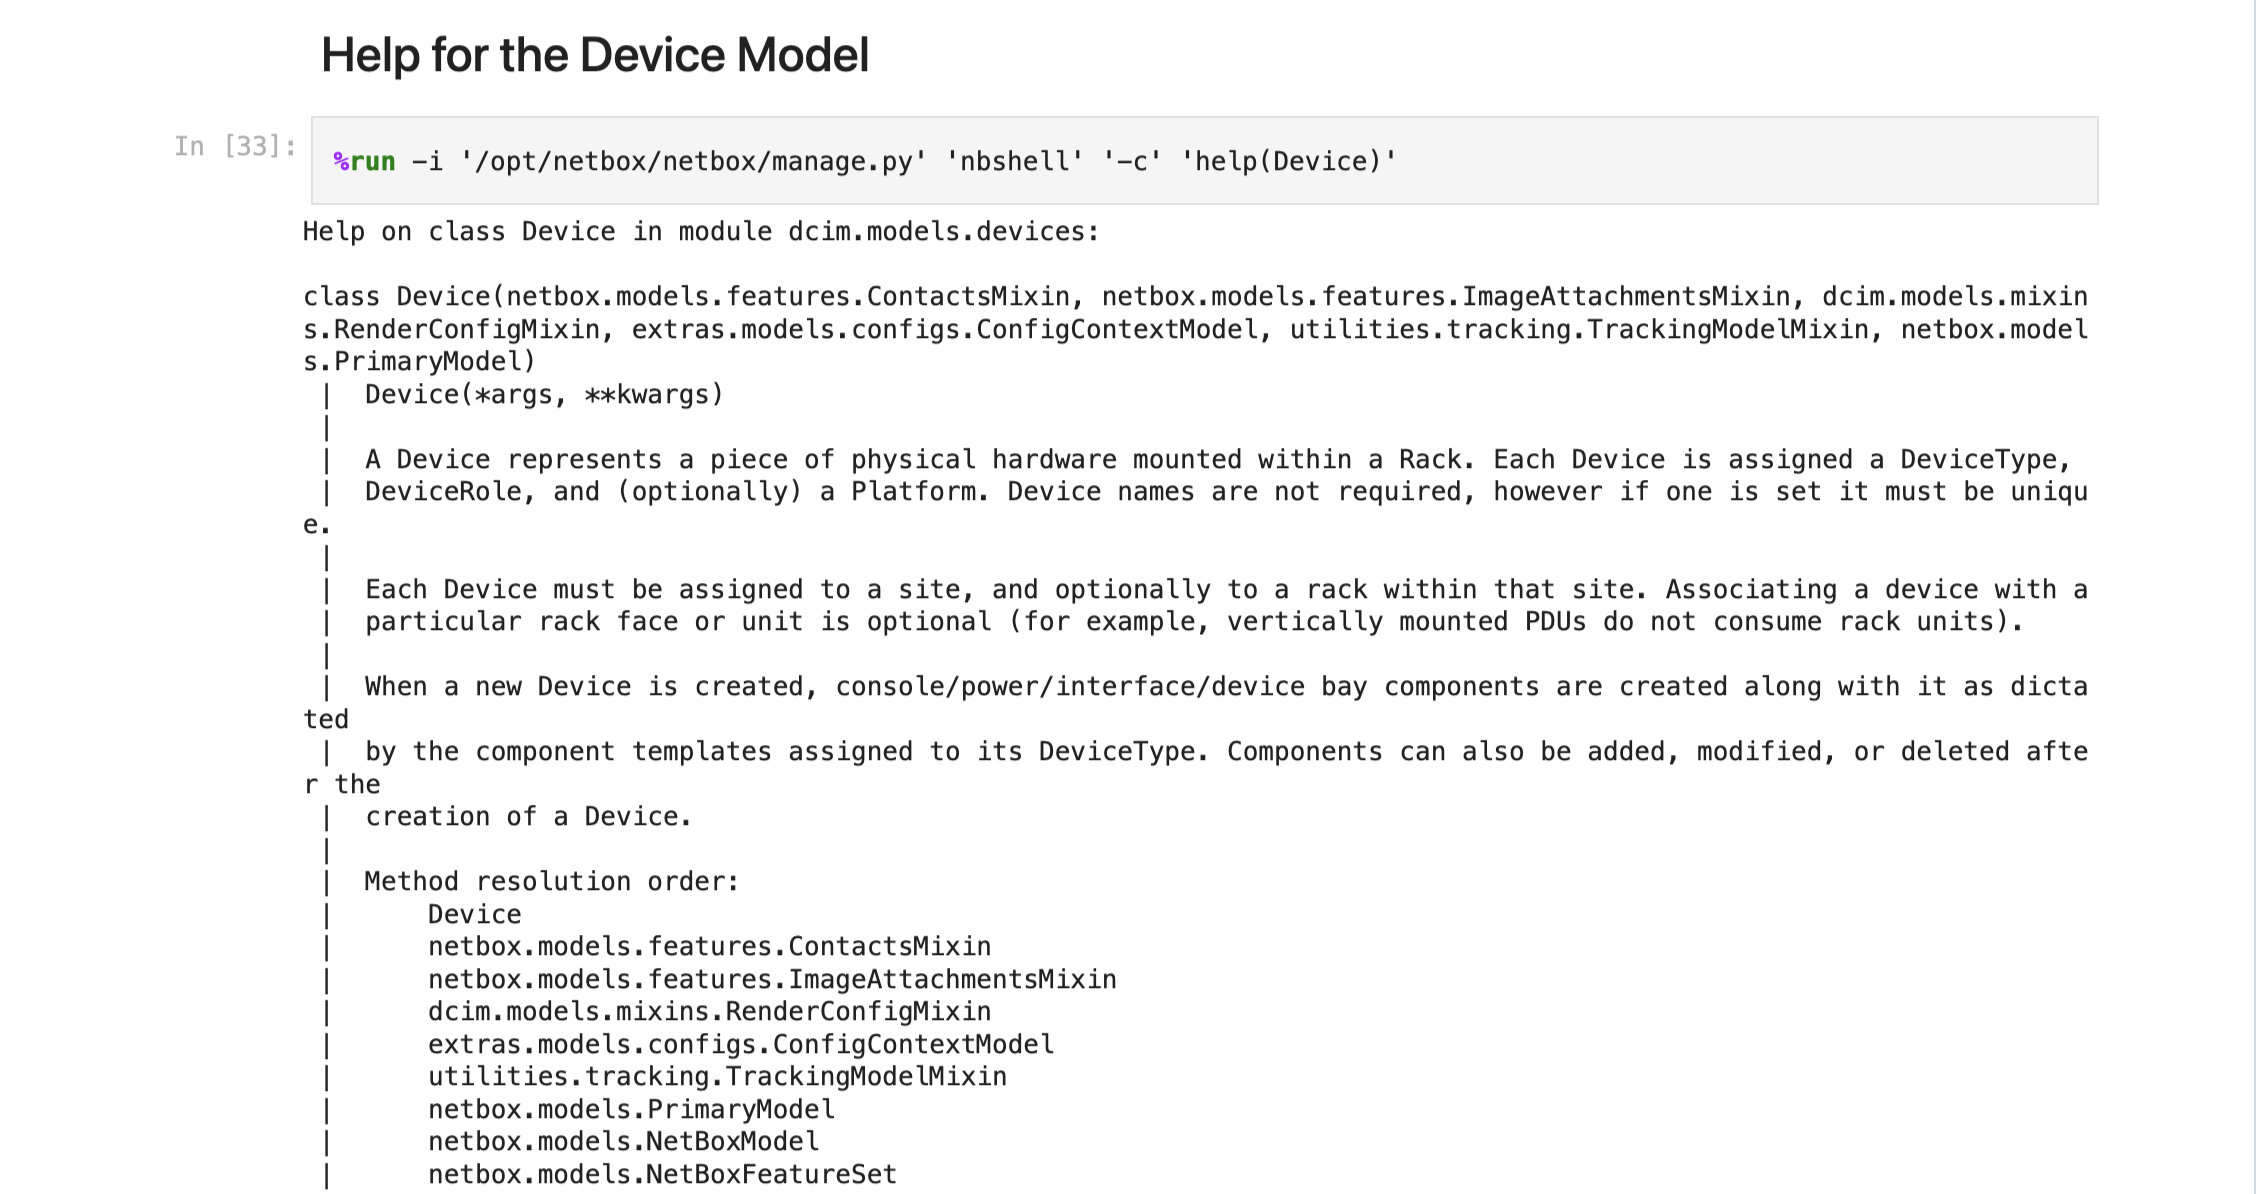
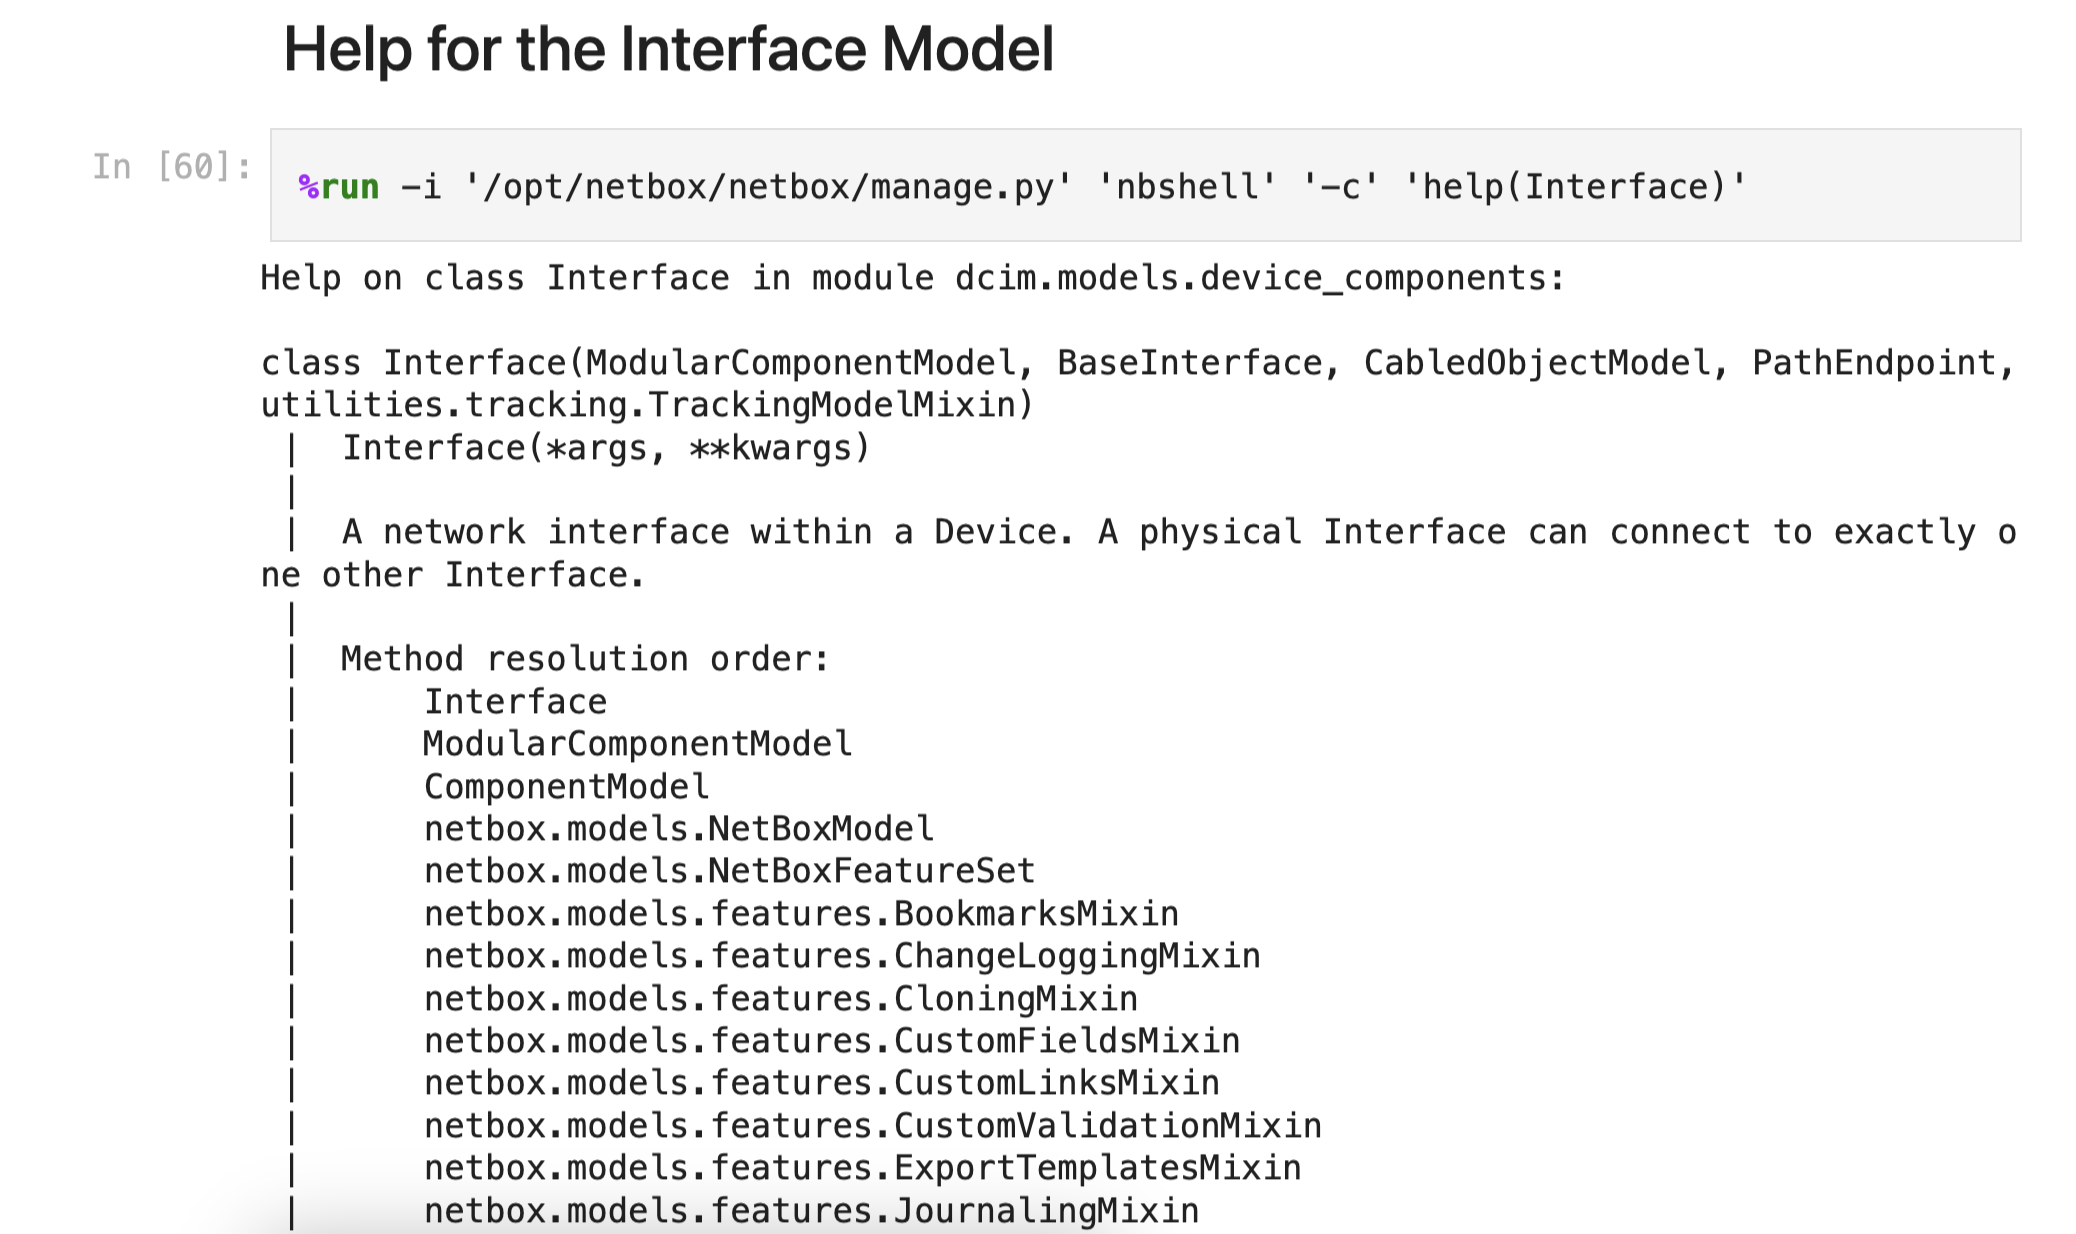
Examine Shell Help for the IP Address Model
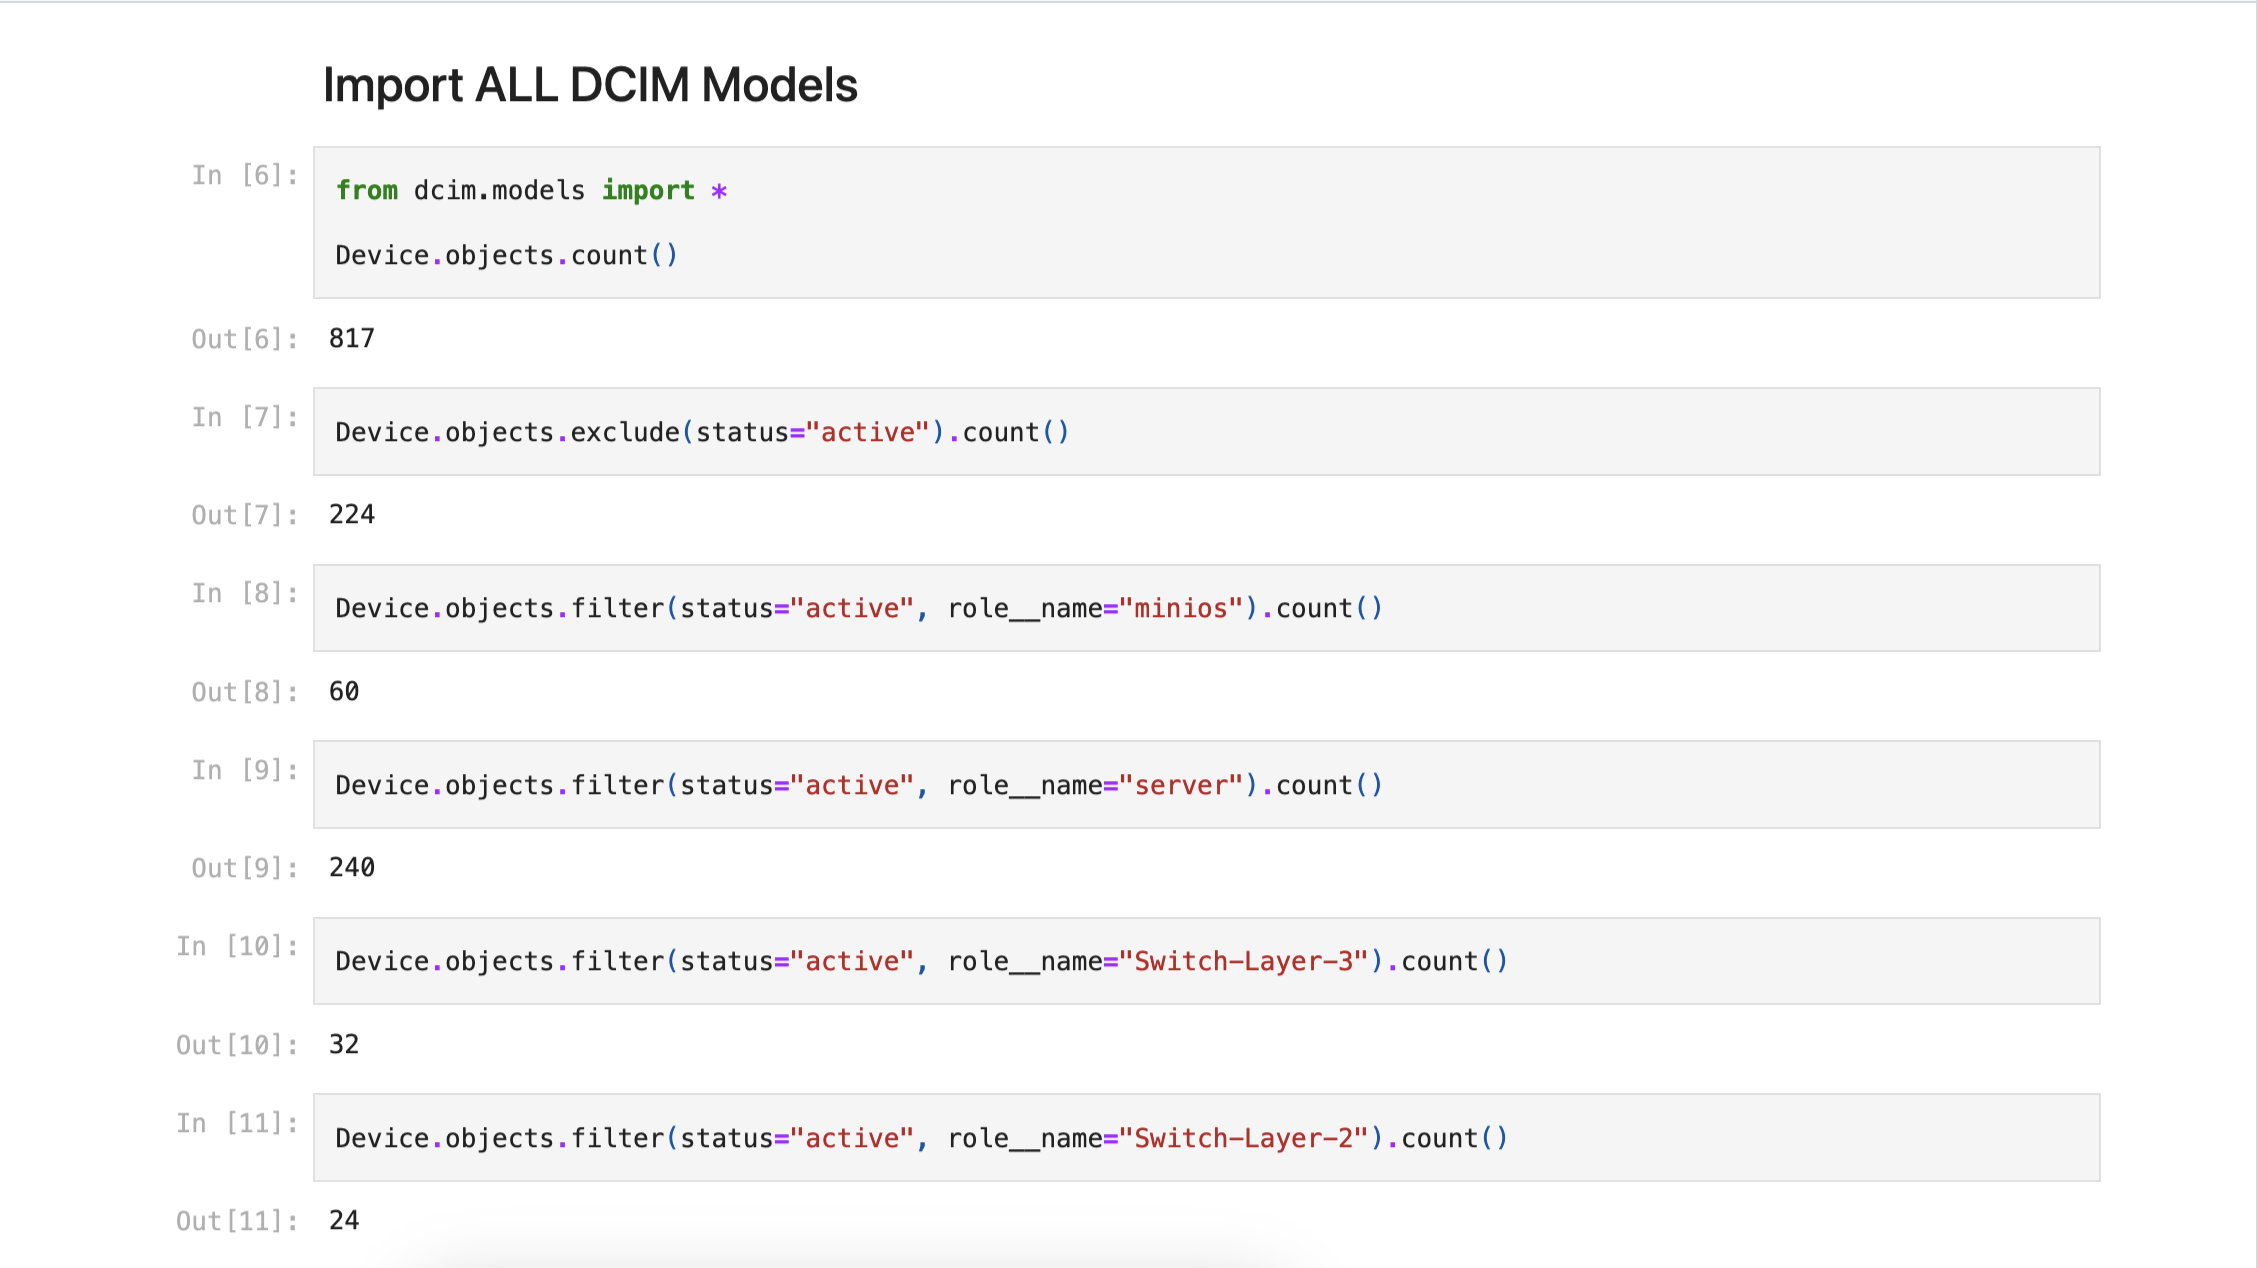
Import all the NetBox Models so we can start chaining results later
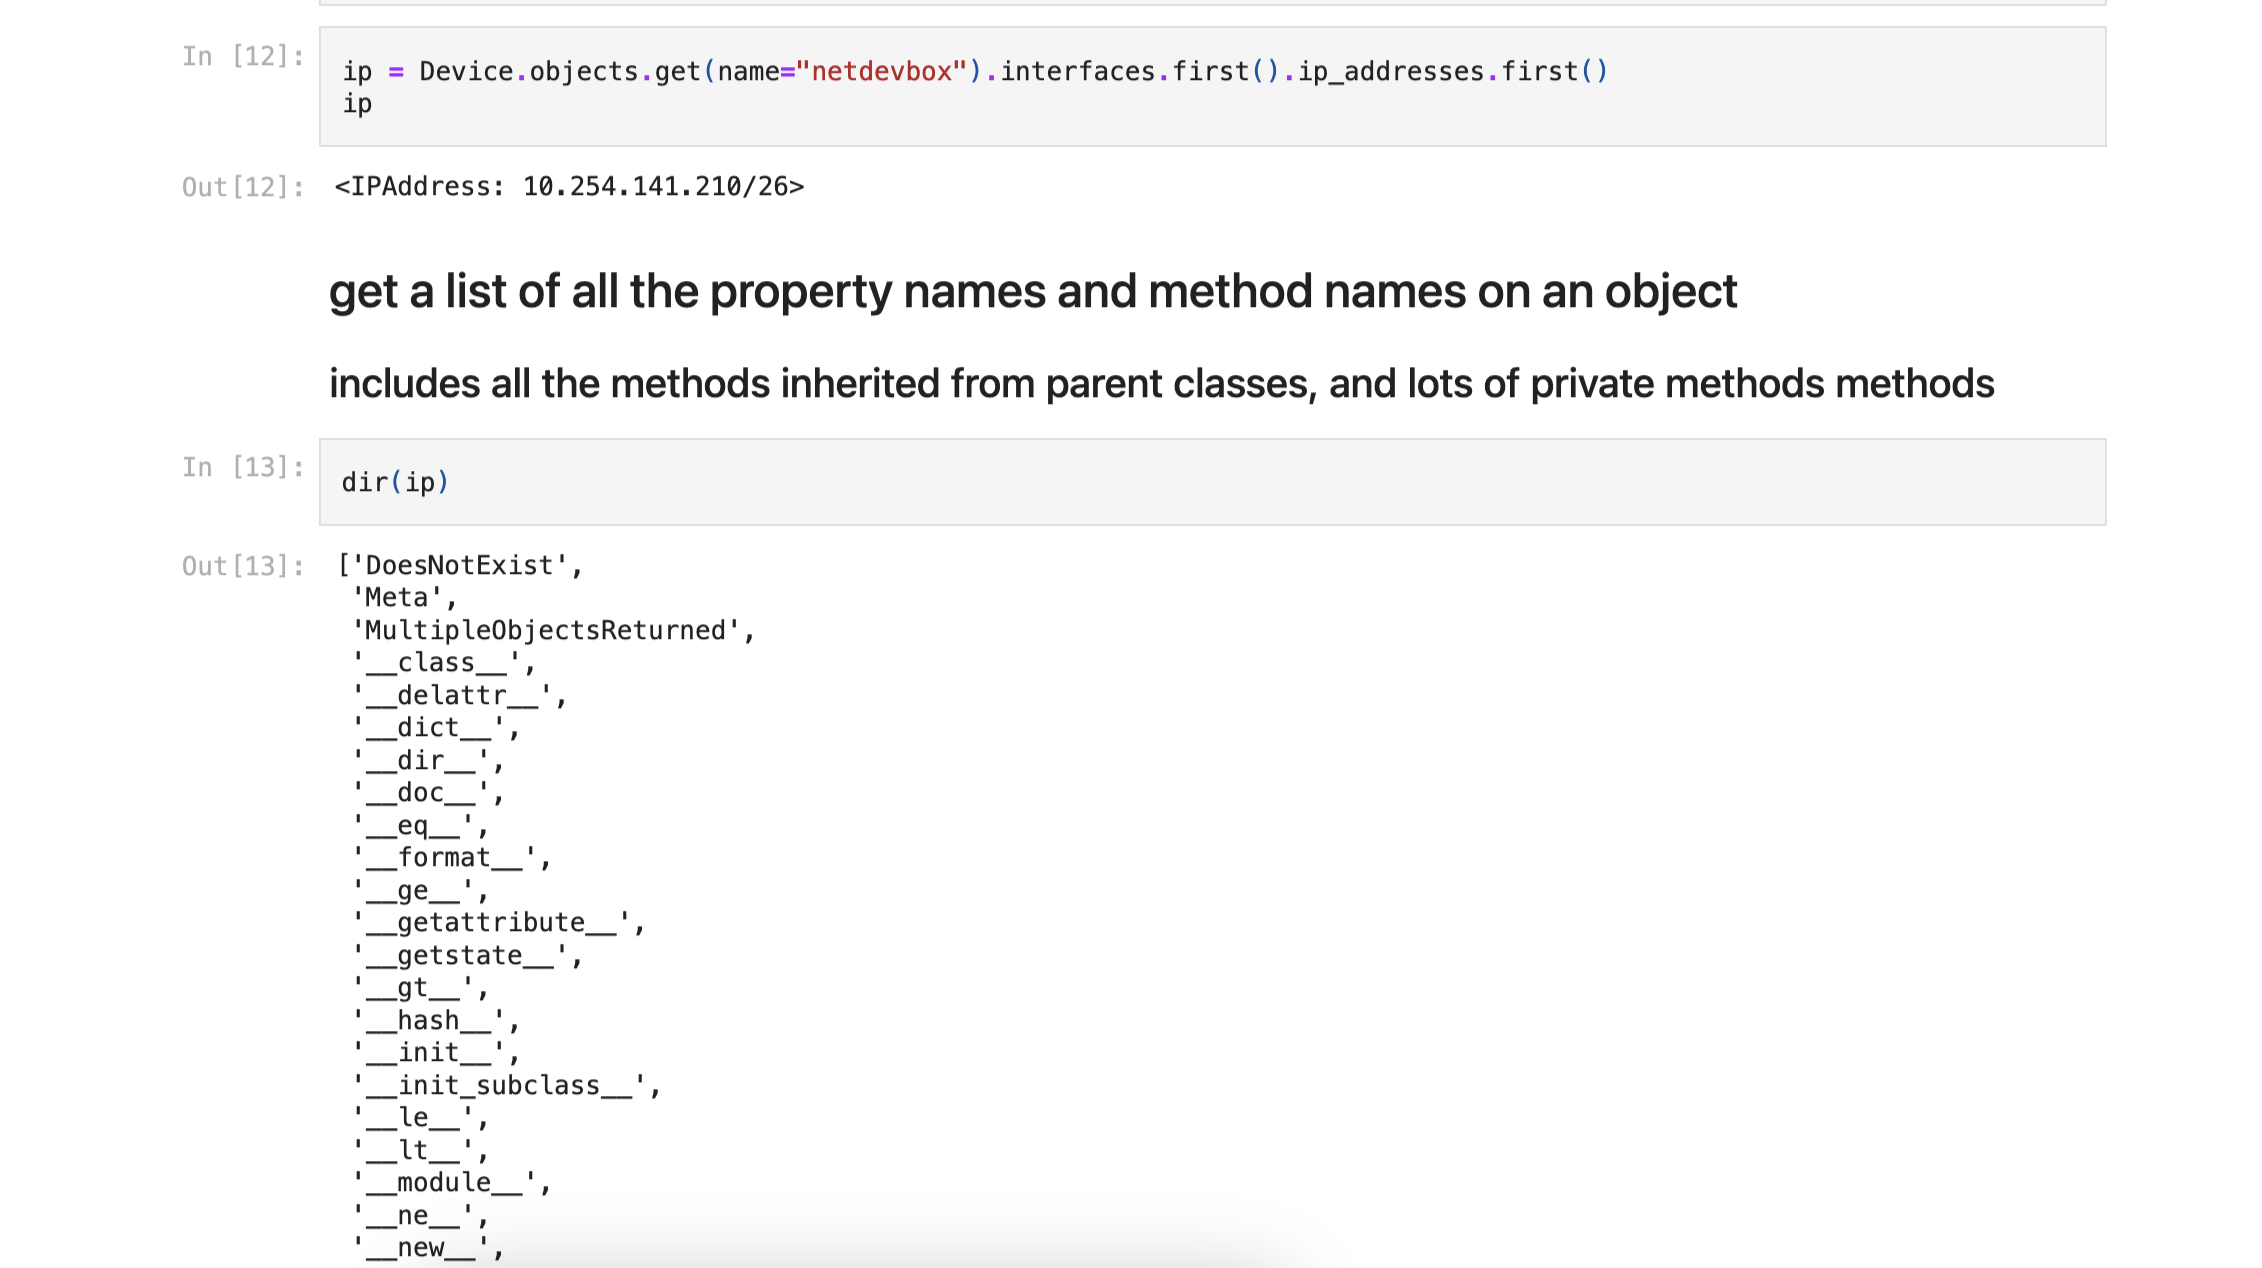
We will use the IP address to find out all kinds of other things using different models
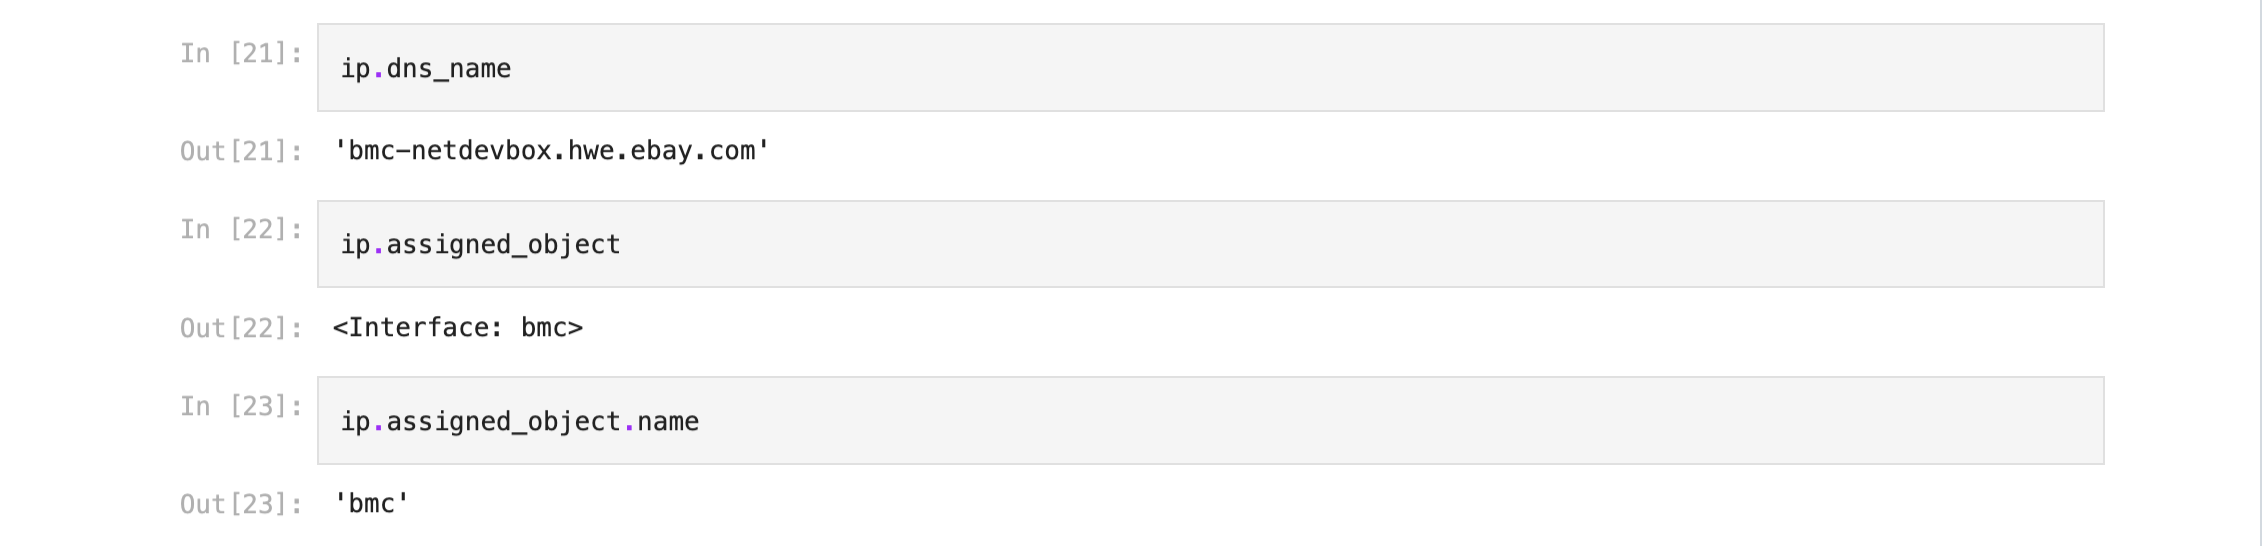
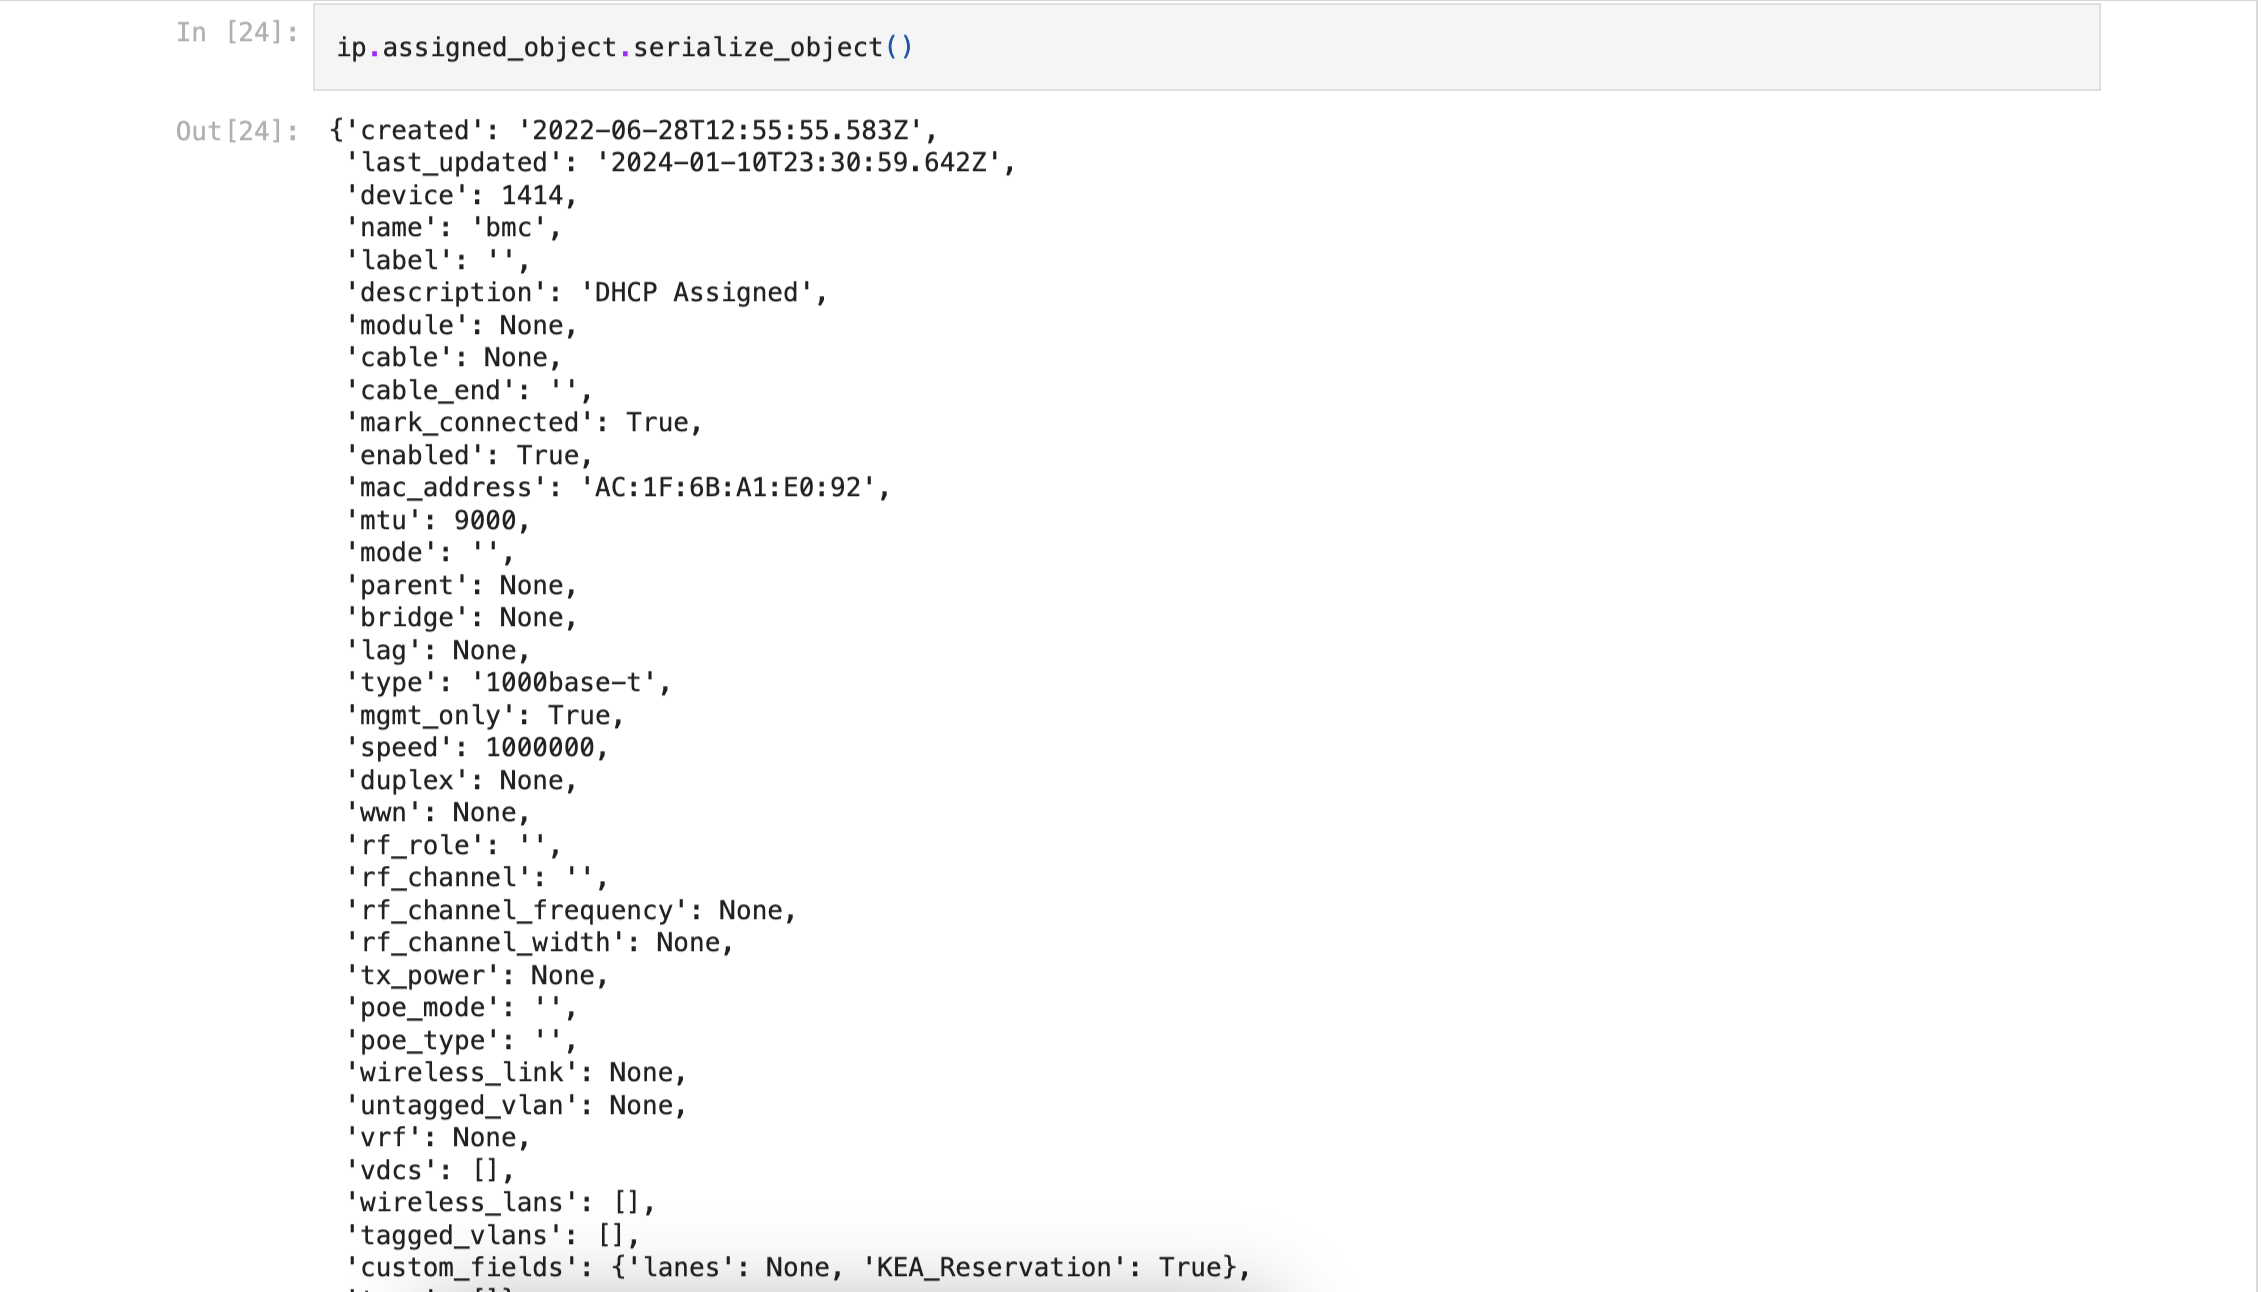
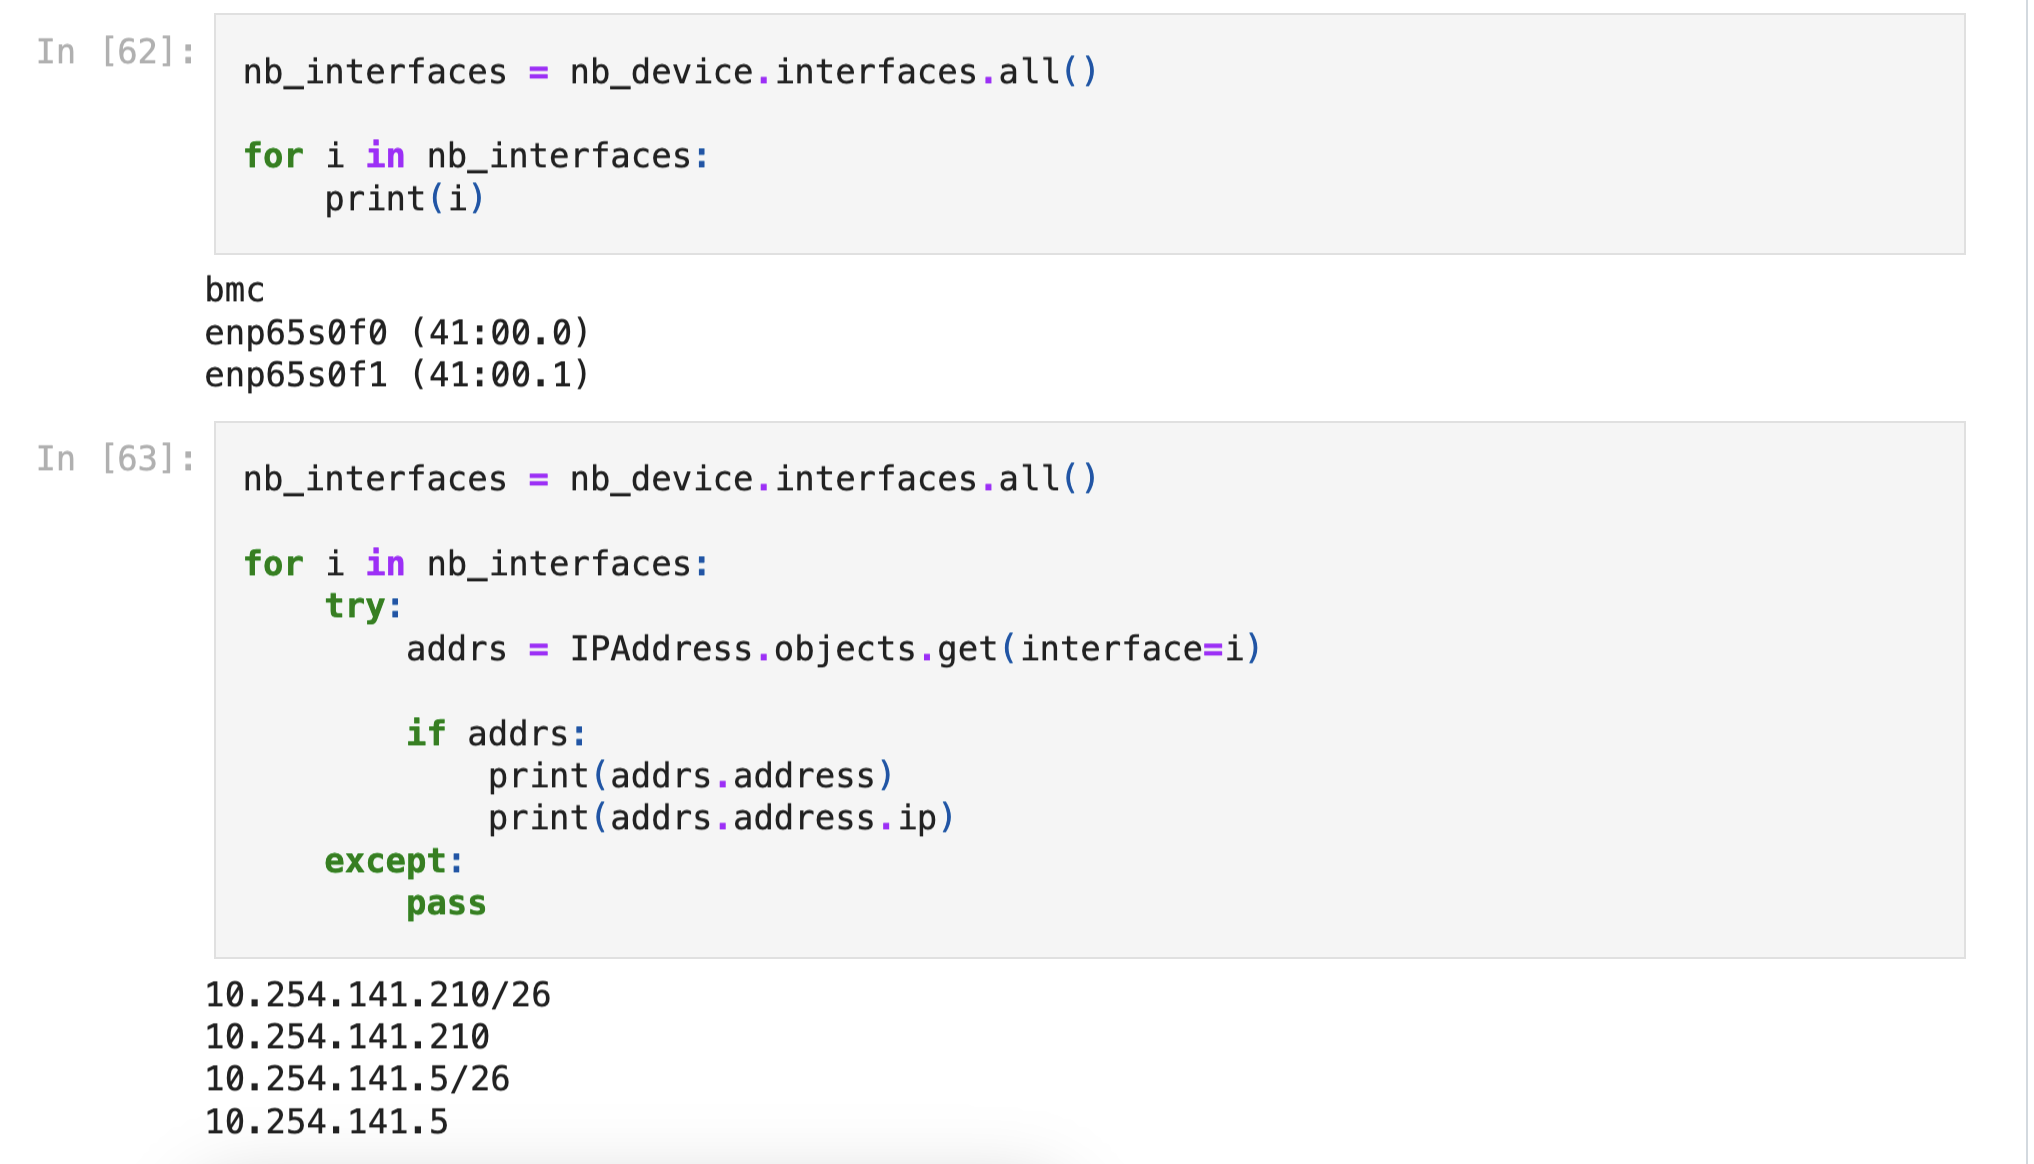
We can use the IP address to get all the info about the interface it’s assigned to
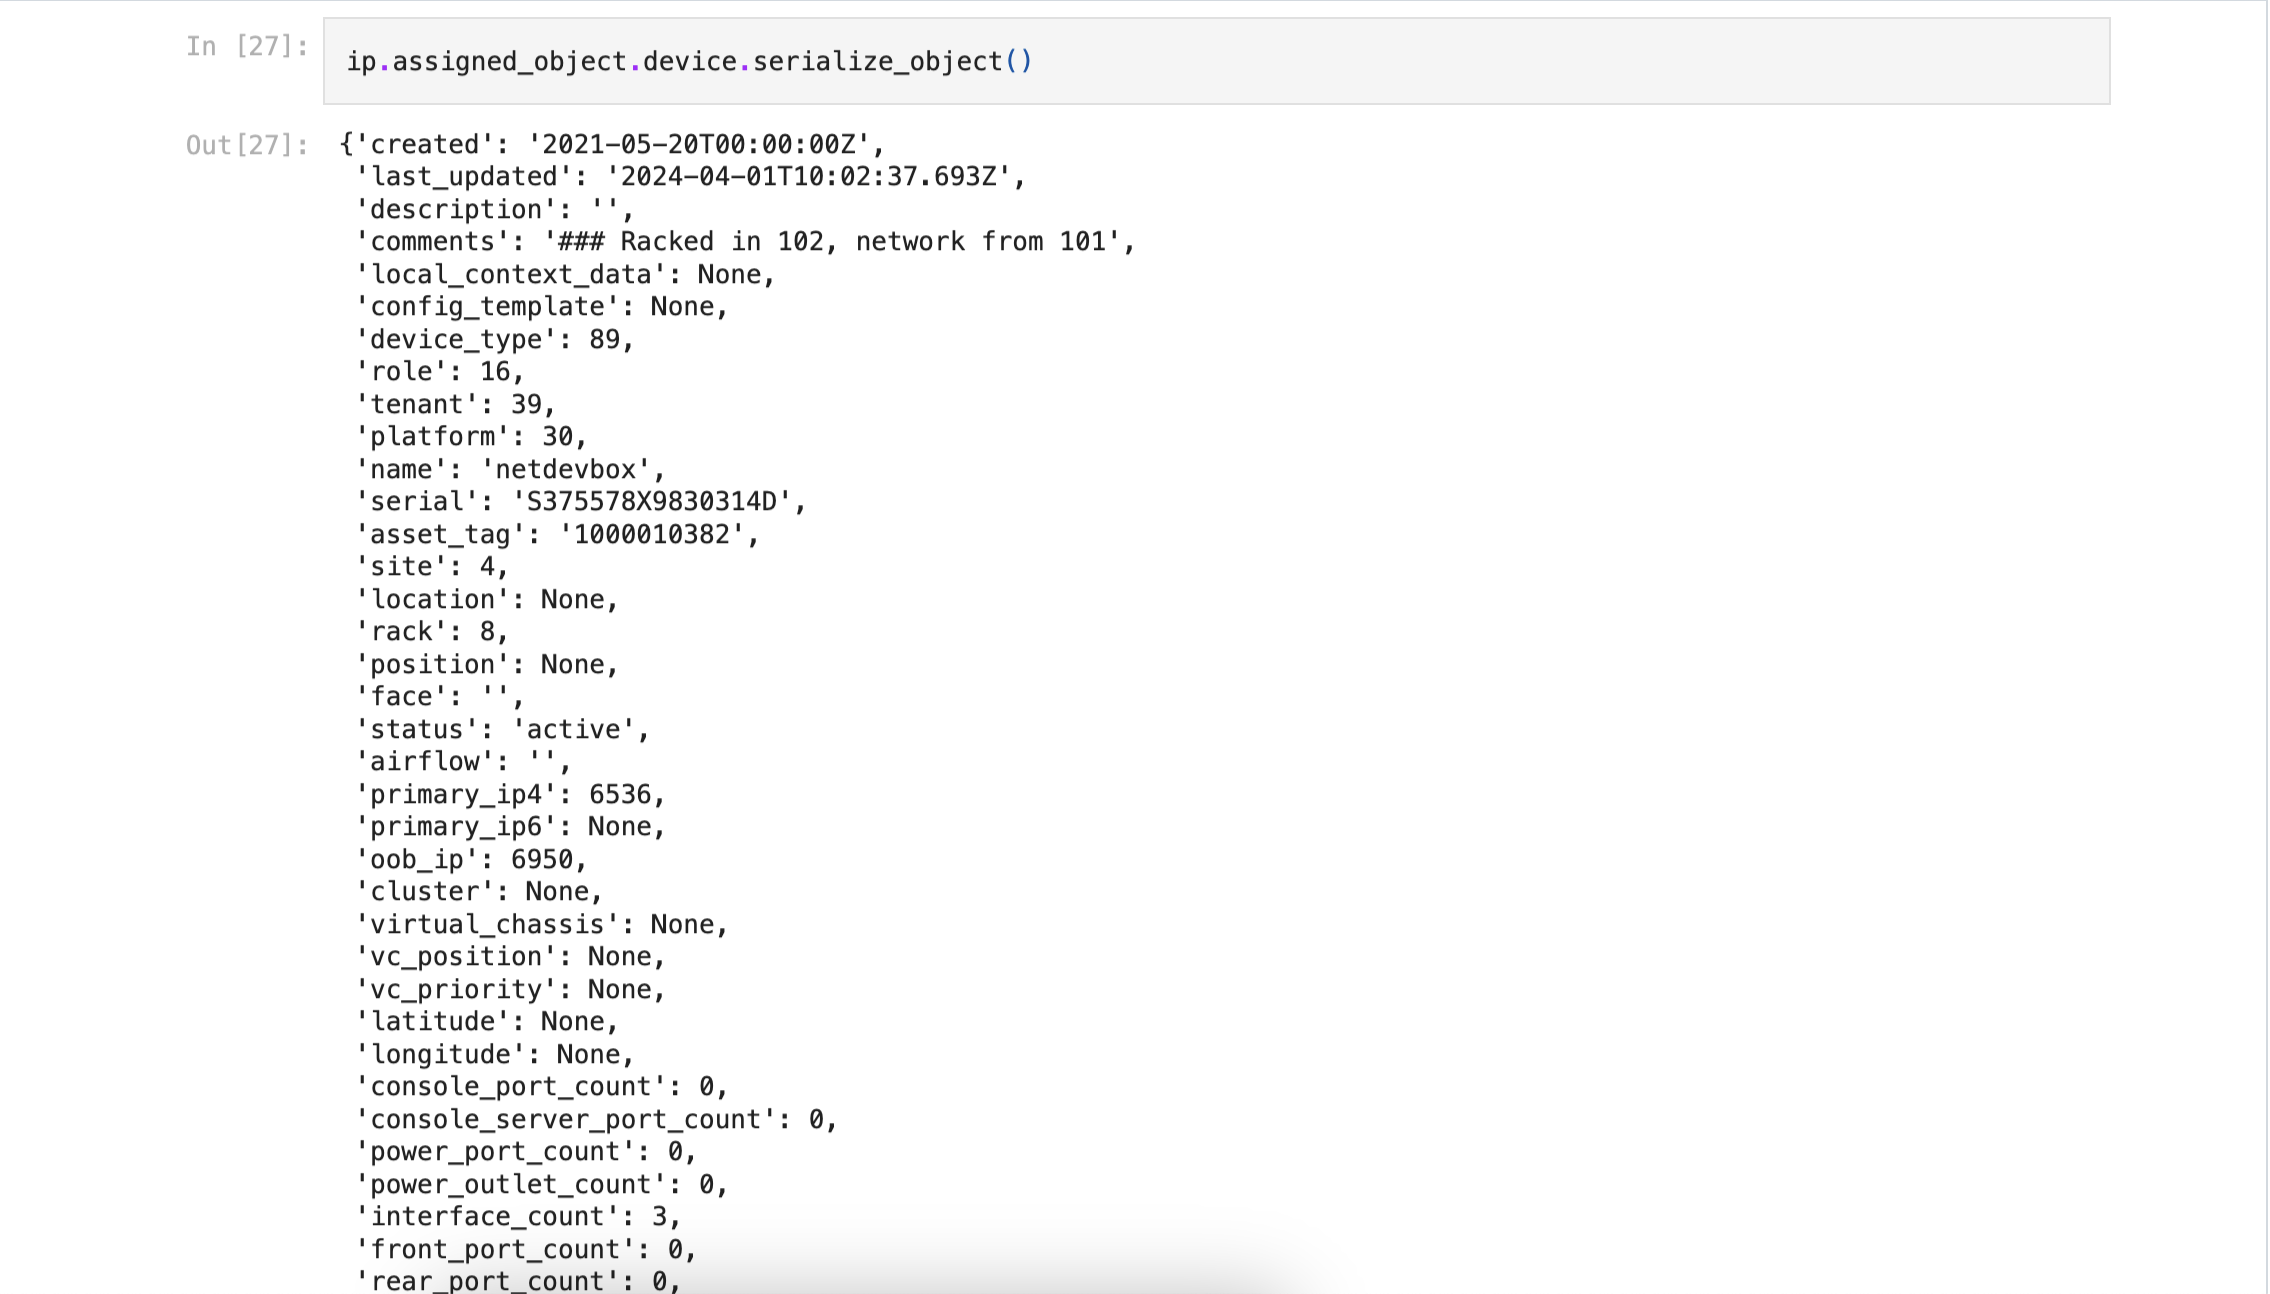
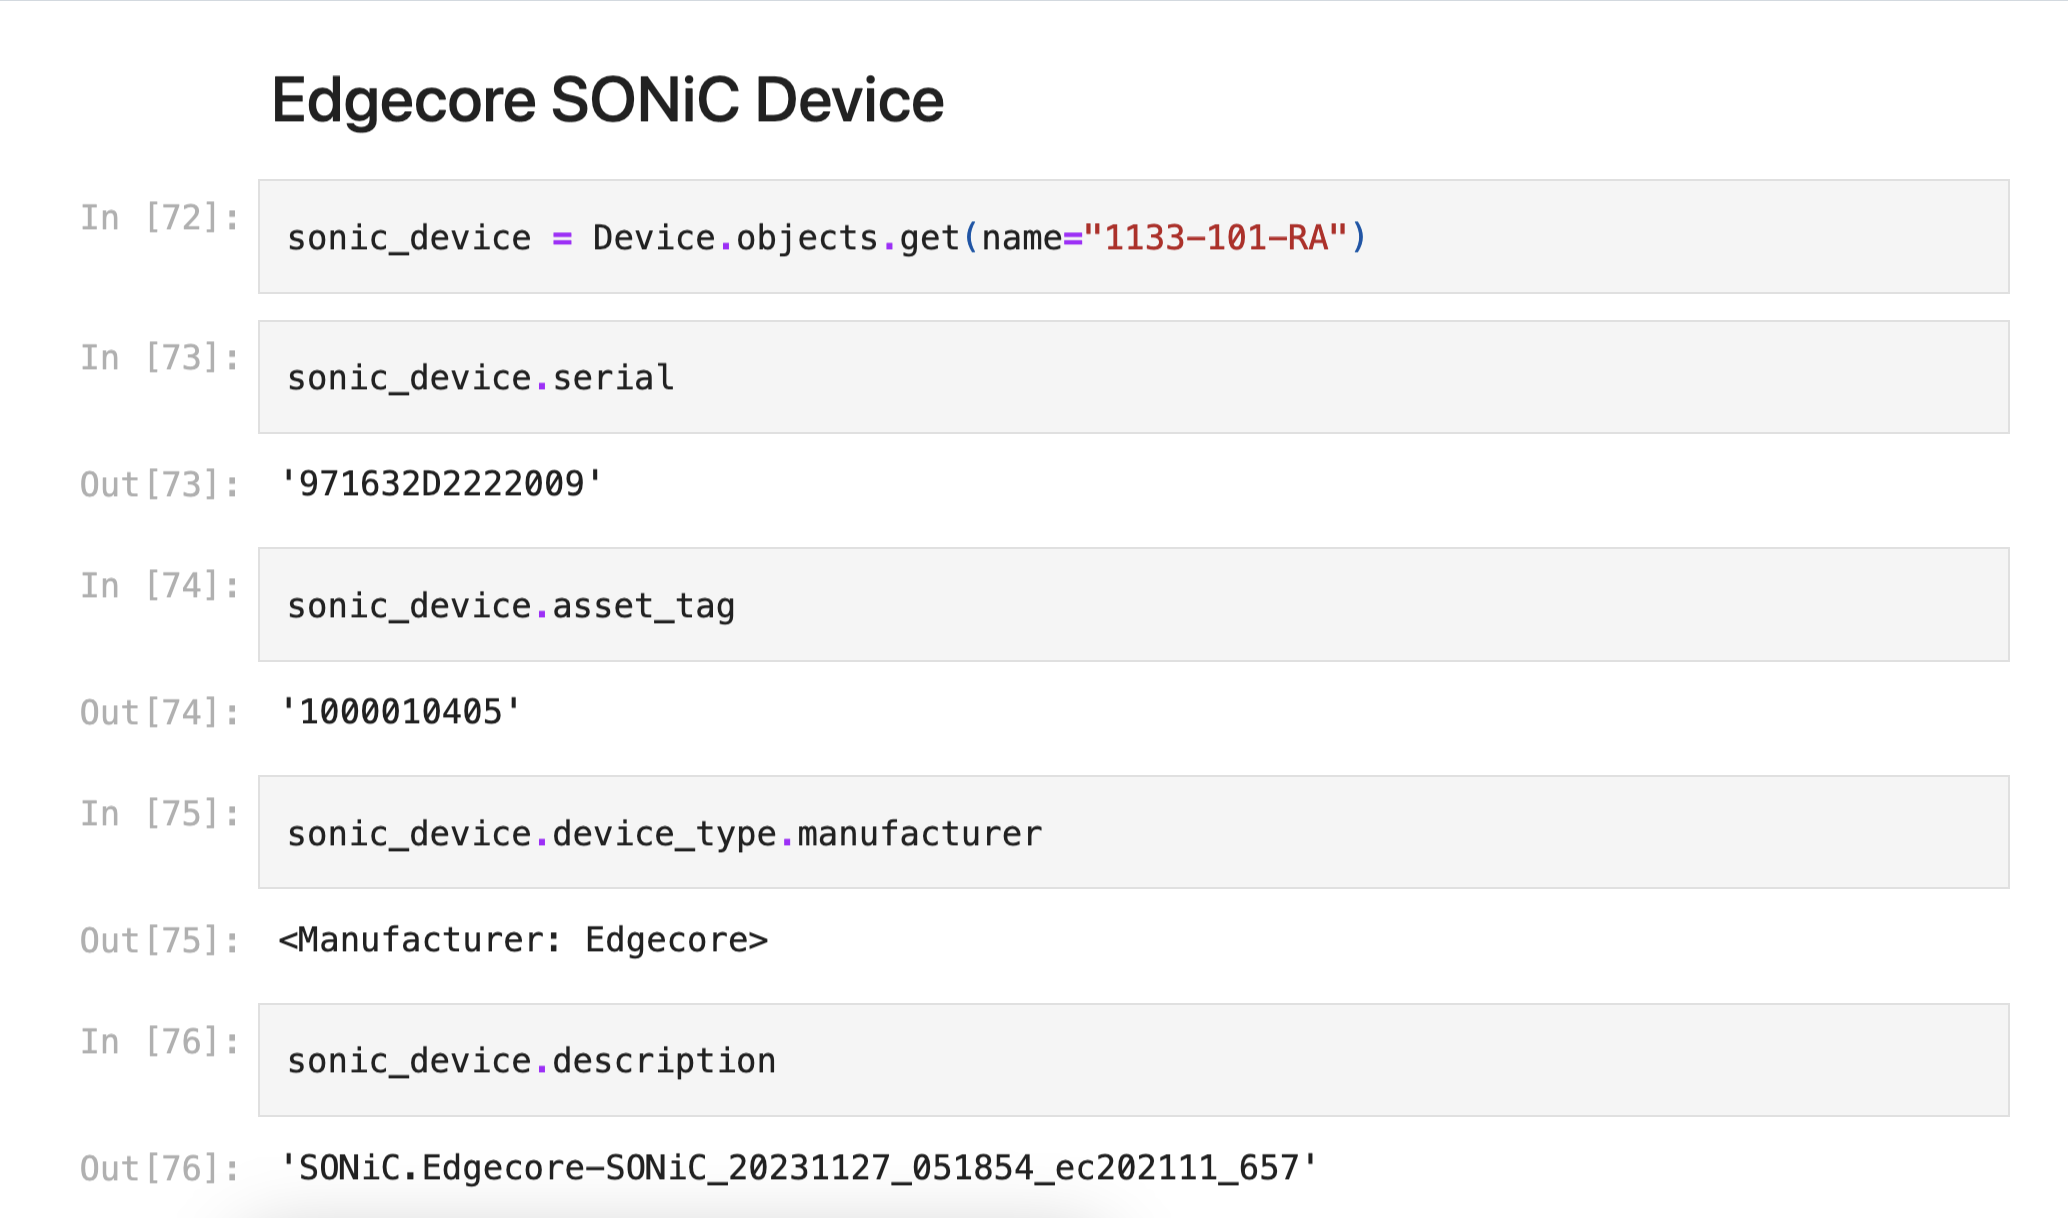
We can also look at what device that IP is assigned to
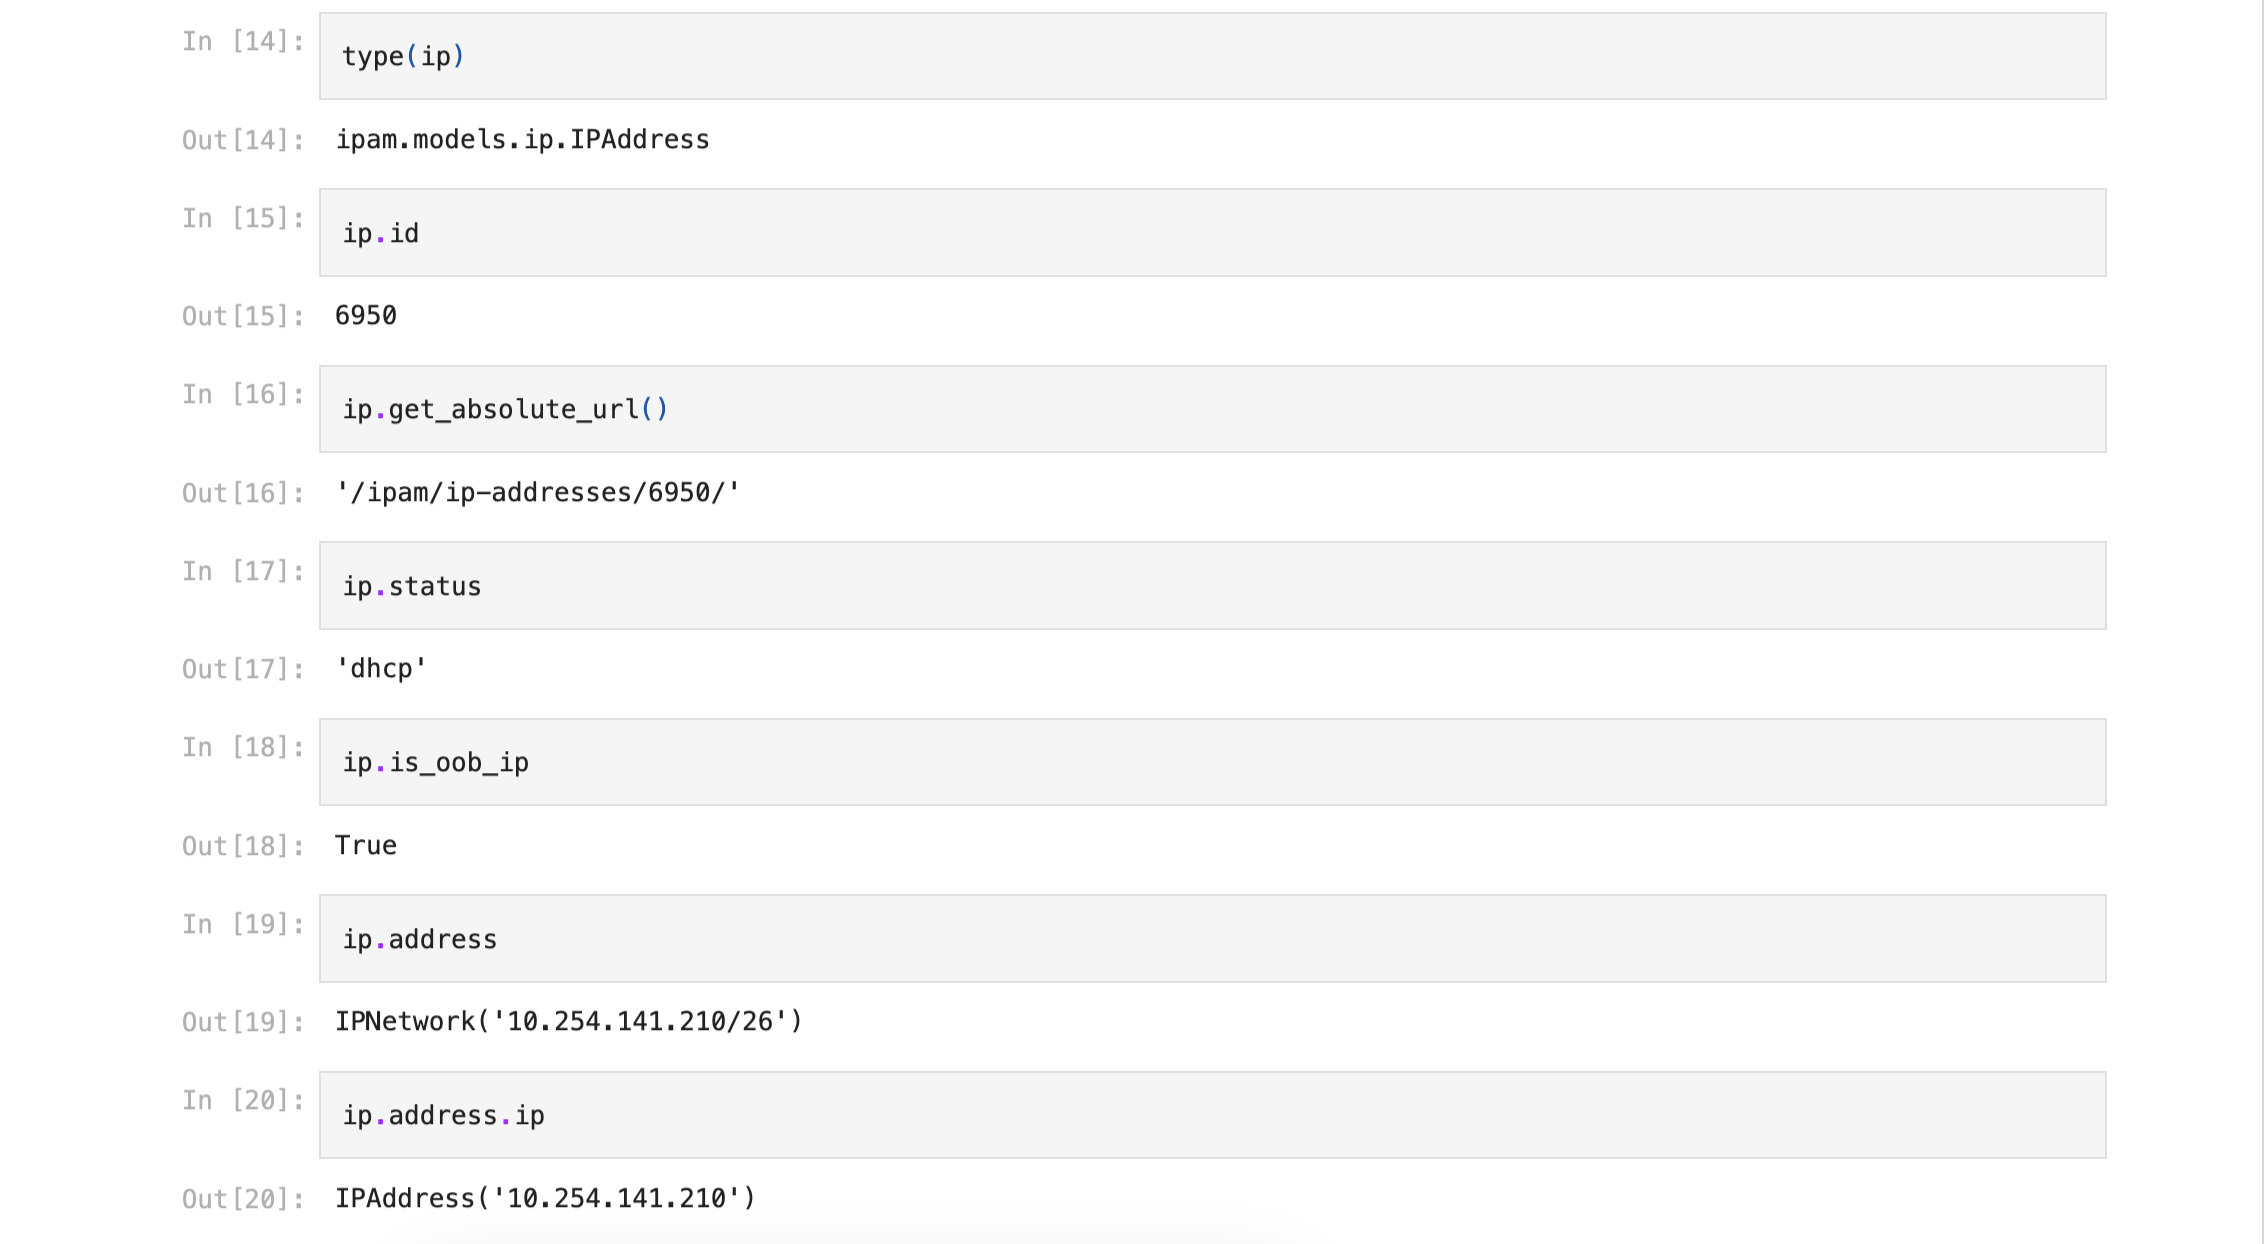
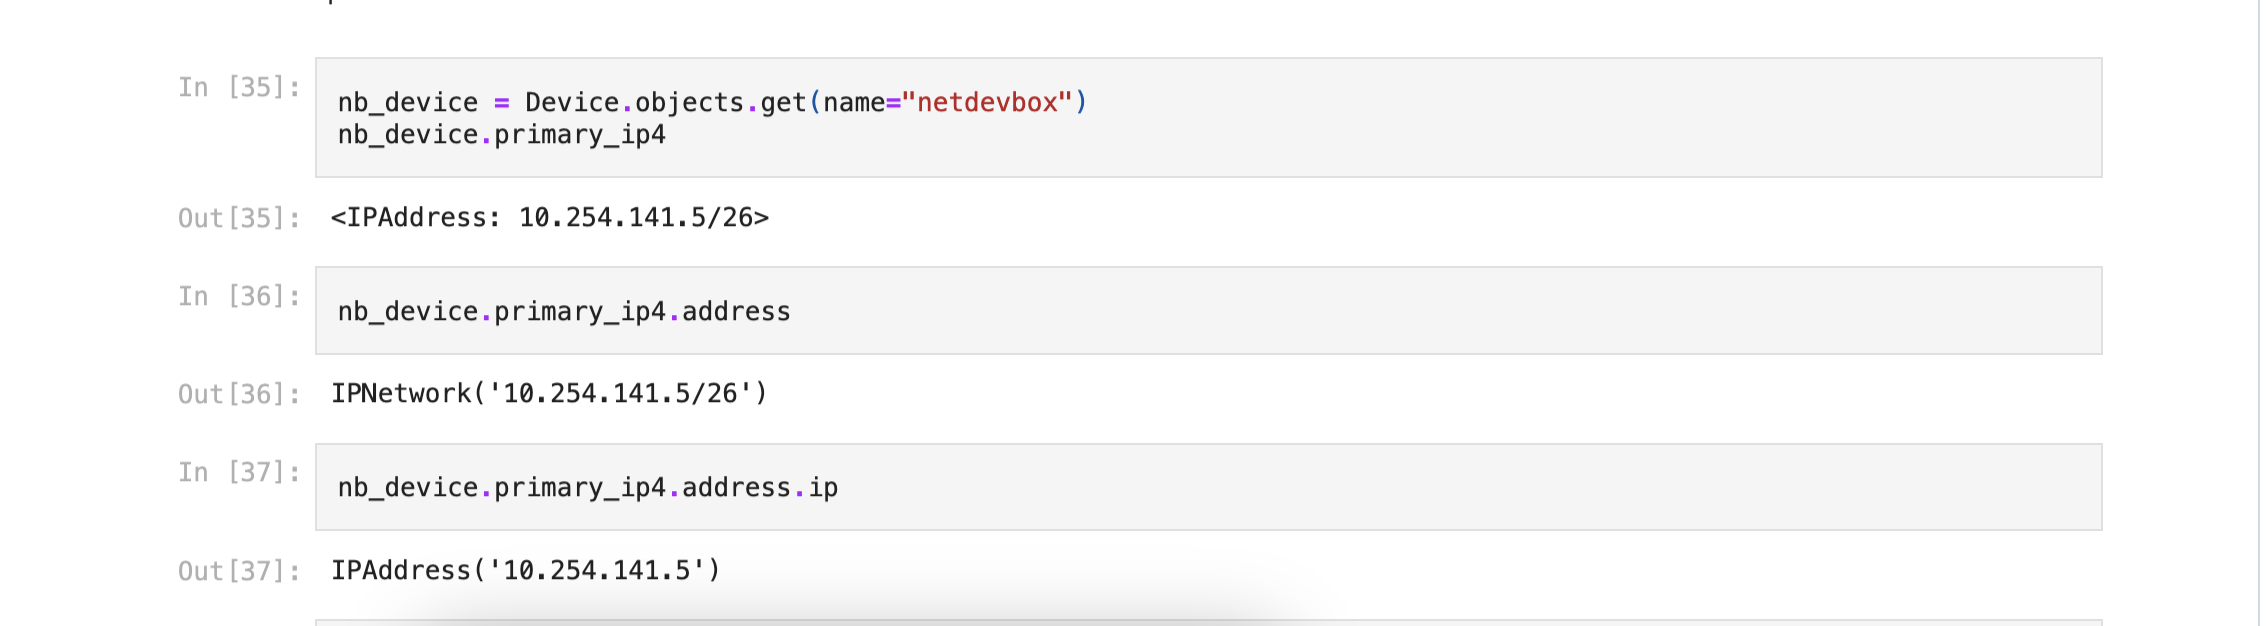
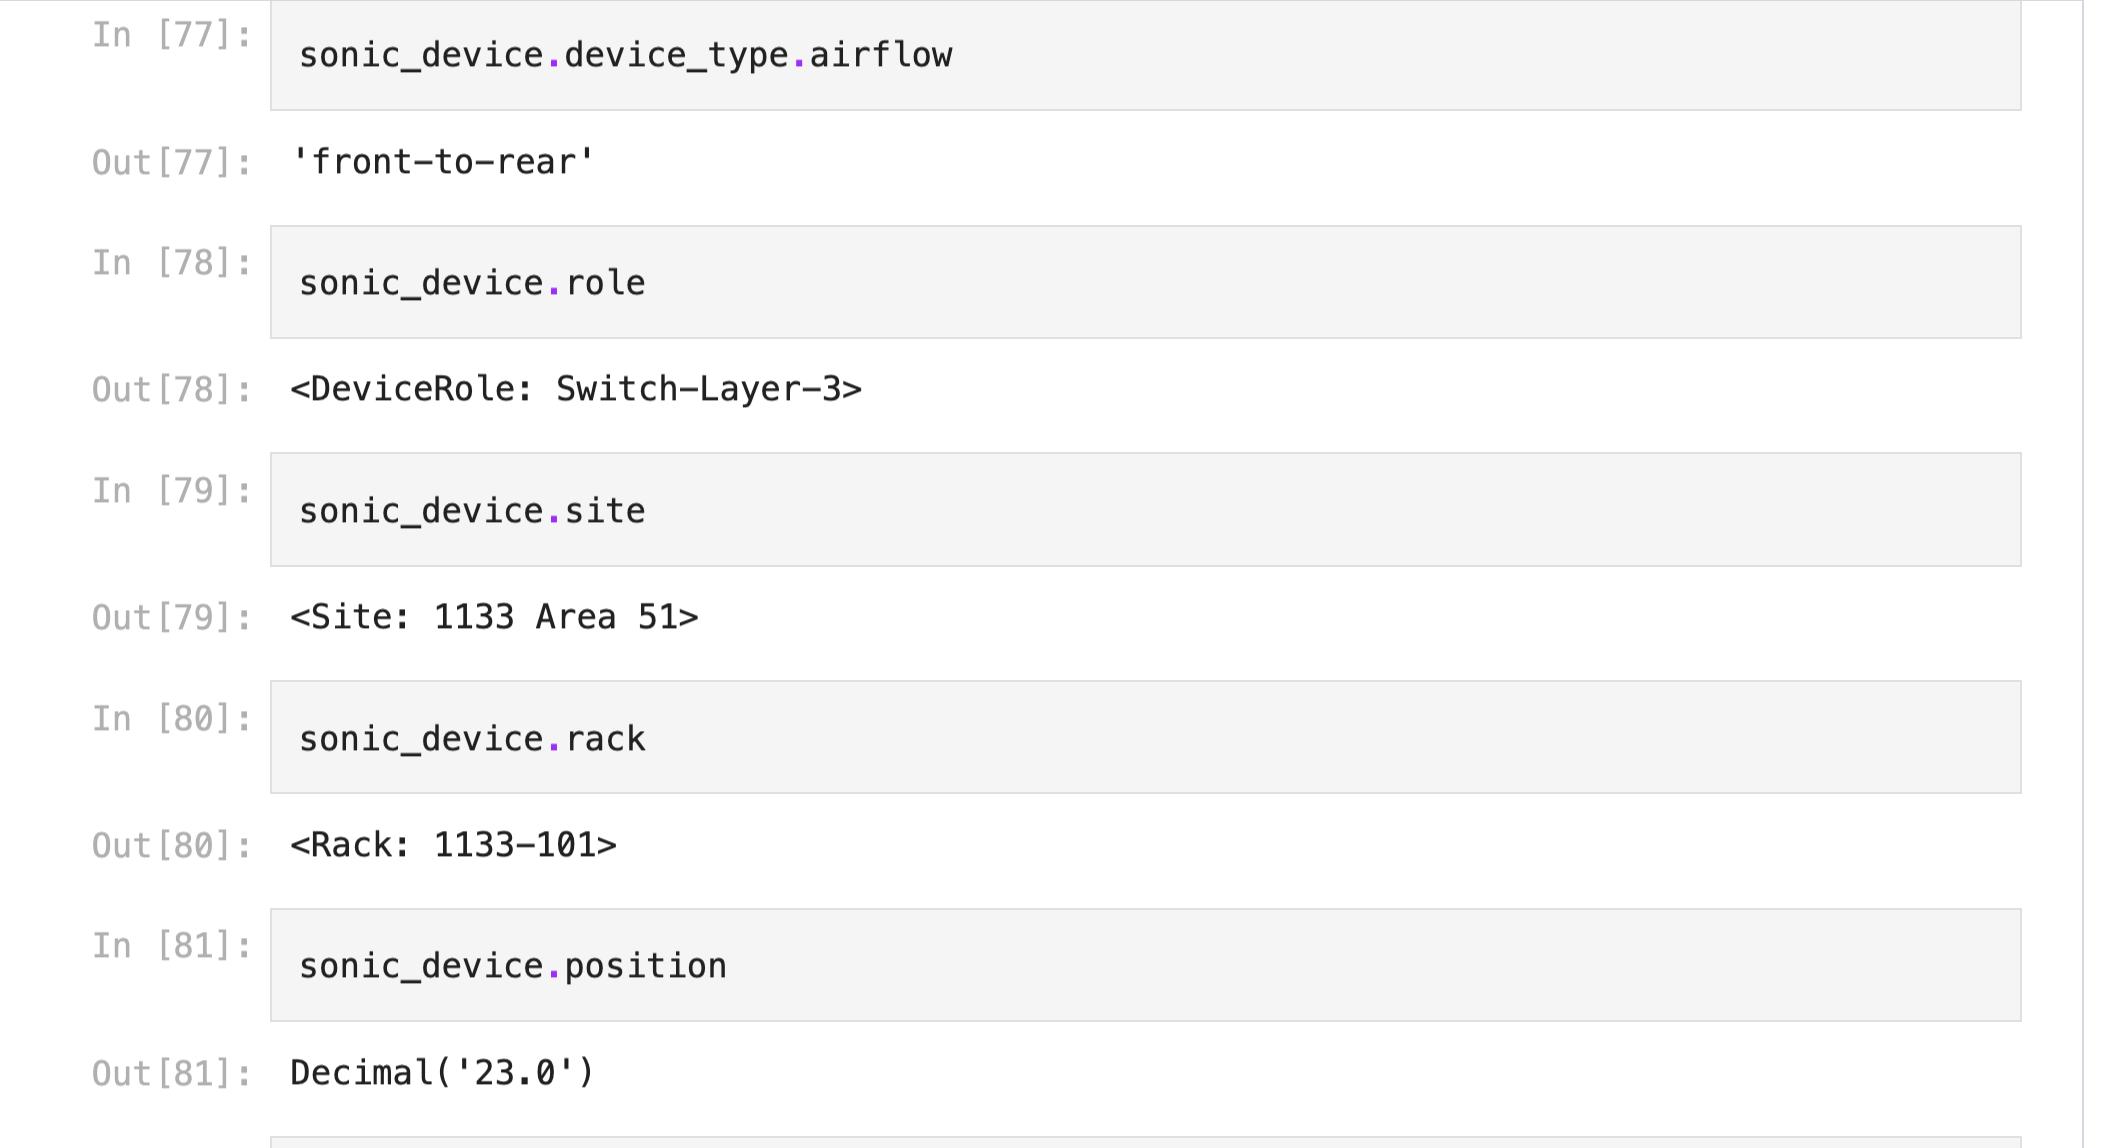
Using the IP address we can see all of the details of the device it’s assigned to
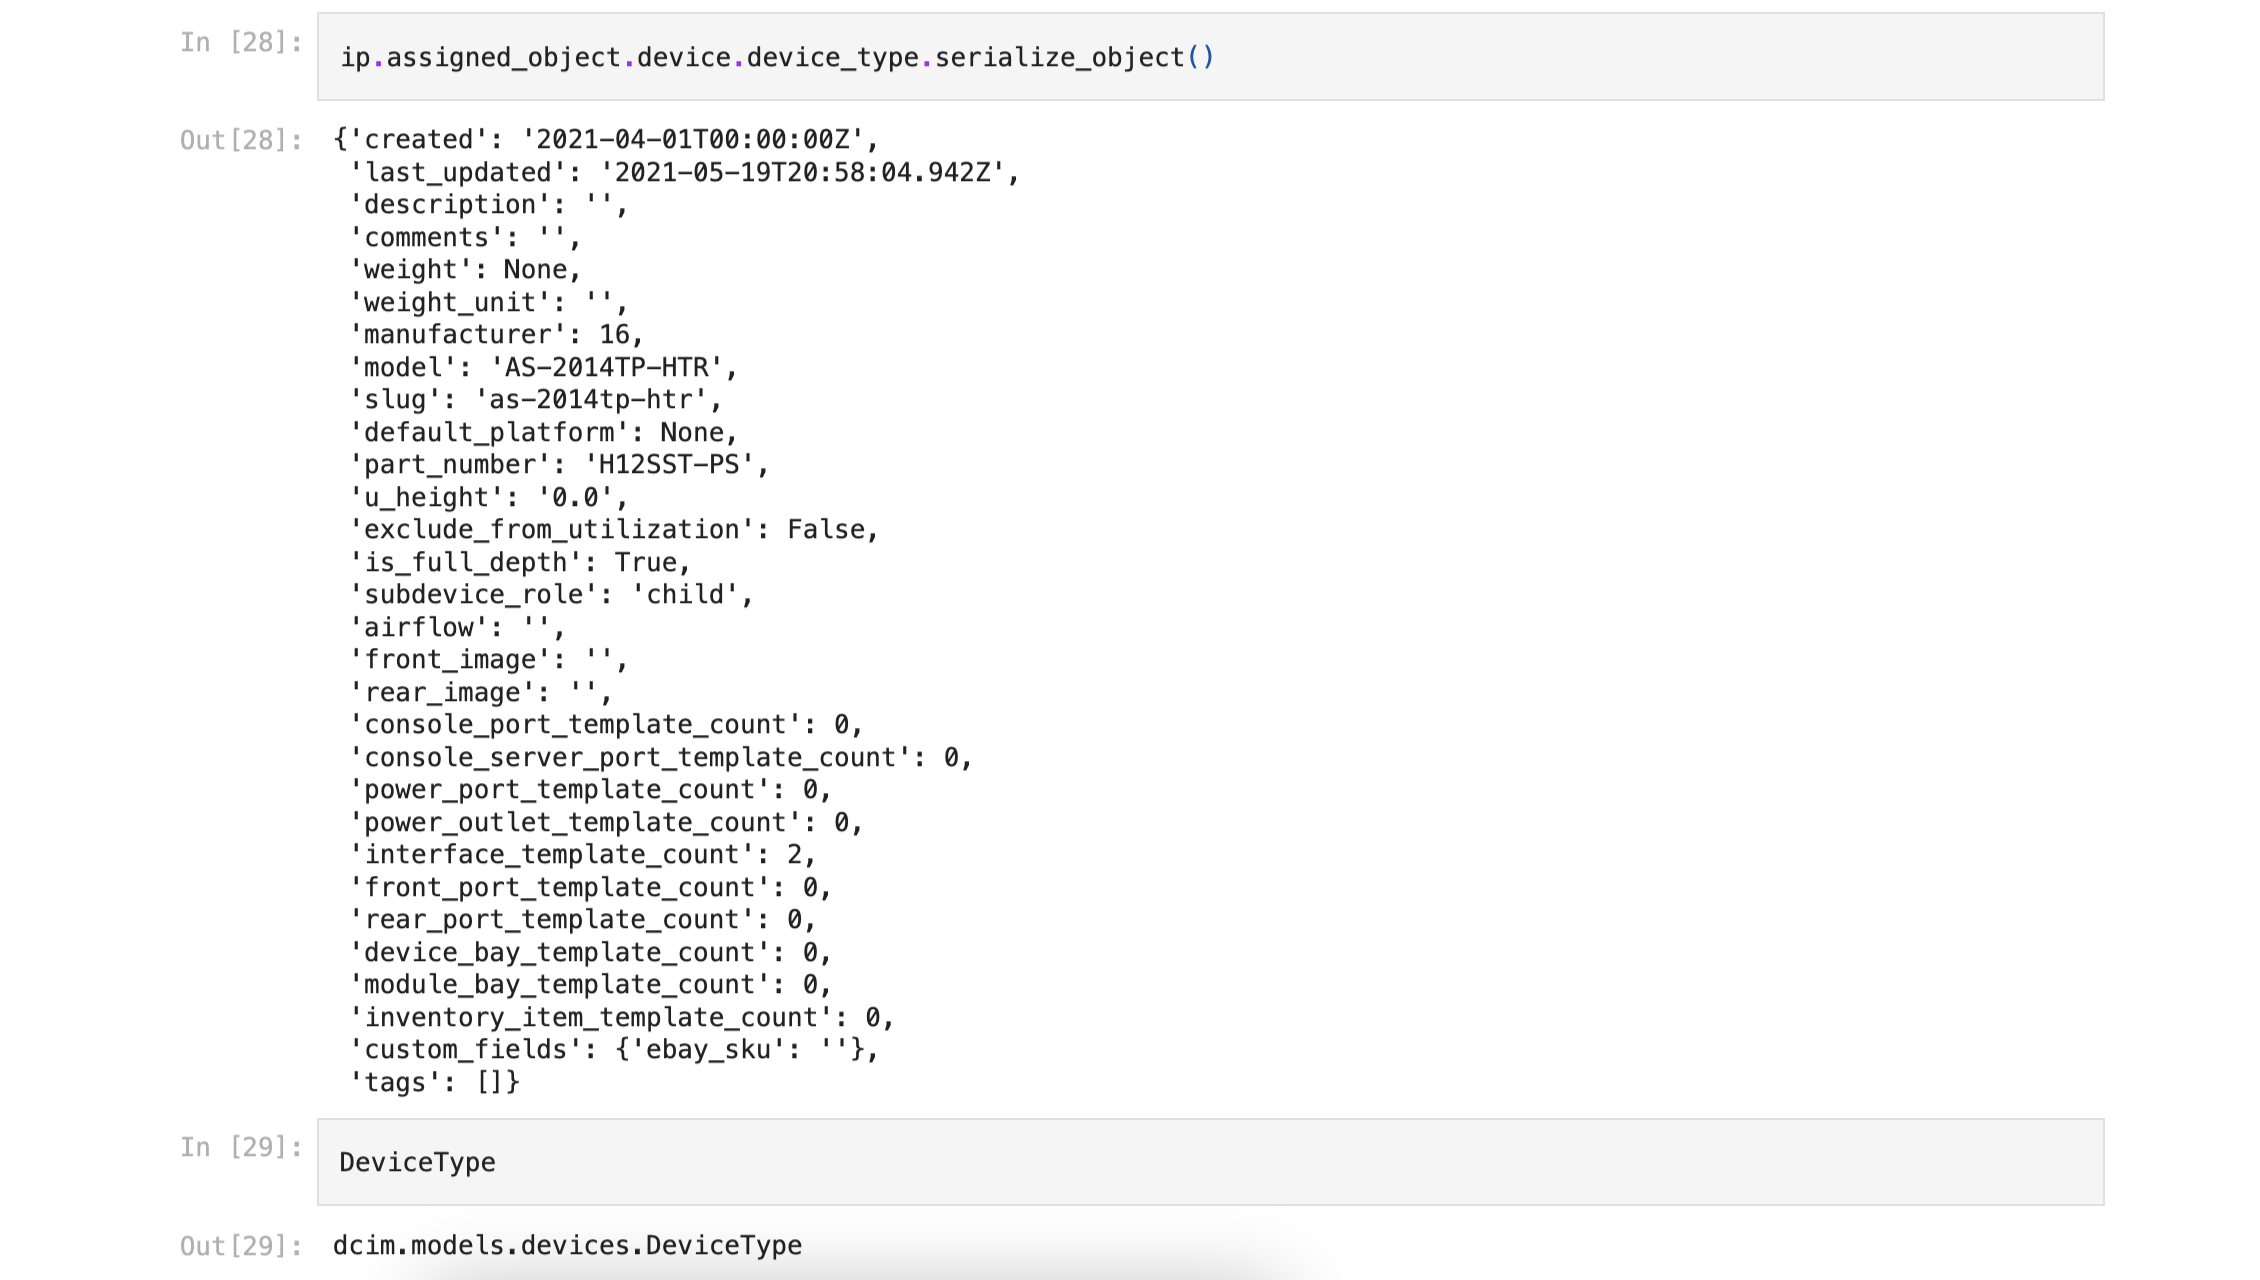
Using the IP we can see all of the details of the device type by chaining the models
Next we can dig into the help for the Device Type Model
You can work from the other direction and find IP from Device Name
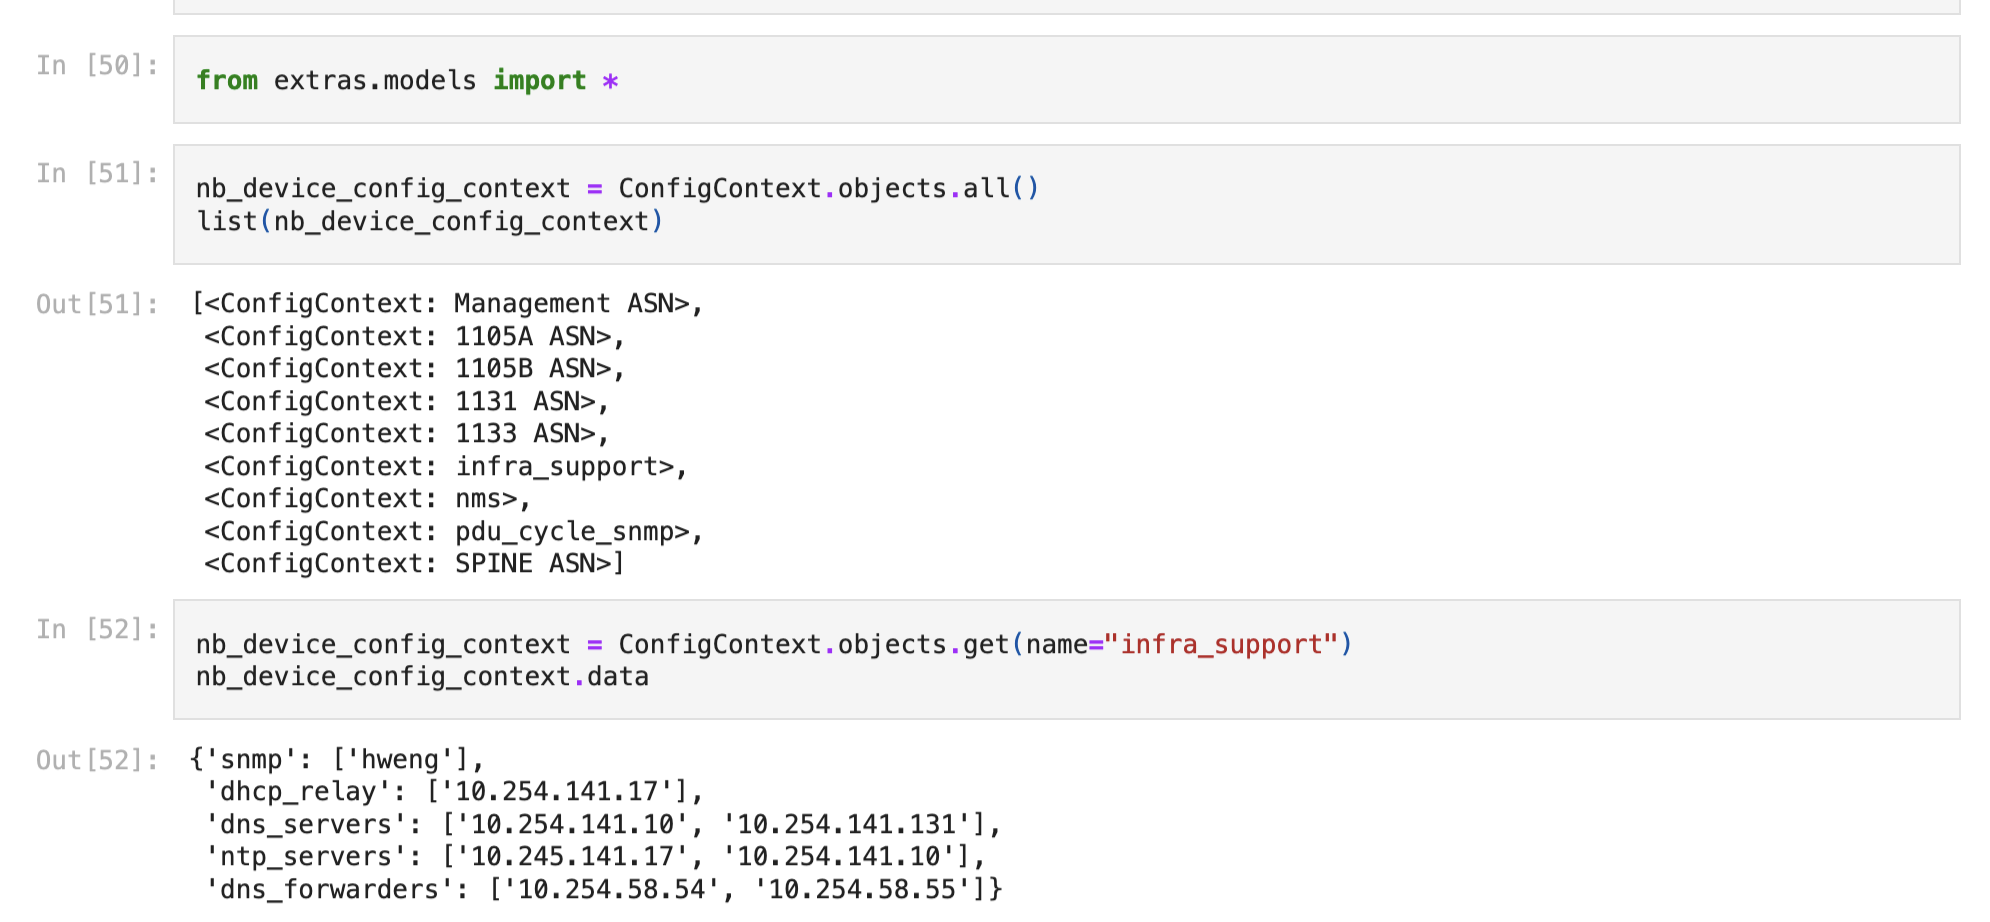
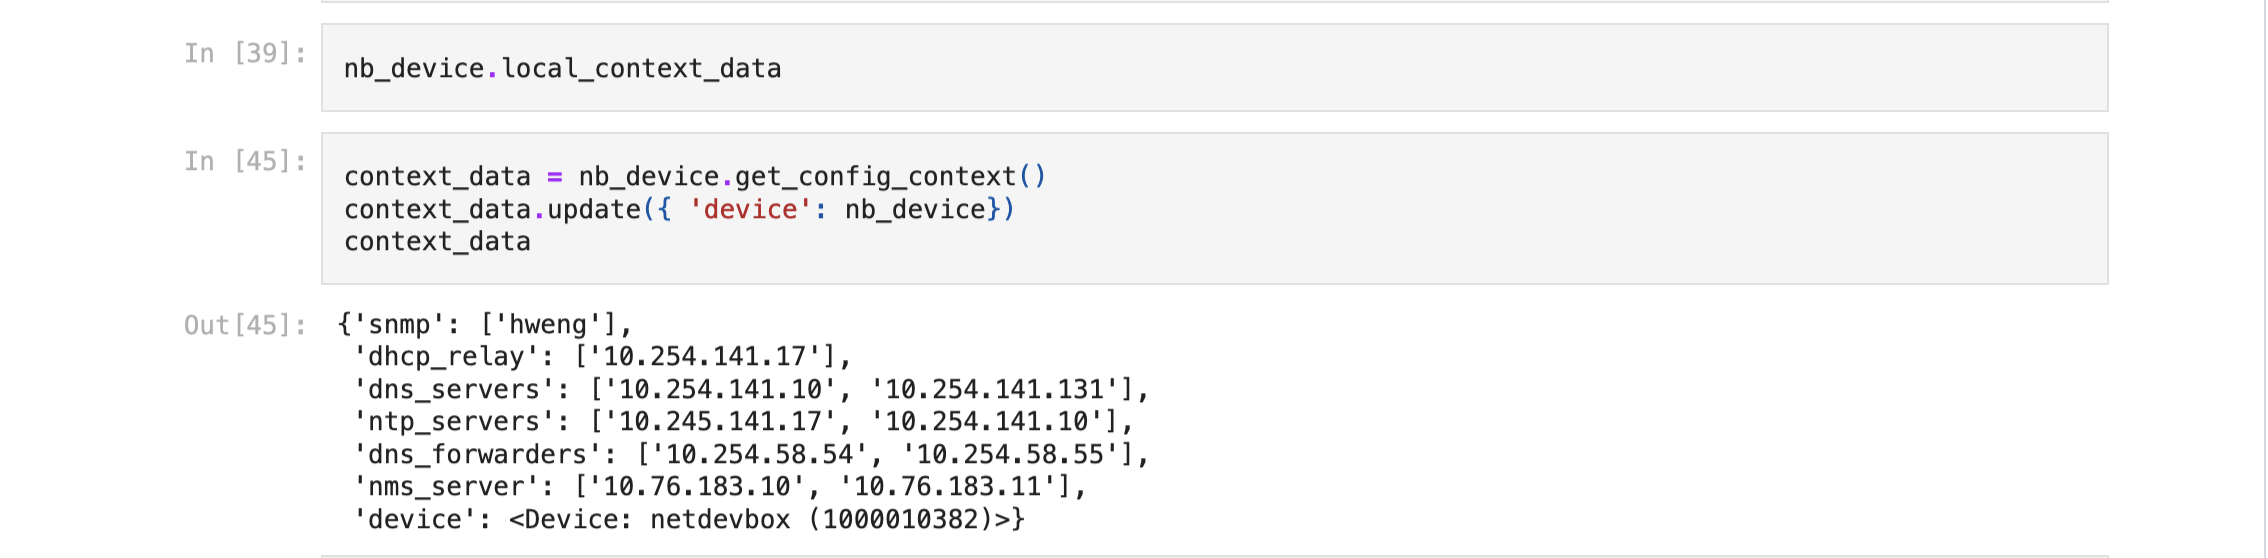
You can define config contexts that the devices inherit based off user criteria
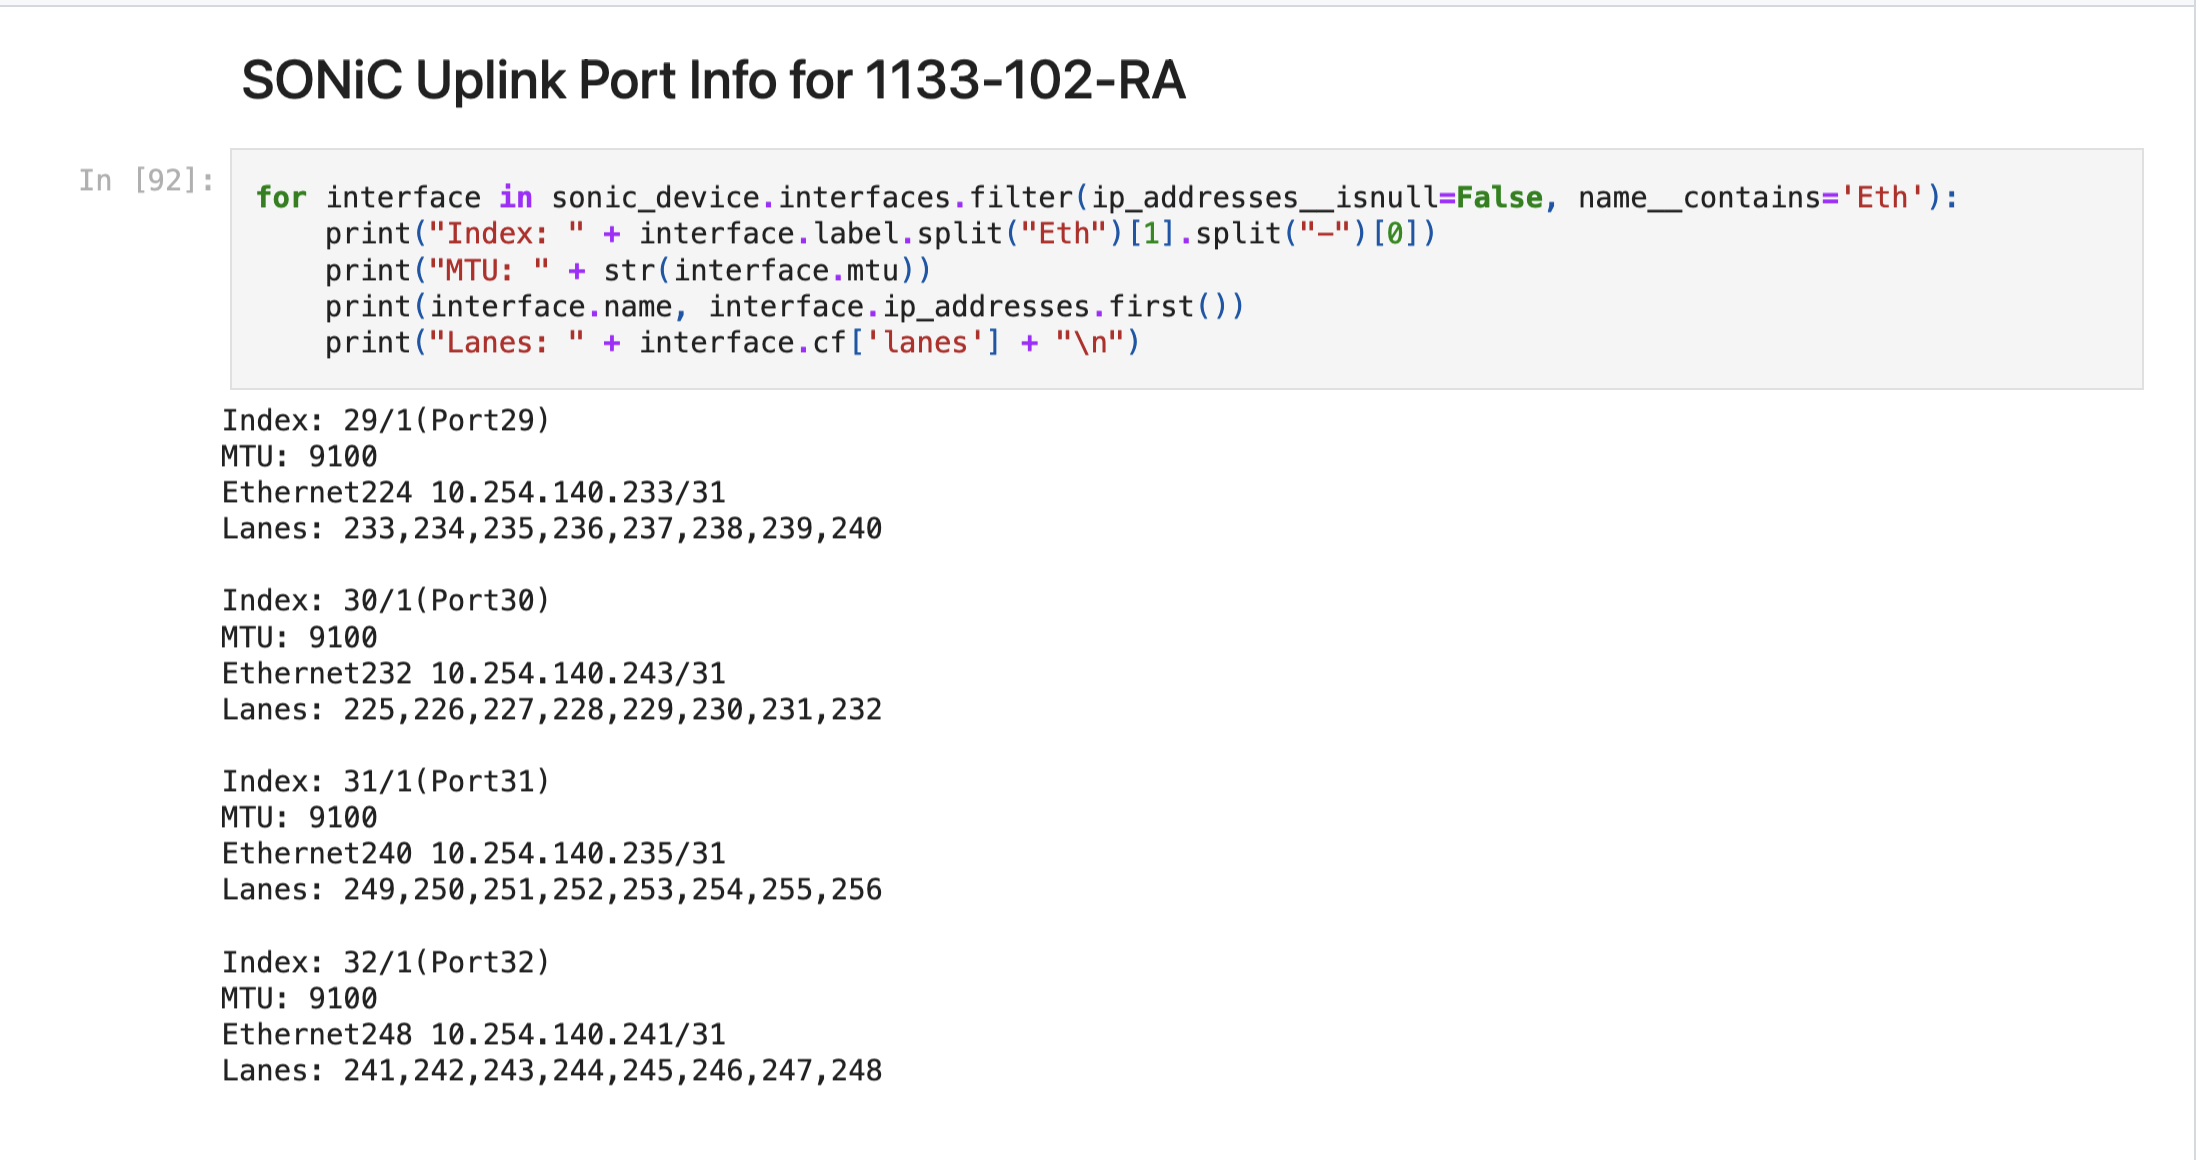
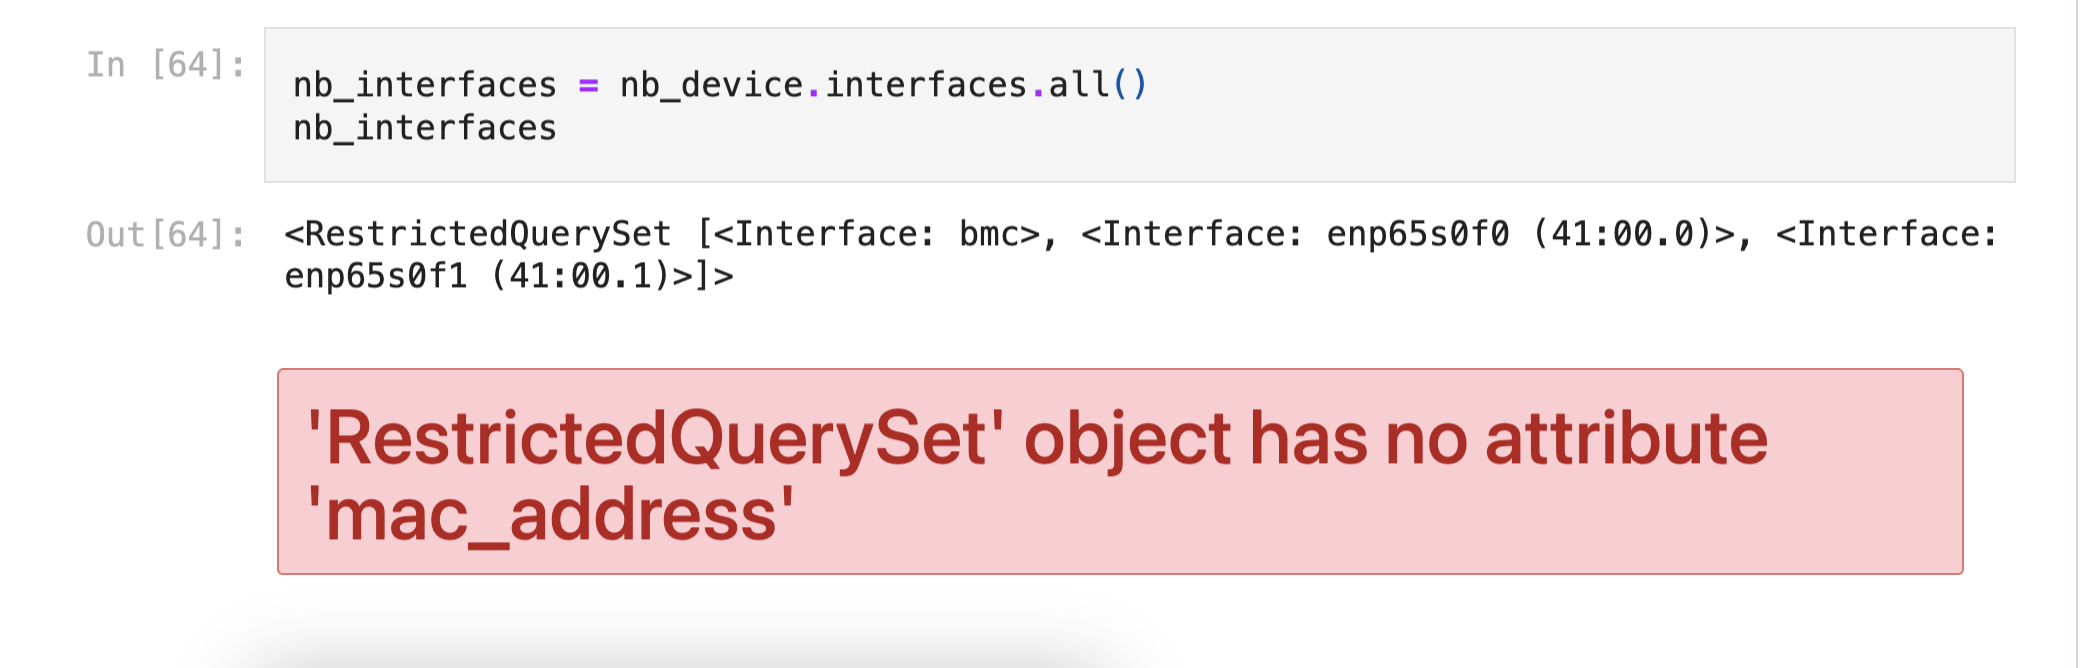
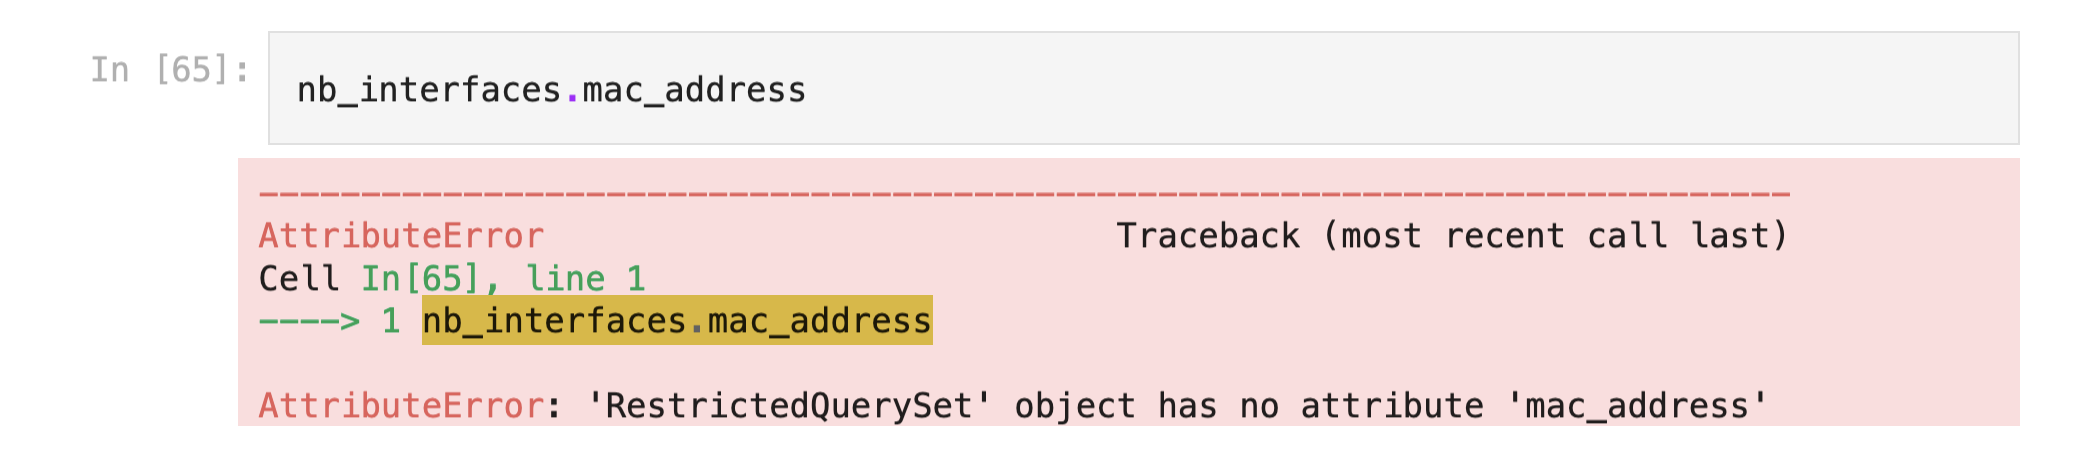
Digging into the Interface model various ways
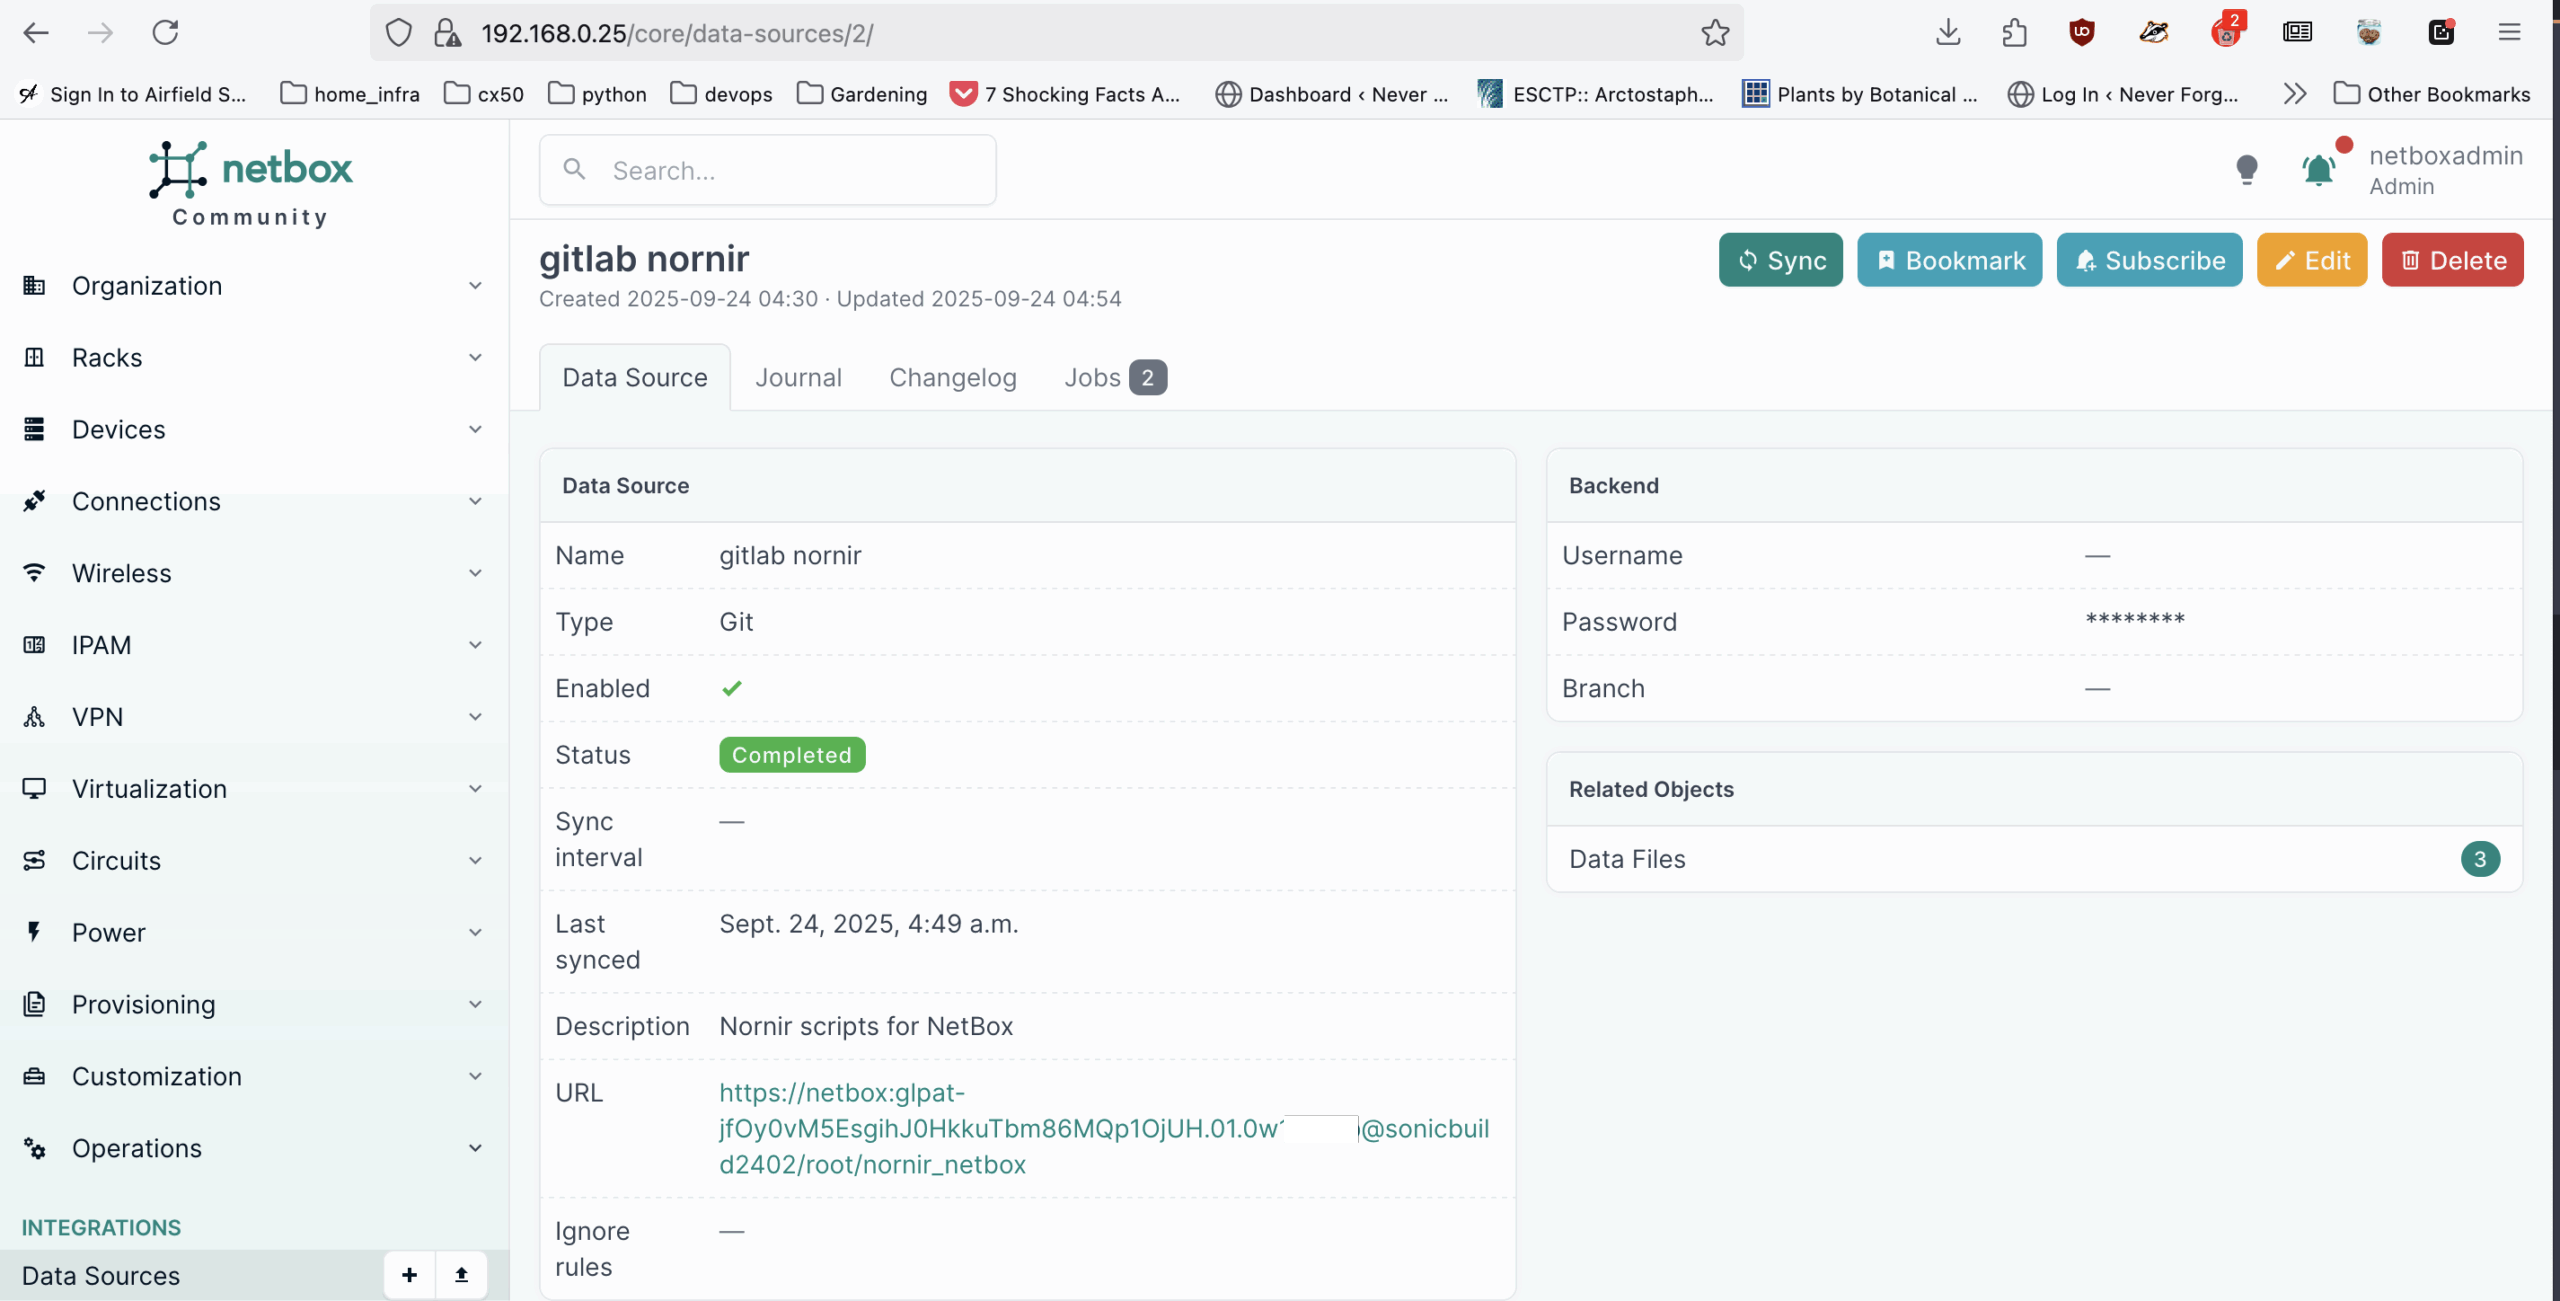
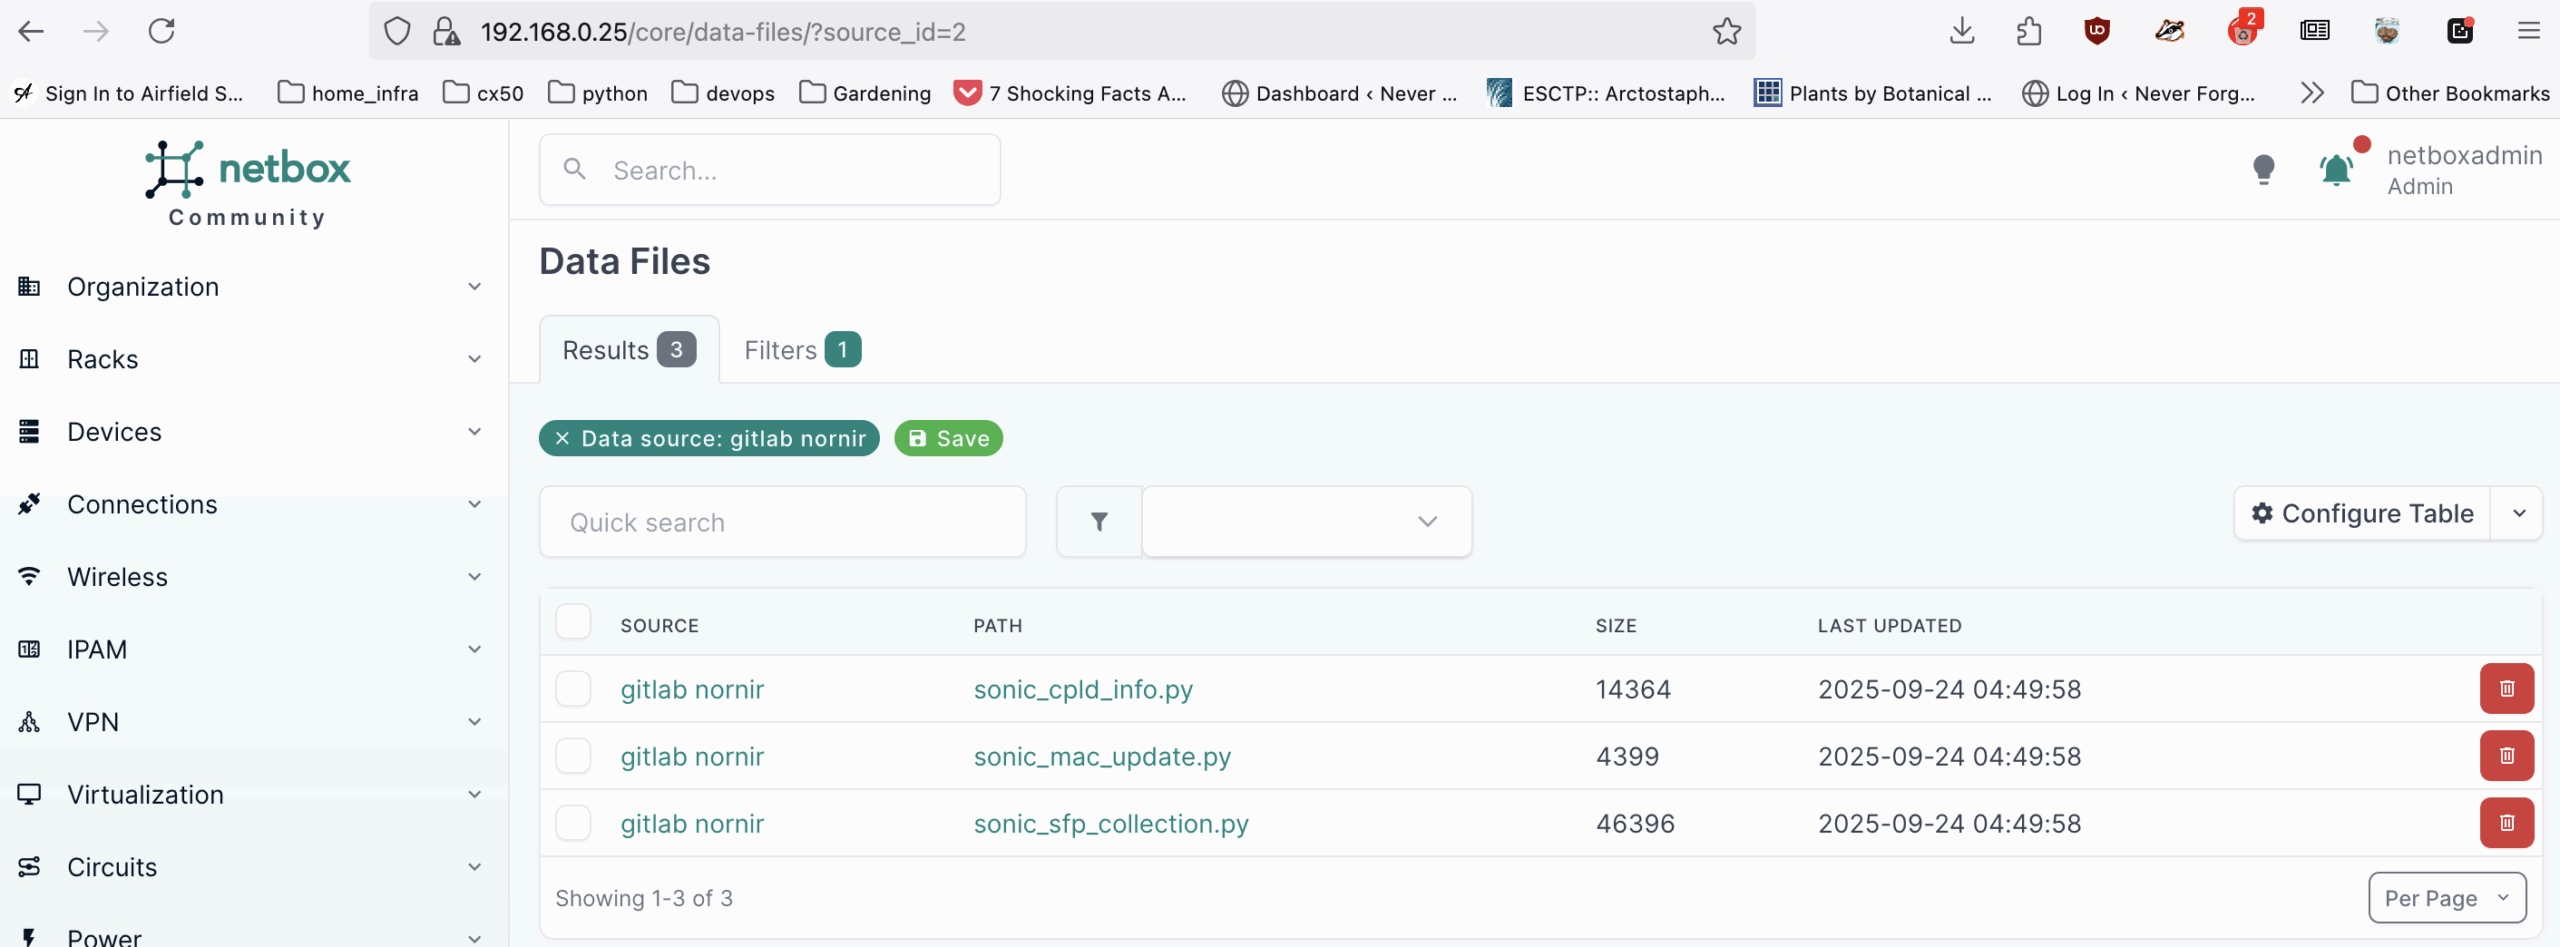
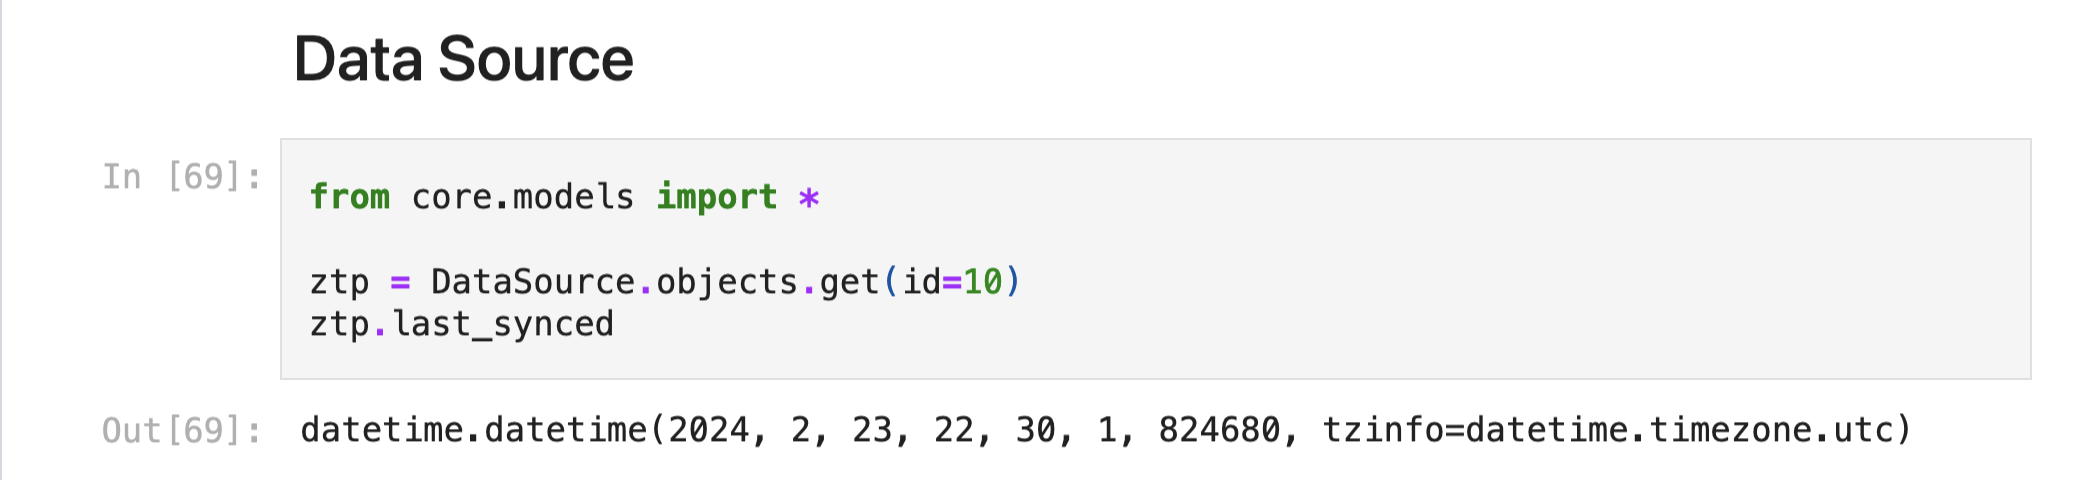
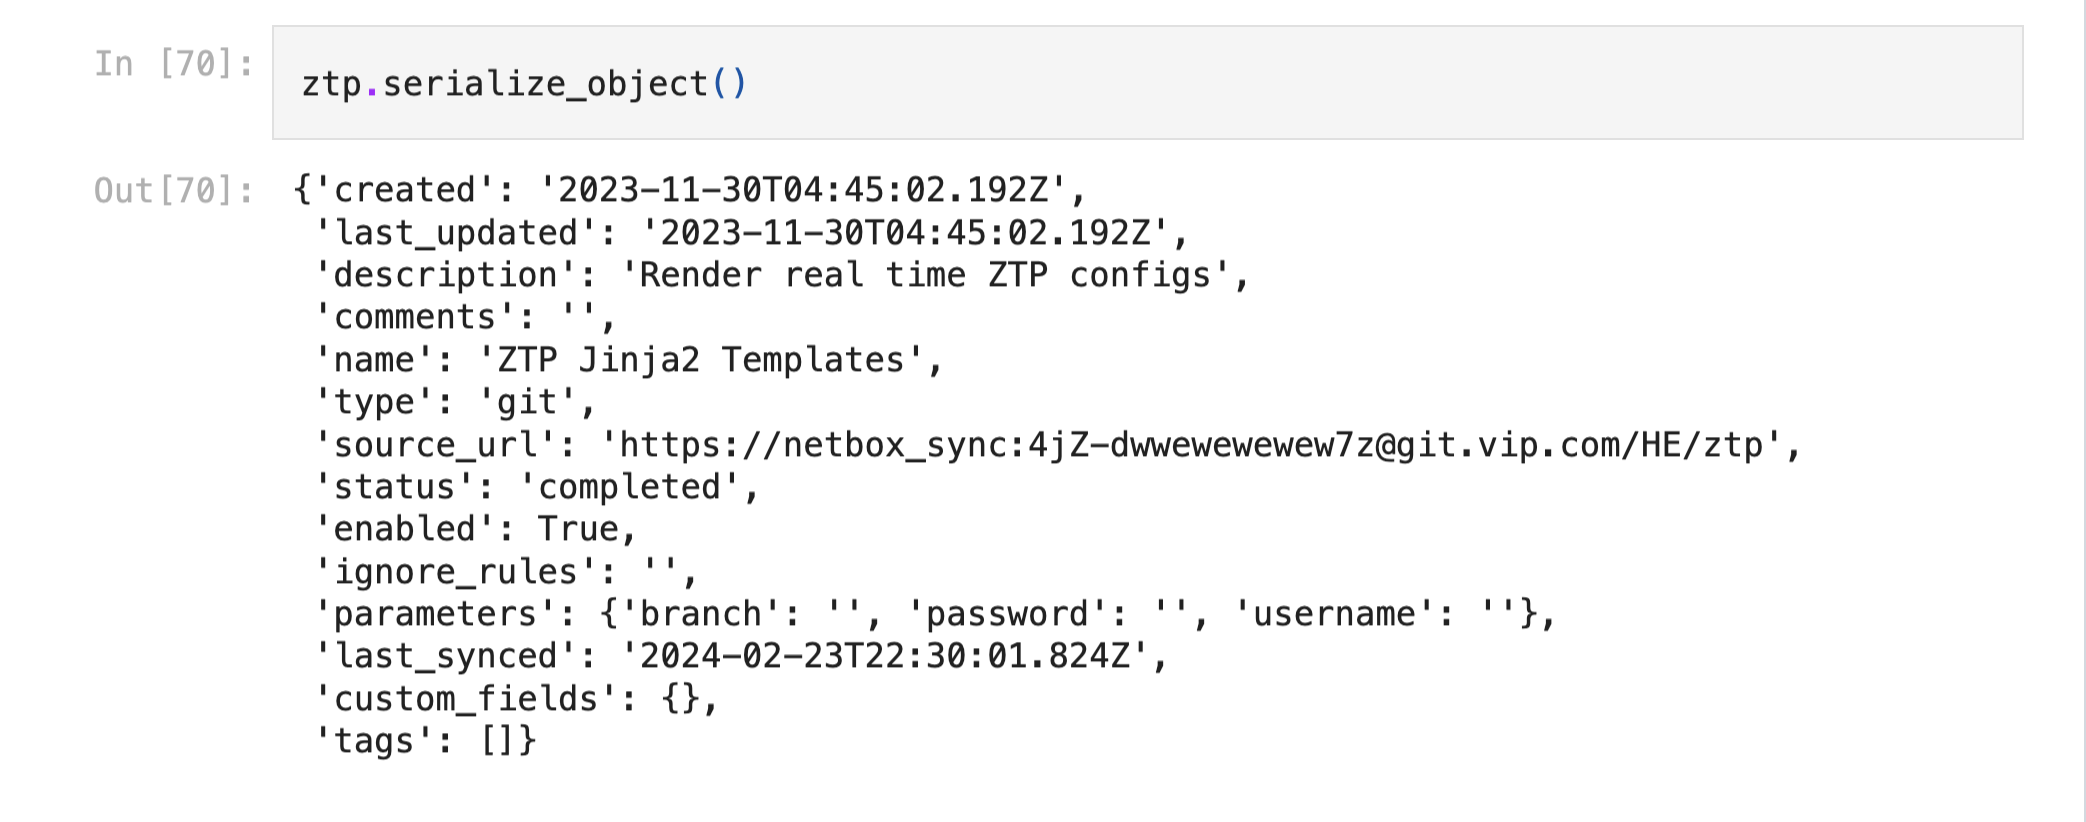
Sync Data from Git to NetBox
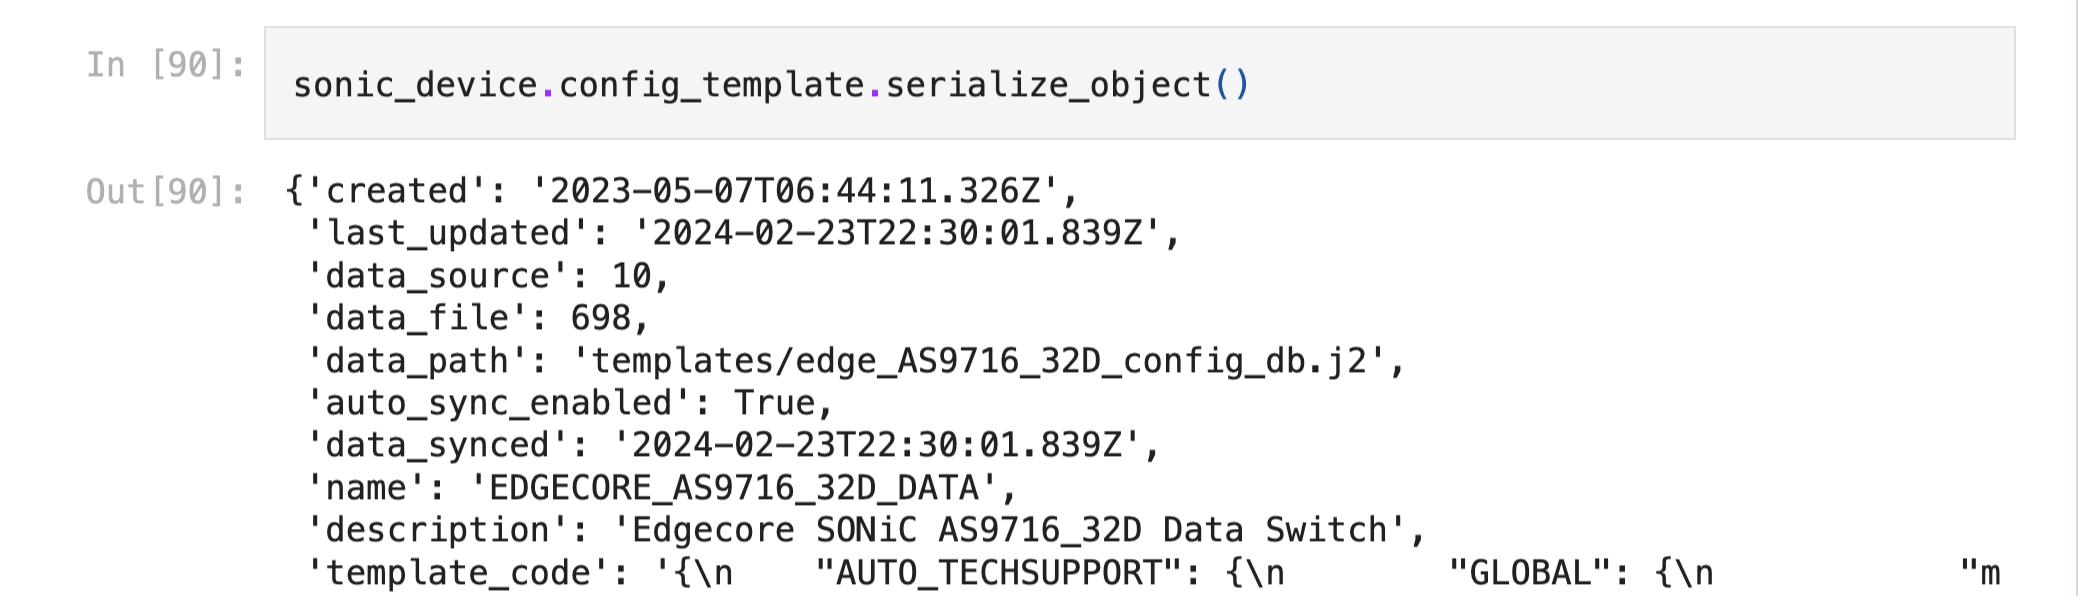
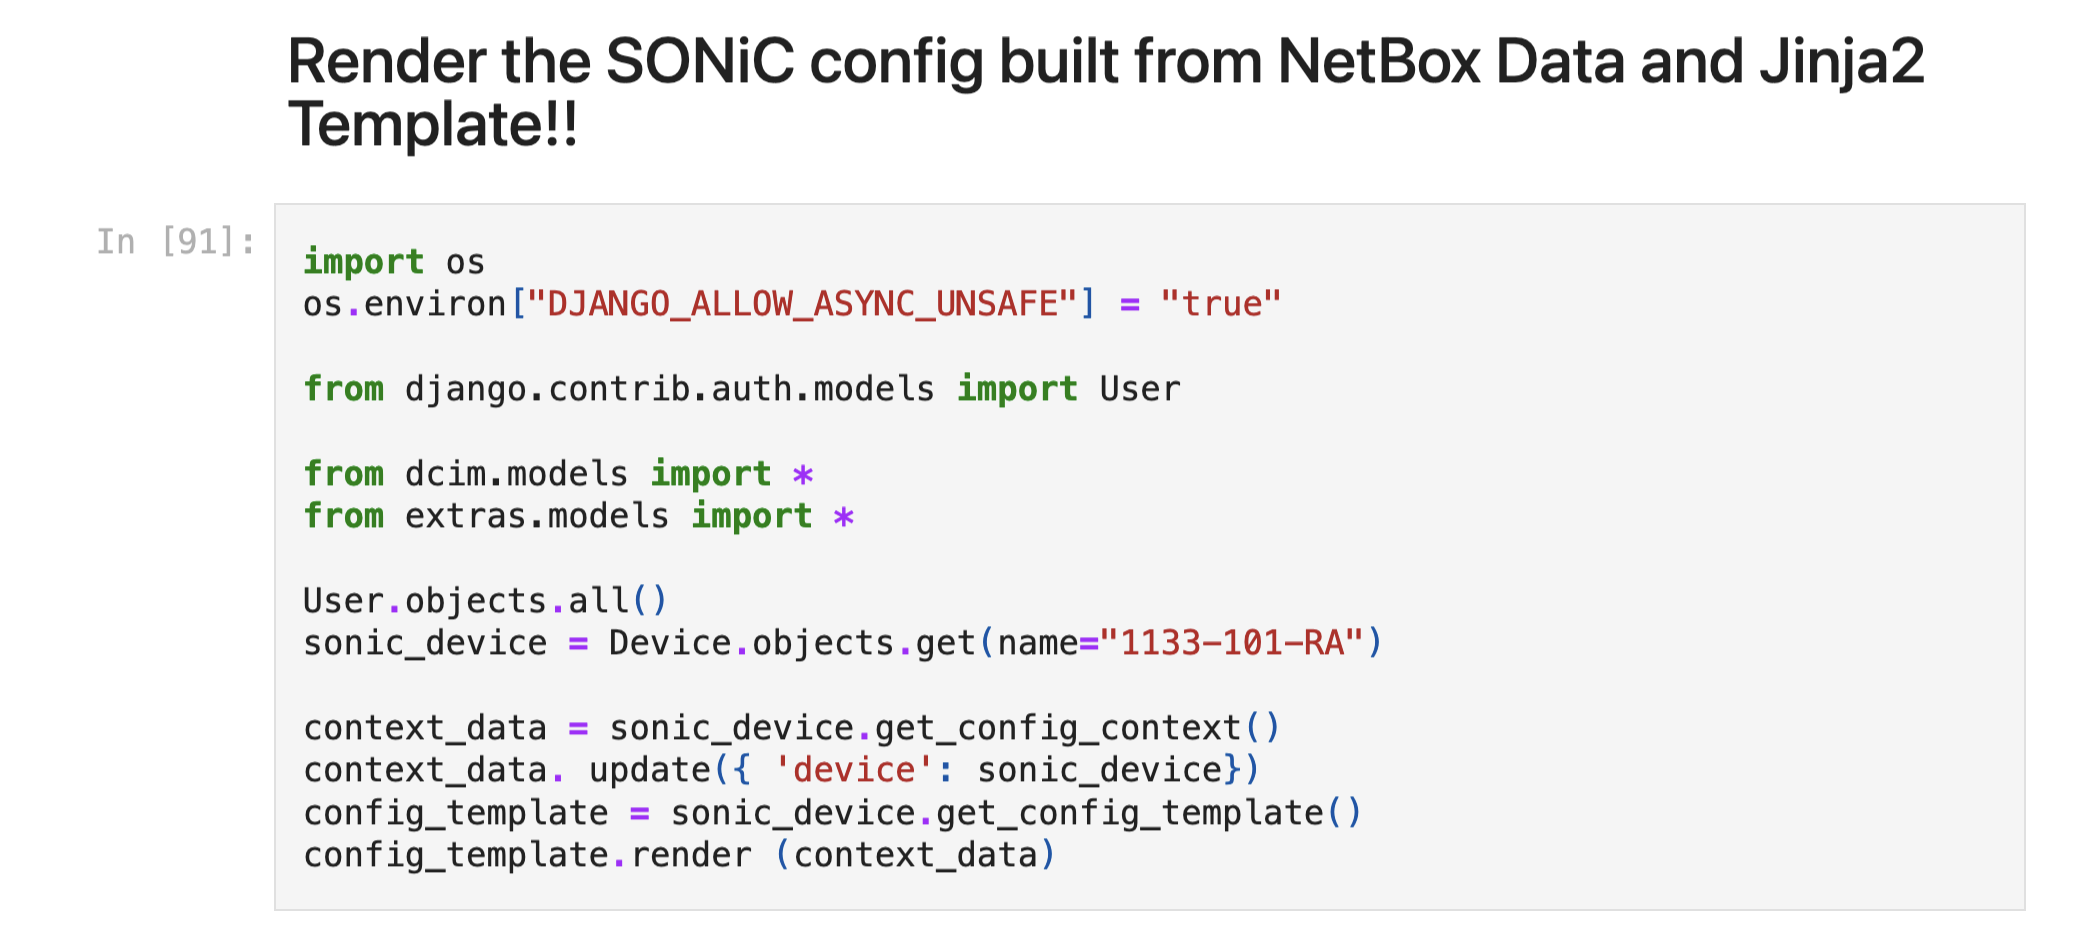
Jinja 2 Examples using NetBox data to render configs (Infrastructure as Code)
Posted inUncategorized|Comments Off on NetBox Shell Examples with Jupyter Notebook
I was hired onto the Hardware Platform Engineering team at eBay just as they started getting ready to deploy their next-gen 400G network that was using SONiC, an open source network operating system. The team is in charge of validating all of the hardware that runs on the eBay infrastructure, so it’s pretty important to find issues BEFORE the gear gets deployed to Production.
This is the story about how a curious network engineer that knew very little about hardware was able to blow up a switch that was already in production and effect changes on the existing product line. Moreover, I was able to expose important operational issues that would have been a nightmare to support in the field.
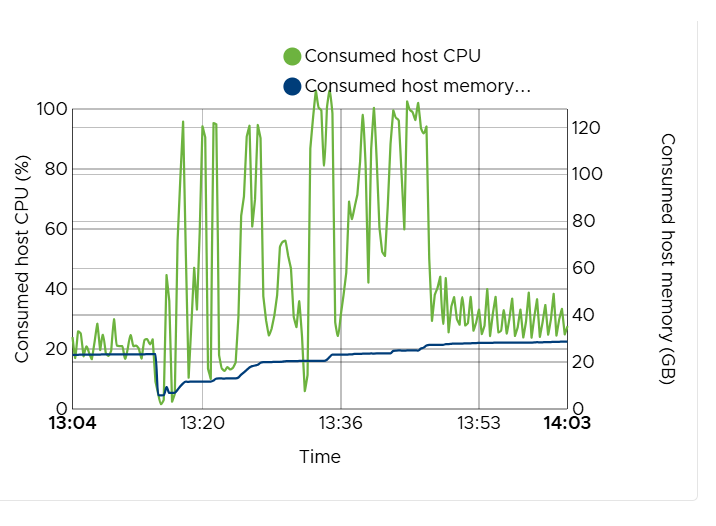
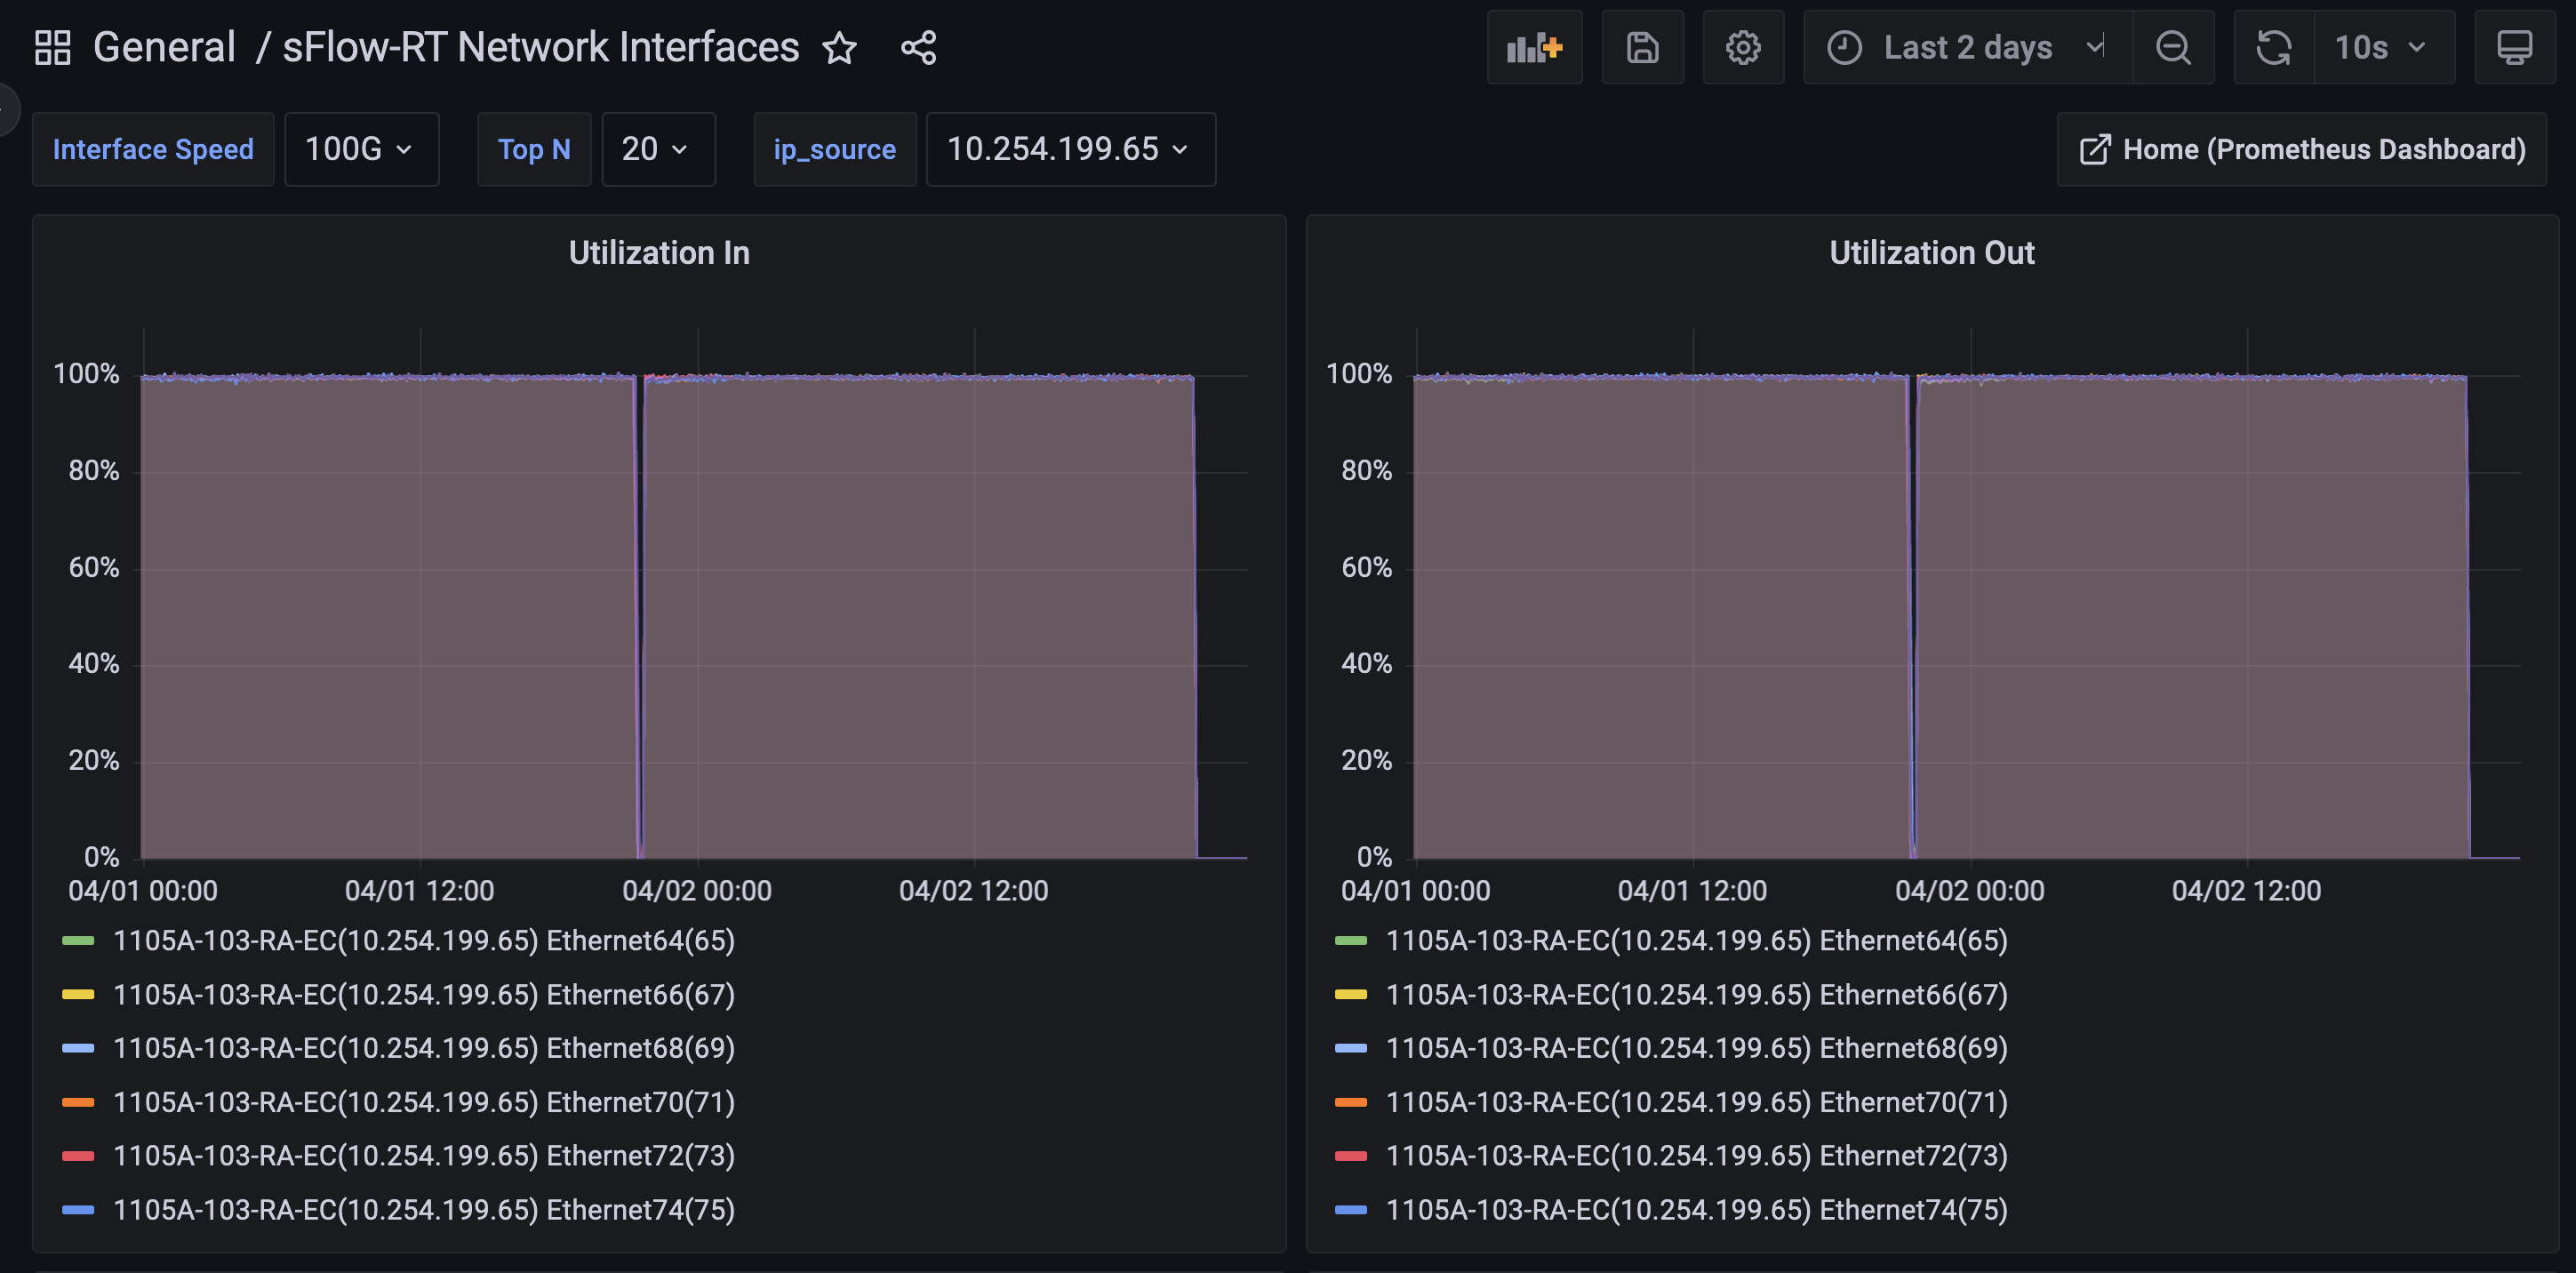
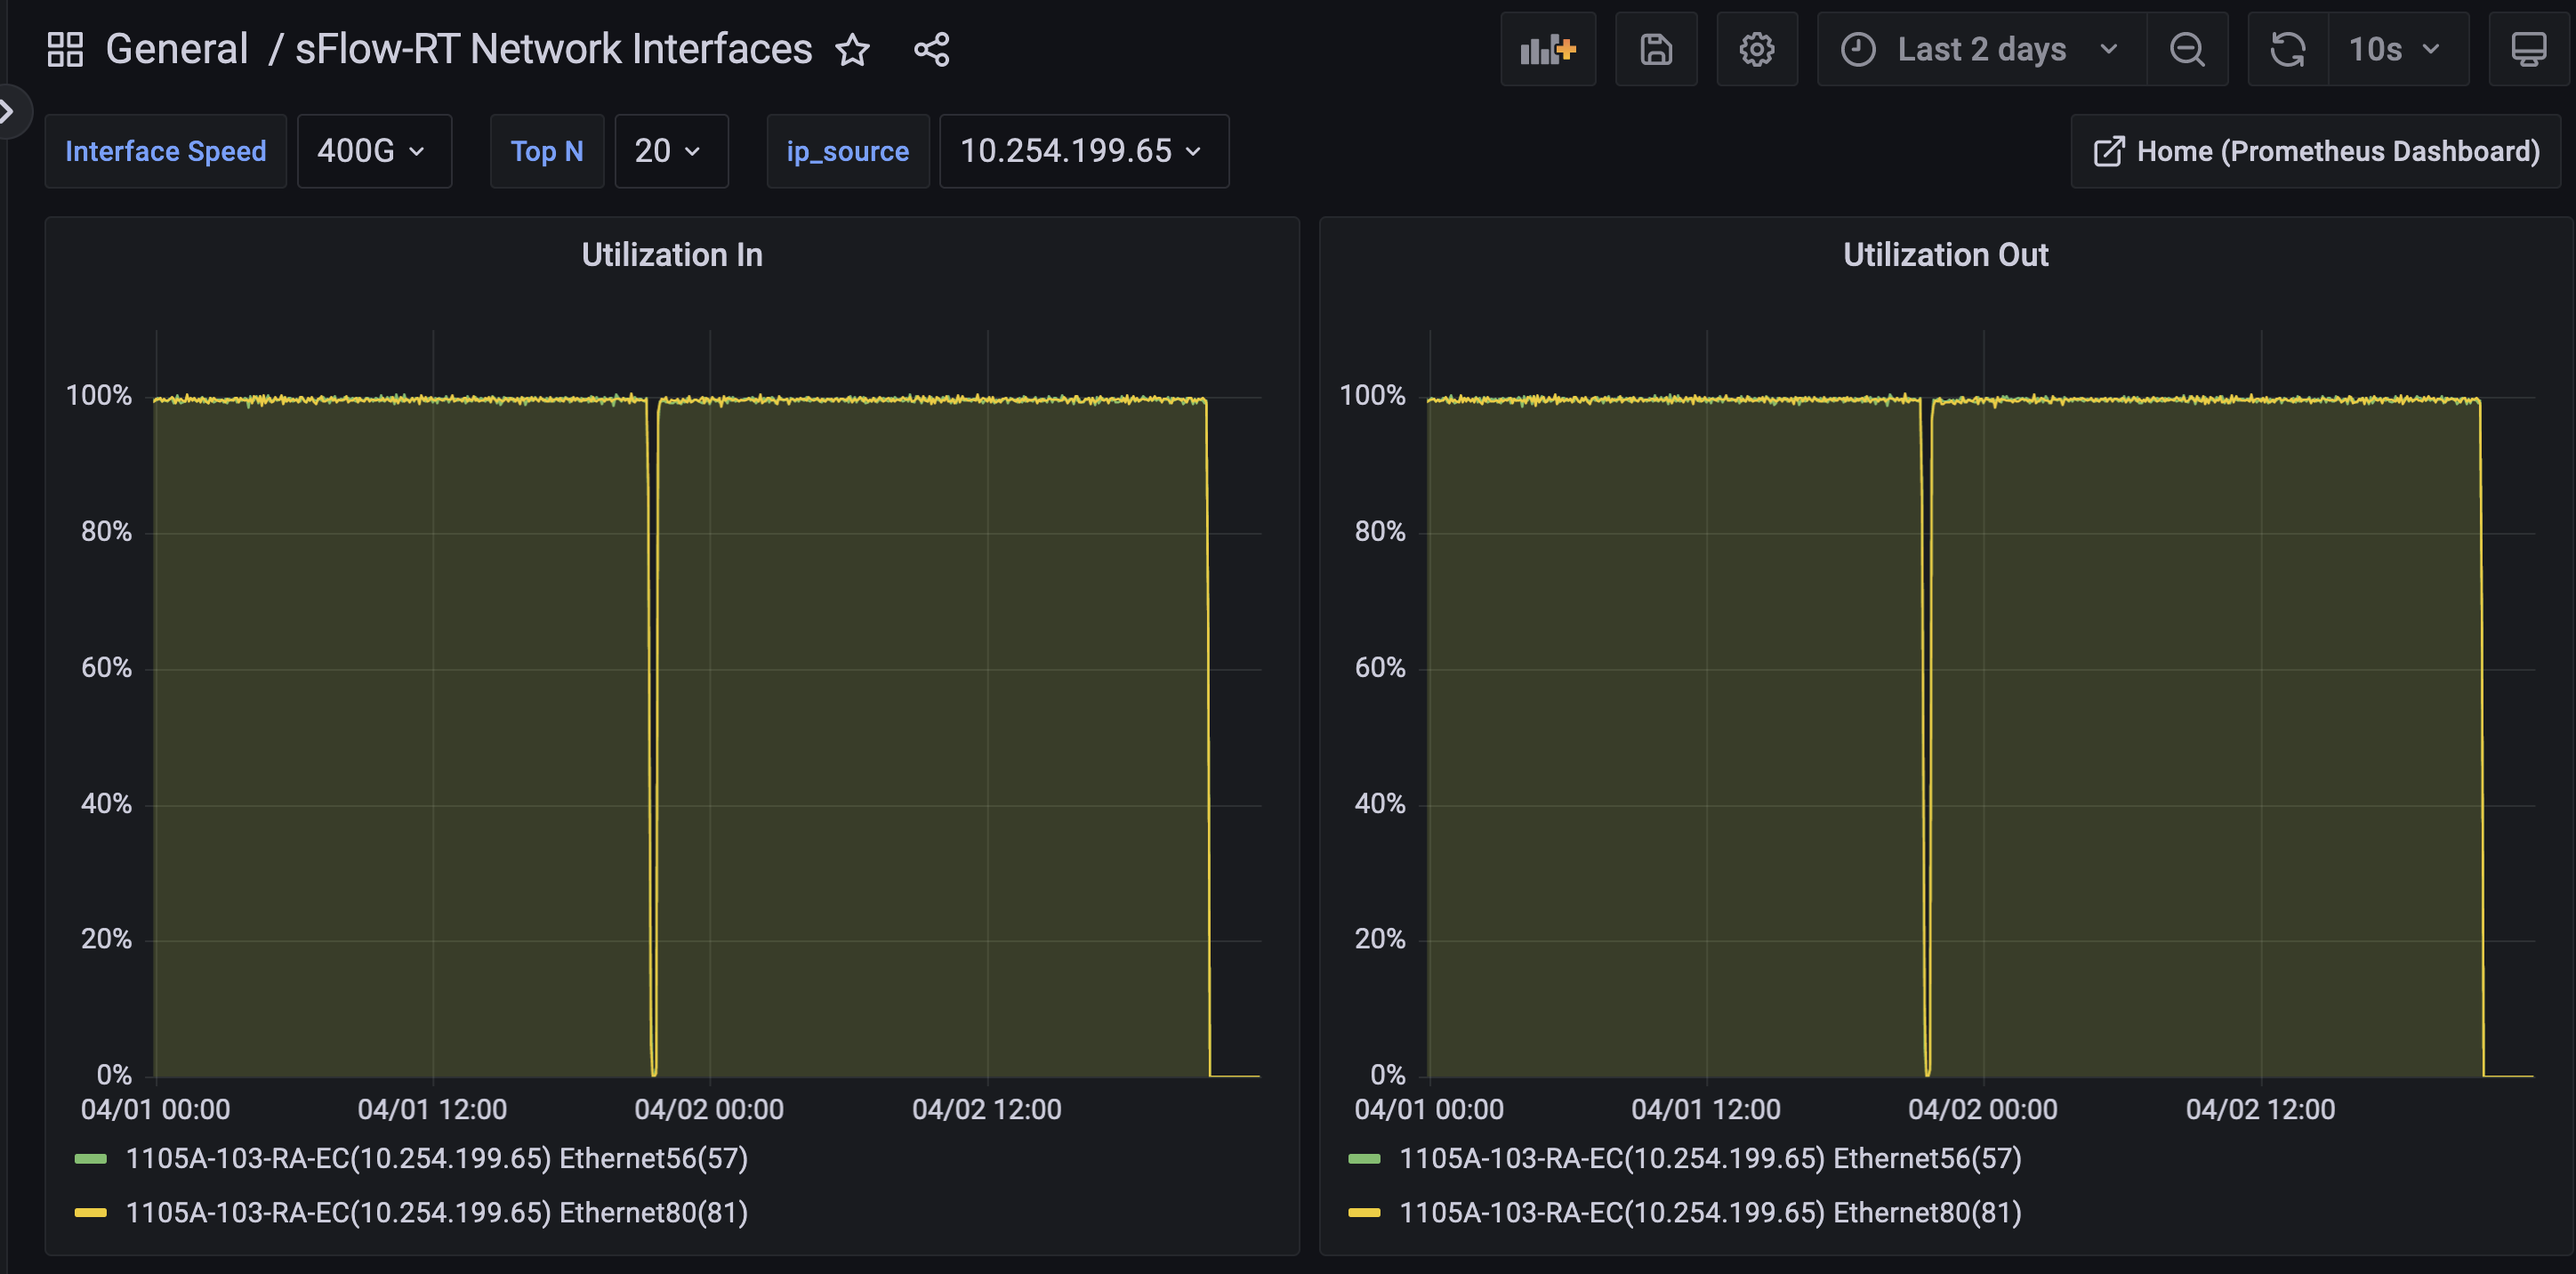
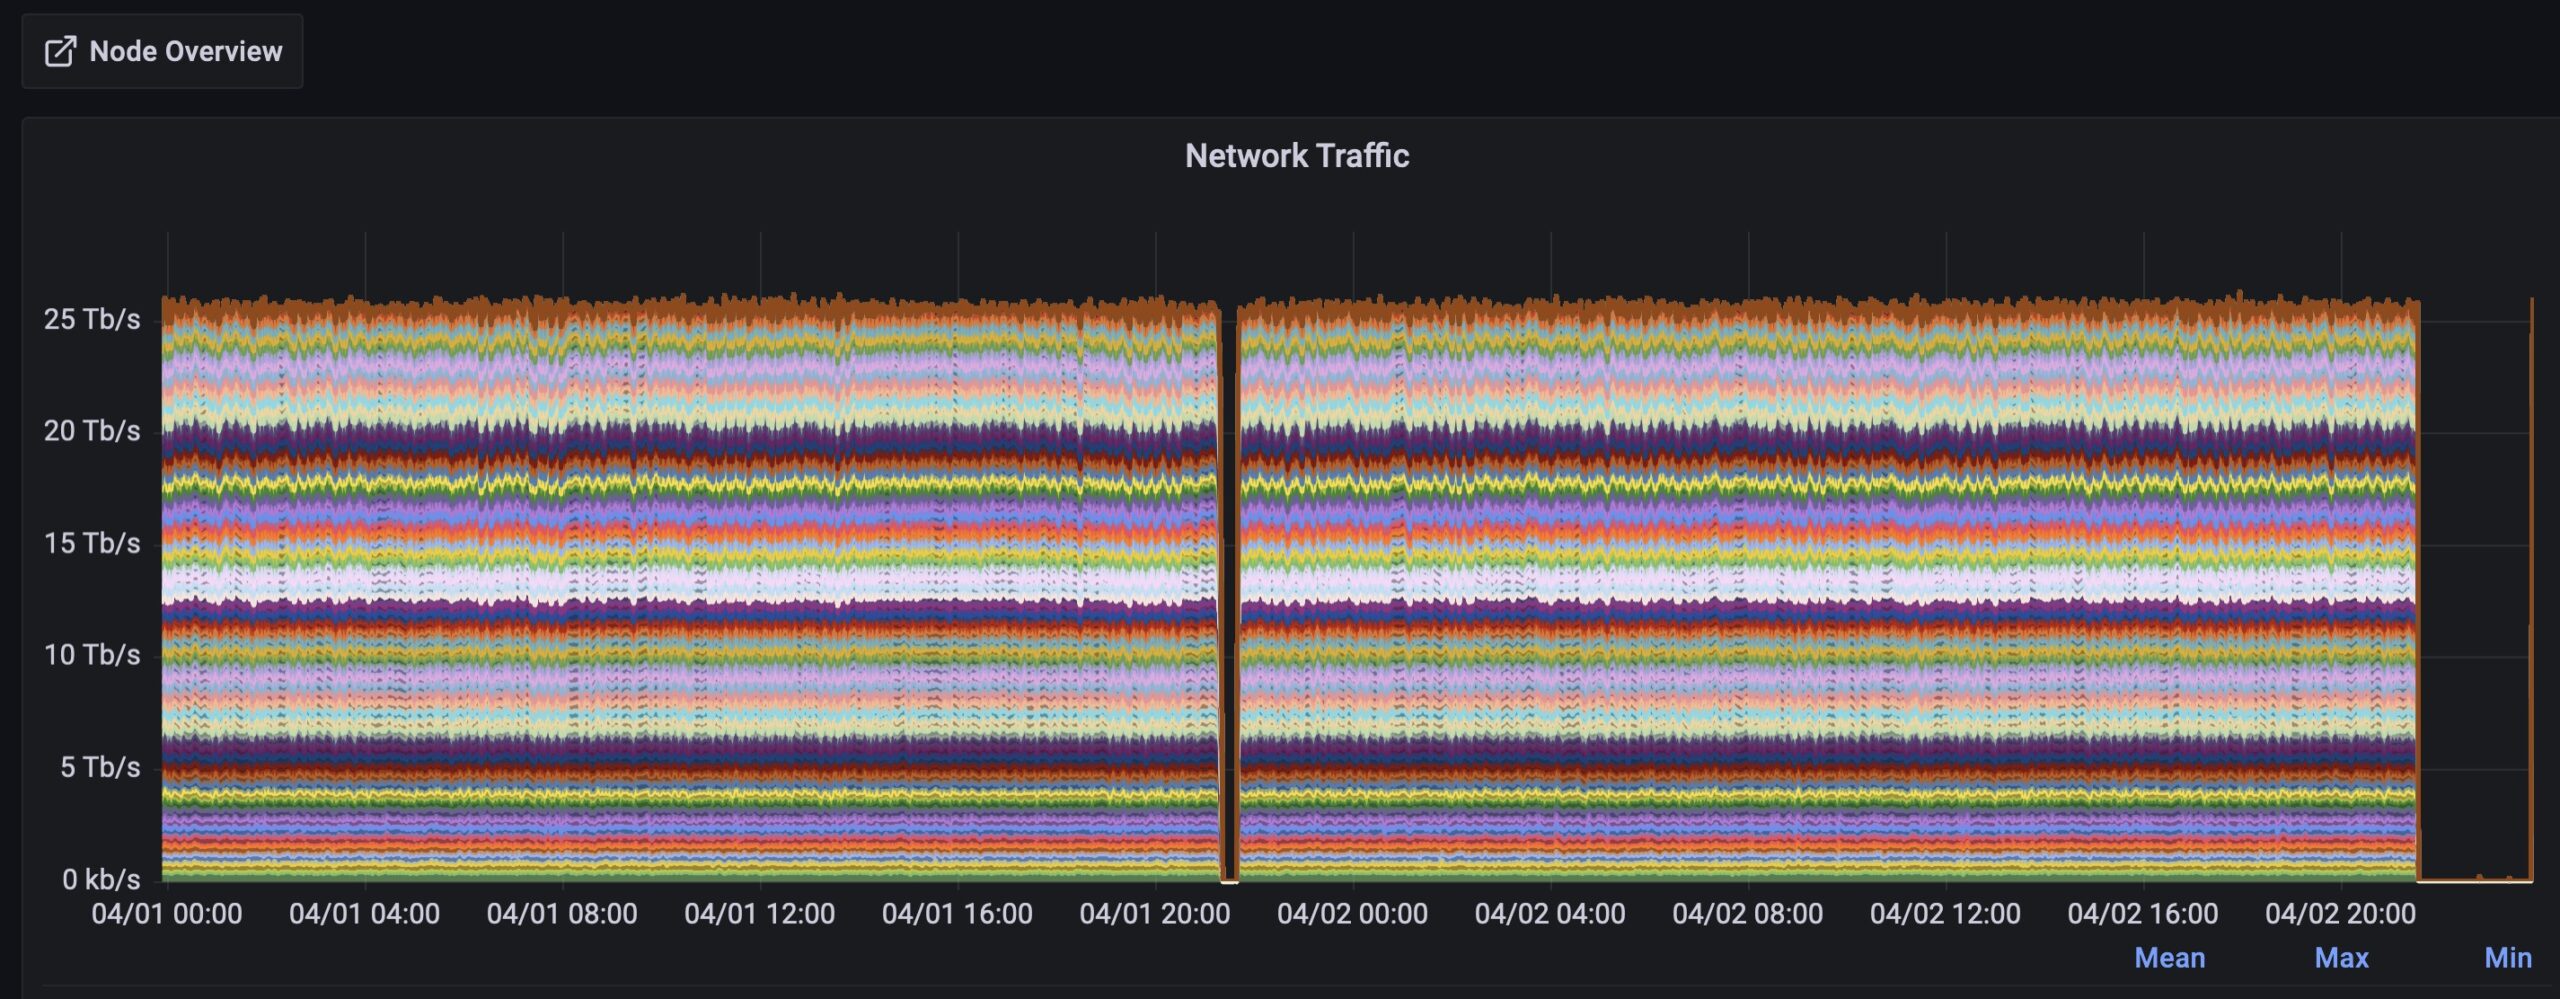
Observability is criticial when evaluating a system, be it a manual process, how hardware runs, or software is supposed to work. You must have tests and feedback loops so that you can look for patterns or inconsistencies that can help you find potential landmines before they blow up in your infrastructure. In the examples below we used Prometheus to export the data off the switch and send it to Grafana, so we could see the data in real time.
Power discrepancy was immediately apparent between PSU1 and PSU2. I’m just a network engineer but I’ve dabbled in building some of my own hardware, so I’m already thinking something is not right here.
Jumping onto the switch and running the show commands verifies the huge delta between PSU1 / PSU2. This is NOT how power sharing is supposed to work! One important thing to note here is the model of the PSU1 & PSU2 is exactly the same but the serial numbers are different.
After the switch blew up and as part of the root cause analysis, the switch vendor tells us to NEVER mix the 2 DIFFERENT power supply vendors, even though the part numbers are the same. Apparently, one of the manufacturers forgot to calibrate their power supplies after they retooled them to change the airflow to meet production demands!
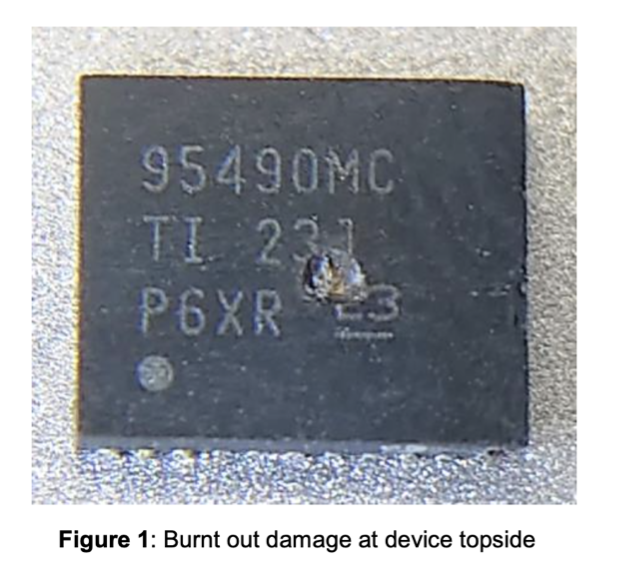
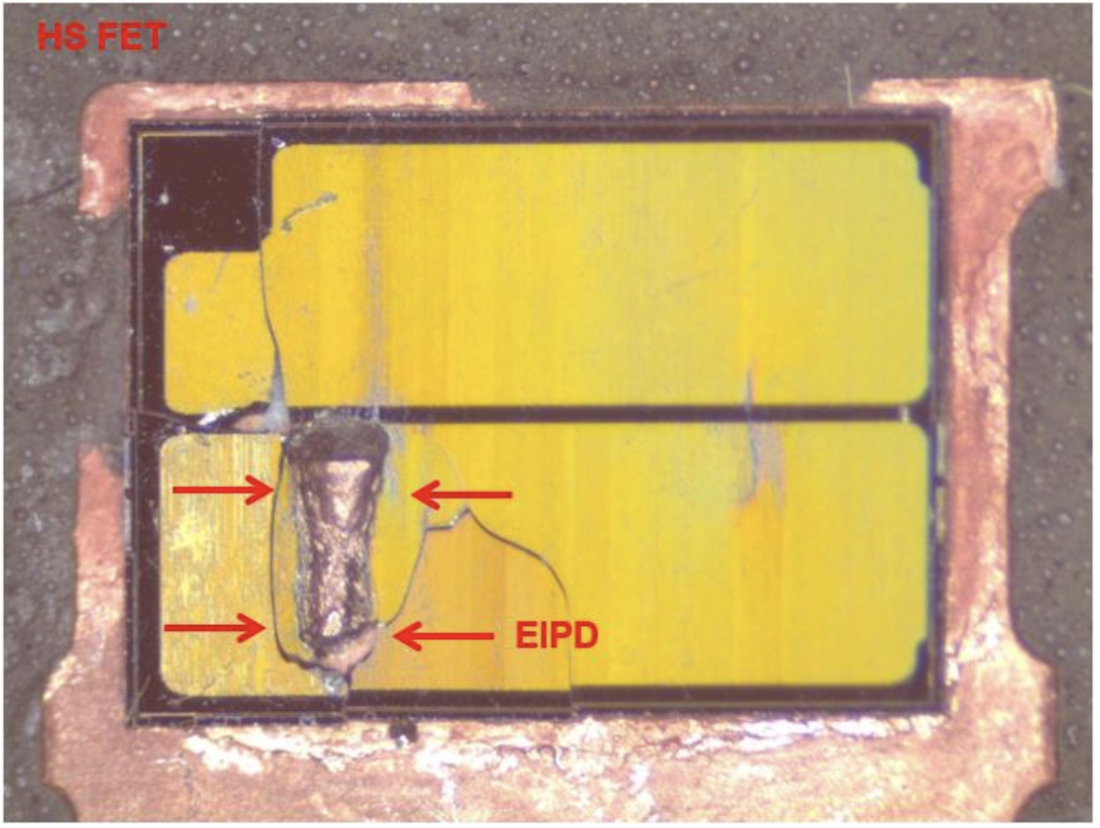
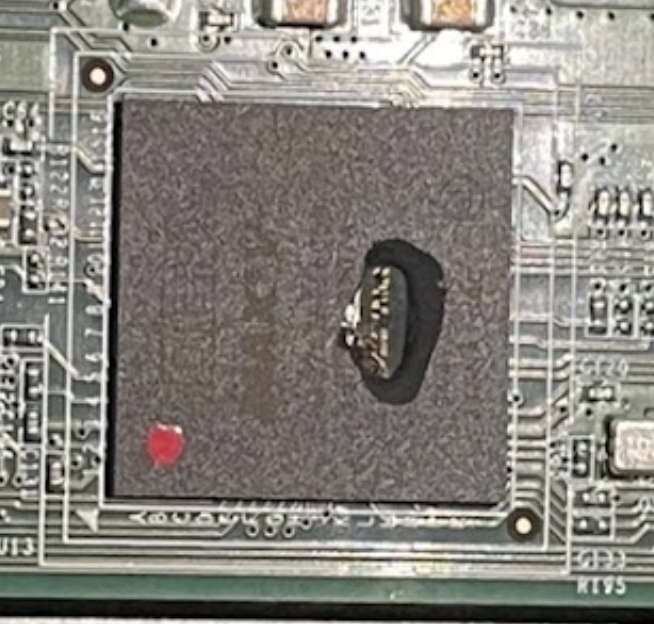
Here is the picture of ONE of the chips that melted. In addition to the switch blowing up, we also lost 16 out of the 32 400G optics. Apparently the chip that handles the 12V to 3.3V conversion did not protect downstream devices from this power event, it effectively cascaded through the switch as it was in the process of melting down!
3 Chips EOS on main board and 1 chip EOS on the fan board
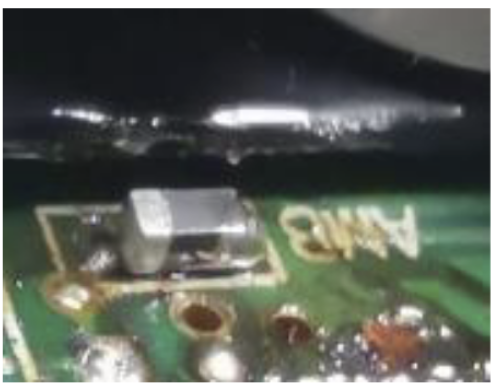
Another issue that was uncovered during these tests were fluctuating power tempsas can be seen here.
Apparently more quality control issues with the power supply factory, turns out there was an empty weld causing the problem with the power temp readings.
The main takeaway here is that observability, pattern recognition, curiosity and attention to details are all very important skills to develop.
Nobody told me to mix the power supplies as part of my test regime but I thought that it was a worthwhile test since they had the EXACT same part number and should have been interchangeable!
As a result of these findings, eBay was able to make sure that we only received the GOOD power supplies and communication was made to look out for this potential issue. Could you imagine these things hitting production and doing a simple power supply swap and then the Production switch blowing up!
Finally, as a result of these issues I helped to uncover, the switch has had it’s hardware and software upgraded to prevent this issue moving forward! They beefed up the power chips and added downstream protections to the optics that were fried in the process. Also the CEO of the company reached out to me to connect on LinkedIn 😉
Never stop asking questions or wondering why something is happening. Always build in feedback loops to ensure your systems are working as you expect them to. DON’T ASSUME THINGS, BE CURIOUS AND ASK QUESTIONS.
Posted inUncategorized|Comments Off on How I melted a data center switch and effected changes to an existing product line.
The Network team took our traffic generator so we needed to build our own using (4) servers with (8) 100G NIC’s. Here is the design I came up with to build our own “home brew” traffic generator used to saturate the switches while stress testing them in the thermal chamber.
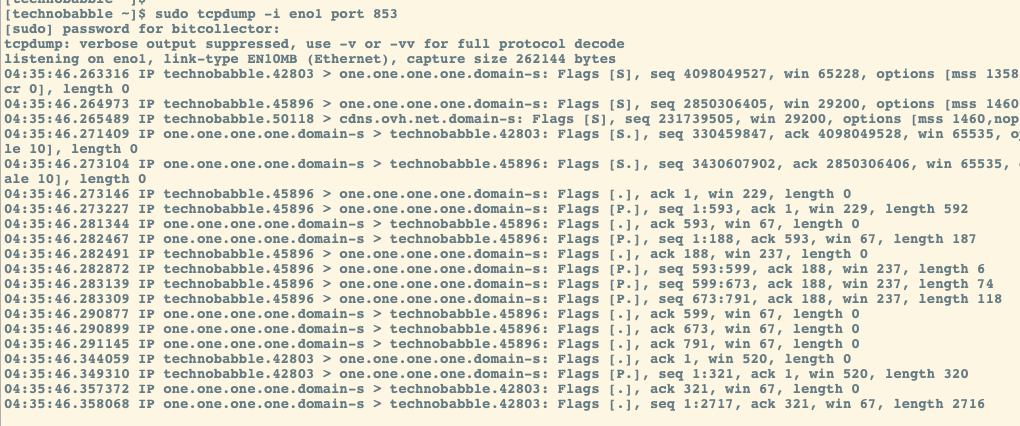
DNS over TLS is a big step in fixing a badly designed protocol, at least in terms of privacy, but it still leaves you having to trust the endpoint with all of that data that you are trying to keep private. While Cloudflare claims not to log your info or sell your data, you can never know for sure what’s going on at the far end.
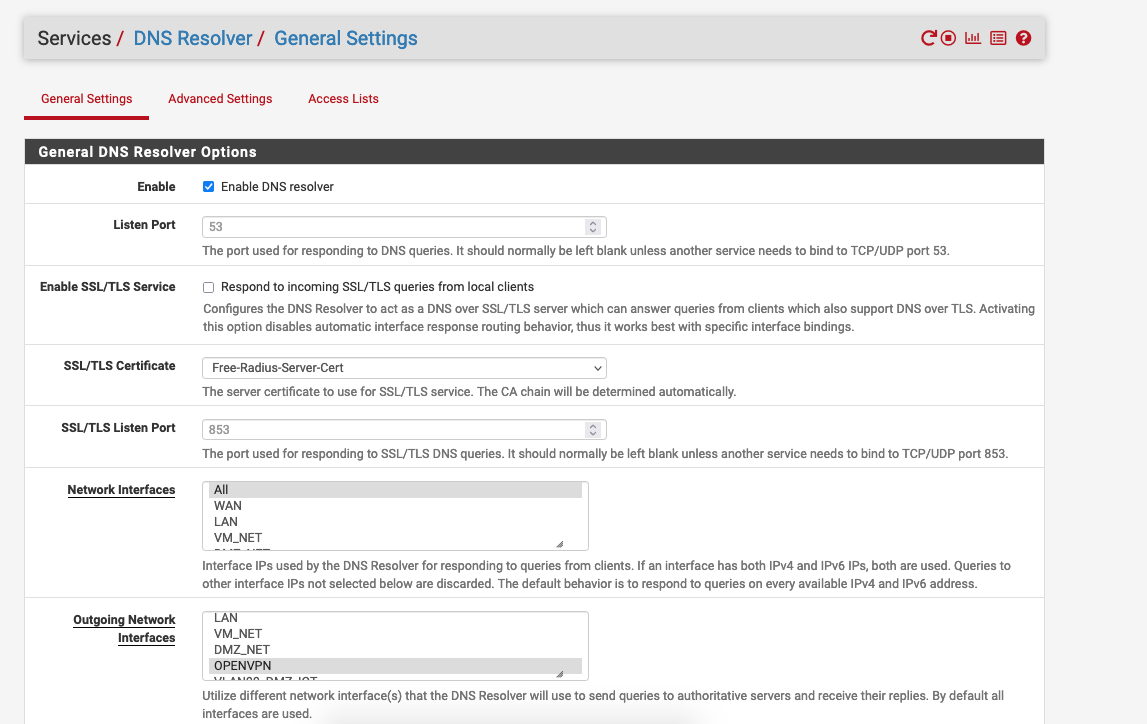
To that point, I’ve decided to send all of my DNS traffic over my self managed VPN that terminates on a server I rent in a Canada. This is an extra step I take to break the direct connection from my home IP address. In fact there are ZERO DNS packets leaving my home network, port 53 or 853.
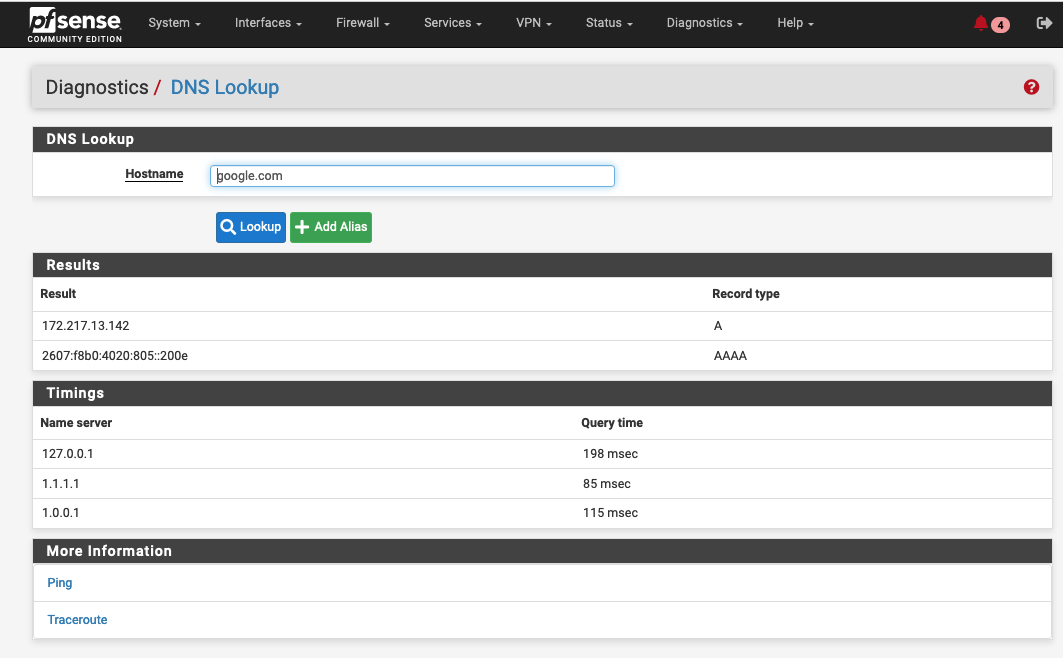
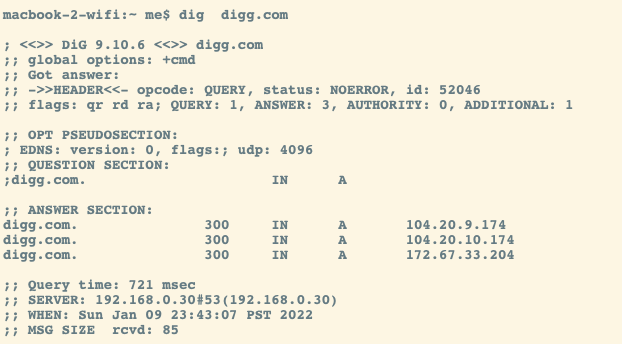
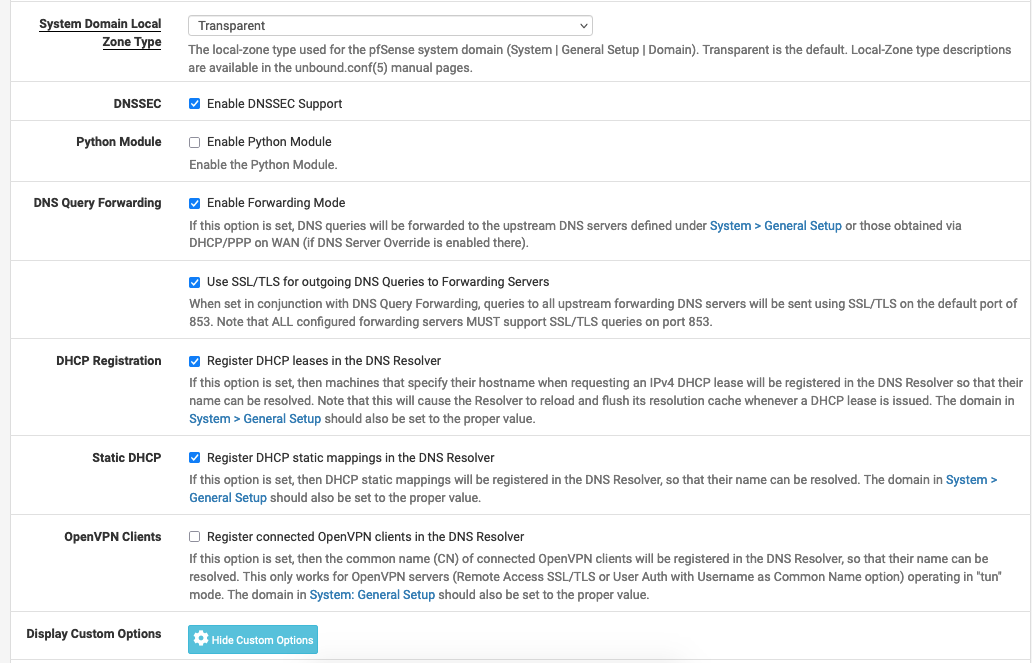
I’m running a DNS-TLS resolver on my pfSense firewall and connecting to 1.1.1.1 on port 853. I’m also explicitly blocking Google DNS 8.8.8.8/8.8.4.4 and QUIC protocol (UDP 443)
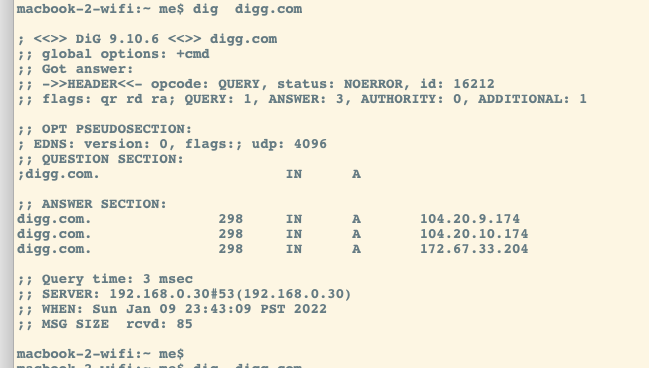
While my DNS lookup times suffer greatly, the resolver caches entries so only the initial lookup is slow.
DNS Lookup to digg.com took 721 msec! (west coast to east coast and back)
The following lookup took 3msec, much better!
Here are my pfSense settings where I’m sending the DNS over the VPN